
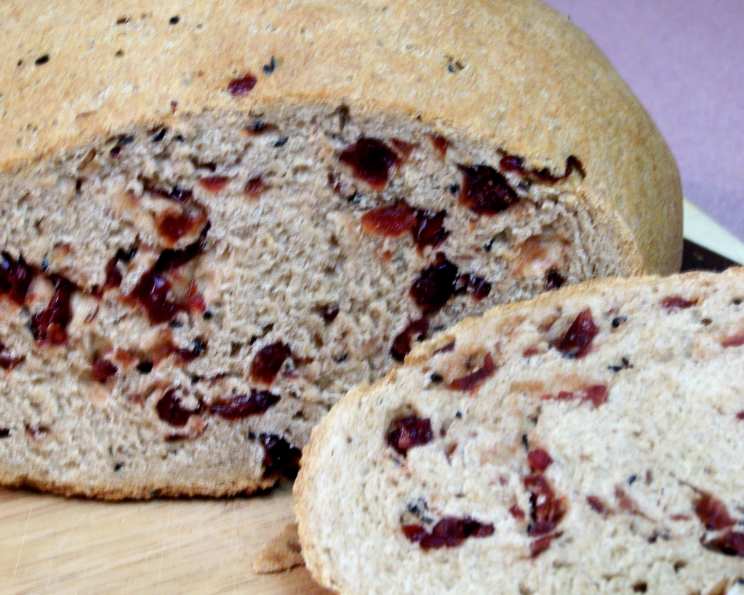
Russian Rye Bread with Dried Cranberries: A Taste of Tradition
There’s something profoundly comforting about the aroma of baking rye bread, a scent that instantly transports me back to childhood visits to my grandmother’s dacha. The dark, dense loaf, still warm from the oven, would be sliced thick, spread generously with creamy butter, and enjoyed with a simple glass of kvass. This particular recipe, with its delightful bursts of sweet-tart dried cranberries and the subtle, intriguing earthiness of nigella seeds, always felt like a special treat, a touch of quiet luxury in the heart of the Russian countryside. It’s a bread that speaks of history, of resilience, and of the simple, enduring pleasures found in honest, homemade food.
Recipe Overview
- Prep Time: 15 minutes (plus dough cycle time)
- Cook Time: 1 hour
- Total Time: Approximately 2 hours 15 minutes (including rising and baking)
- Servings: 16 slices
- Yield: 2 loaves
- Dietary Type: Can be made Vegan (omit egg wash)
Ingredients
Here’s what you’ll need to create this hearty and flavorful loaf:
- 1 1⁄4 cups warm water
- 2 tablespoons honey, dark
- 1⁄4 cup olive oil
- 3 cups bread flour
- 1 1⁄2 cups rye flour
- 2 teaspoons salt
- 2 teaspoons fast rising yeast
- 1⁄2 tablespoon nigella seeds (also known as black caraway seeds or kalonji)
- 1⁄3 cup dried cranberries
- 1 tablespoon caraway seed
- 1 egg, beaten (for optional egg wash)
- Extra rye seeds (for optional topping)
Equipment Needed
- Bread machine
- Measuring cups and spoons
- Large mixing bowl (if using bread machine dough cycle)
- Baking sheet
- Parchment paper or greasing agent for baking sheet
- Wire cooling racks
- Pastry brush (for egg wash)
Instructions
Let’s embark on the journey of creating this wonderful Russian rye bread. The bread machine will do much of the heavy lifting for us, ensuring a perfectly developed dough.
- Prepare the Dough in the Bread Machine: Begin by placing all the ingredients except the nigella seeds, dried cranberries, and caraway seeds into your bread machine pan. Follow the specific order suggested by your bread machine’s manufacturer. Typically, liquids go in first, followed by dry ingredients, and then the yeast is added last, often in a small well on top of the flour.
- Select Dough Cycle and Start: Close the lid of your bread machine and select the “Dough” cycle. Start the machine and let it work its magic. This cycle will mix, knead, and allow the dough to have its first rise.
- Incorporate Seeds and Cranberries: Listen for your bread machine’s beep, which usually signals the end of the kneading and initial rising phase of the dough cycle. At this point, carefully open the lid and add the nigella seeds, dried cranberries, and caraway seed directly into the pan. Close the lid and allow the machine to complete its dough cycle.
- Punch Down and Shape the Dough: Once the dough cycle is finished, remove the dough from the bread machine pan. It will be slightly sticky and beautifully aerated. Gently punch down the dough to release any excess air. Turn the dough out onto a lightly floured surface. Divide the dough in half, creating two equal portions.
- Shape the Loaves: Gently shape each half into a round loaf. You can do this by tucking the edges underneath to create surface tension and a smooth, round top.
- Second Rise: Prepare a baking sheet by greasing it or lining it with parchment paper. Place the two shaped loaves onto the prepared baking sheet, leaving some space between them as they will expand. Cover the loaves loosely with a clean kitchen towel or plastic wrap. Let them rise in a warm, draft-free place until they have doubled in size. This typically takes about 1 hour, but can vary depending on the ambient temperature.
- Preheat the Oven: While the loaves are on their second rise, preheat your oven to 350 degrees F (175 degrees C). This ensures the oven is at the correct temperature when the bread is ready to bake.
- Egg Wash and Seed Topping (Optional): Once the loaves have doubled in size and the oven is preheated, you can apply an optional egg wash. In a small bowl, beat one egg. Using a pastry brush, gently brush the top of each loaf with the beaten egg. If desired, you can also sprinkle additional rye seeds over the egg wash for a rustic finish.
- Bake the Bread: Carefully place the baking sheet with the loaves into the preheated oven. Bake until the loaves are a deep, dark brown color and sound hollow when tapped on the bottom. This baking process usually takes about 1 hour. The dark color is characteristic of rye bread and contributes to its flavor.
- Cool Completely: Once baked, remove the bread from the oven. Transfer the loaves to wire racks to cool completely. It’s crucial to let the bread cool thoroughly before slicing to allow the internal structure to set. Slicing too early can result in a gummy texture.
Expert Tips & Tricks
- Rye Flour Variation: While this recipe calls for a specific ratio of bread flour to rye flour, feel free to experiment slightly. Increasing the rye flour will result in a denser, more intensely flavored bread. Conversely, a touch more bread flour will yield a lighter loaf.
- Checking for Doneness: Beyond the hollow sound, you can also use an instant-read thermometer. The internal temperature of the bread should be between 190-200°F (88-93°C) when it’s fully baked.
- Bread Machine Nuances: Every bread machine is different. If your dough seems too dry or too wet during the initial mixing in the machine, you can adjust by adding a tablespoon of warm water at a time if too dry, or a tablespoon of bread flour at a time if too wet.
- Shaping for Even Baking: When shaping your round loaves, try to create a taut surface by tucking the dough underneath itself. This helps the loaf rise evenly and maintain its shape during baking.
Serving & Storage Suggestions
This Russian Rye Bread is incredibly versatile. It’s divine served simply with a generous slathering of butter, but it also makes an exceptional base for open-faced sandwiches, piled high with cured meats, cheeses, or smoked fish. It pairs wonderfully with hearty soups and stews, adding a satisfying chew and depth of flavor to any meal.
For storage, allow the bread to cool completely before wrapping. Store at room temperature, wrapped in a clean kitchen towel or a bread bag, for 2-3 days. If you need to store it for longer, slice the bread and freeze it in an airtight container or freezer bag for up to 3 months. To reheat, toast slices directly from frozen or thaw at room temperature.
Nutritional Information
Please note that this is an approximation, as ingredient brands and precise measurements can influence the final nutritional values.
| Nutrient | Amount per Serving | % Daily Value |
|---|---|---|
| Calories | 161 kcal | 8% |
| Total Fat | 3.9 g | 5% |
| Saturated Fat | 0.5 g | 2% |
| Cholesterol | 0 mg | 0% |
| Sodium | 292 mg | 12% |
| Total Carbohydrate | 28.1 g | 9% |
| Dietary Fiber | 2.4 g | 9% |
| Sugars | 2.4 g | 5% |
| Protein | 3.6 g | 7% |
Variations & Substitutions
- Seed Intensity: If you’re a fan of seeds, feel free to increase the nigella and caraway seeds slightly. You can also add a tablespoon of poppy seeds for an extra layer of texture and flavor.
- Sweetness Adjustment: The honey provides a subtle sweetness. If you prefer a sweeter bread, you can increase the honey to 3 tablespoons, or substitute with maple syrup for a different flavor profile.
- Dairy-Free/Vegan: To make this bread entirely vegan, simply omit the optional egg wash. The bread will still bake beautifully and have a delicious crust.
FAQs (Frequently Asked Questions)
Q: Why are nigella seeds called “black caraway seeds”?
A: While they belong to a different botanical family, nigella seeds share a similar flavor profile to caraway, often described as slightly peppery and onion-like, hence the common descriptive name.
Q: Can I make this bread entirely in the oven without a bread machine?
A: Yes, absolutely! You would mix the ingredients according to a standard bread recipe, knead the dough until elastic, then proceed with the first and second rises before baking as instructed.
Q: My bread machine doesn’t have a “Dough” cycle. What should I do?
A: You can use the “Basic” or “White” bread cycle up to the kneading and first rise phase. Then, remove the dough, add your seeds and cranberries, shape, and proceed with the second rise and baking.
Q: How can I ensure my rye bread has a dark, rich crust?
A: Baking at the correct temperature and for the full duration is key. Rye flour naturally browns more intensely than wheat flour. The optional egg wash also contributes to a deeper color and shine.
Q: Is it important to cool the bread completely before slicing?
A: Yes, it is very important. The internal structure of the bread is still setting as it cools. Slicing while hot can cause the loaf to collapse and result in a gummy texture.
Final Thoughts
This Russian Rye Bread with Dried Cranberries is more than just a recipe; it’s an invitation to slow down, embrace tradition, and savor the simple, profound joy of baking. The complex flavors, the satisfying chew, and the delightful pops of tartness from the cranberries create a bread that is both comforting and exciting. I encourage you to try it, perhaps on a quiet weekend morning, and allow the aroma to fill your home. Share it with loved ones, or enjoy a quiet moment with a slice yourself, perhaps accompanied by a dollop of sour cream or a rich stew. I’d love to hear about your baking adventures and how you enjoy this taste of tradition.