
The Enduring Magic of Carl E.’s Rum Balls
There are certain treats that evoke a specific time, a feeling, a cherished memory. For me, those little spheres of boozy delight, known affectionately as Carl E.’s Rum Balls, are intrinsically linked to the festive, slightly chaotic, but always warm gatherings at my friend’s family home. I remember distinctly, years ago, stumbling upon a platter of these unassuming delights, nestled in their snowy coating of powdered sugar. My friend’s father, Carl E. himself, with a twinkle in his eye and a laugh that rumbled like distant thunder, simply said, “Give them a few days. They get better with age.” He was right, of course. That slow bloom of flavor, the way the rum mellows and melds with the rich chocolate and buttery cookie base, is pure alchemy. It’s a testament to the fact that some of the most profound culinary pleasures are those that require a bit of patience, a quiet anticipation that makes the final bite all the more rewarding.
Recipe Snapshot
- Prep Time: 20 minutes
- Cook Time: 0 minutes (no baking required)
- Total Time: 25 minutes + 3 days chilling time
- Servings: 24-30 balls
- Yield: Approximately 24-30 balls
- Dietary Type: Vegetarian (can be adapted for vegan by using vegan chocolate chips and vegan wafer cookies)
Ingredients to Gather
These rum balls are wonderfully simple, relying on a few key ingredients to create their signature rich flavor and tender texture.
- 1 cup semi-sweet chocolate chips
- 3 tablespoons light corn syrup
- 1/2 cup dark rum
- 2 1/2 cups Nilla wafer crumbs (about 35-40 Nilla wafers, processed into fine crumbs)
- 1/2 cup powdered sugar, plus more for rolling
- 1 cup pecans, finely chopped
- Additional powdered sugar for rolling
Essential Equipment
While this recipe requires no oven time, a few basic kitchen tools will ensure a smooth preparation process.
- A microwave-safe bowl or a double boiler setup for melting chocolate
- Measuring cups and spoons
- A mixing bowl
- A spatula or wooden spoon for stirring
- A small plate or shallow dish for rolling the balls
- An airtight container for storing the rum balls
Crafting the Rum Balls: A Step-by-Step Guide
The beauty of these rum balls lies in their effortless assembly. The key is allowing them the time to mature, which transforms them from merely good to truly sublime.
-
Melt the Chocolate: In a microwave-safe bowl, combine the semi-sweet chocolate chips. Microwave them in 30-second intervals, stirring well after each interval, until the chocolate is completely melted and smooth. Alternatively, you can melt the chocolate using a double boiler over simmering water. Be careful not to overheat the chocolate, as this can cause it to seize.
-
Incorporate the Liquids: To the melted chocolate chips, add the light corn syrup and dark rum. Stir these ingredients together until they are thoroughly combined and the mixture is glossy.
-
Combine the Dry Ingredients: In a separate, larger mixing bowl, combine the Nilla wafer crumbs, powdered sugar, and finely chopped pecans. Give these dry ingredients a quick whisk or stir to distribute the nuts evenly throughout the crumbs and sugar.
-
Bring it All Together: Pour the melted chocolate mixture into the bowl with the dry ingredients. Using a sturdy spatula or a wooden spoon, mix everything together until it forms a thick, cohesive dough. Ensure all the dry ingredients are fully incorporated into the chocolate mixture. The dough will be quite sticky and dense at this stage.
-
Allow the Flavors to Meld: Cover the mixing bowl and let the rum ball mixture stand at room temperature for 30 minutes. This resting period allows the flavors to begin mingling and the mixture to become slightly firmer, making it easier to handle.
-
Shape the Balls: After the 30-minute rest, it’s time to shape the rum balls. Take approximately one tablespoon of the mixture at a time and roll it between your palms to form a neat, 1-inch ball. If the mixture is too sticky, you can lightly dampen your hands with water or even a tiny bit of rum. Aim for uniformity in size so they bake (or rather, ripen!) evenly.
-
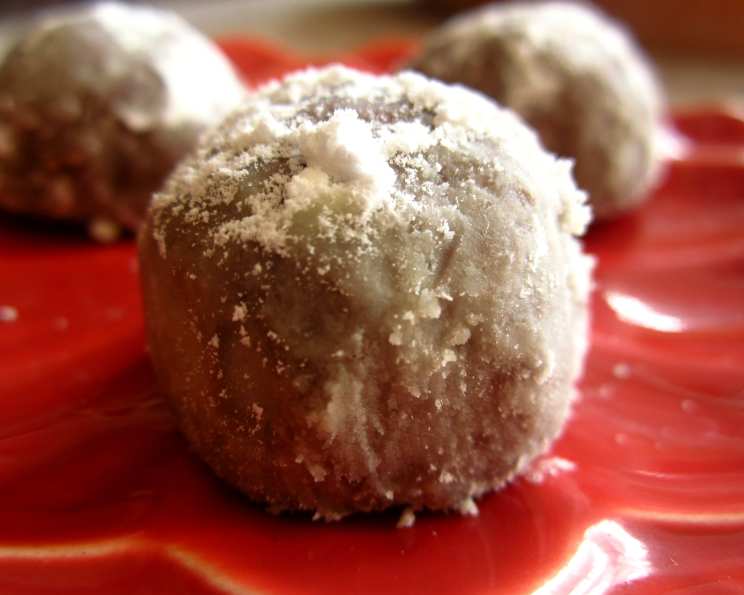
Coat in Powdered Sugar: Place a generous amount of additional powdered sugar onto a small plate or into a shallow dish. Carefully roll each formed rum ball in the powdered sugar until it is evenly coated. Gently shake off any excess sugar.
-
The Crucial Maturation Period: Arrange the rolled rum balls in a single layer in an airtight container. This is perhaps the most vital step in achieving their superior flavor and texture. Let them ripen in the covered container for at least 3 days before enjoying. This period allows the alcohol to work its magic, softening the crumbs and infusing the entire ball with that distinct rum flavor. Store them at room temperature during this ripening process.
Chef’s Secrets for Rum Ball Perfection
As a seasoned cook, I’ve learned that even the simplest recipes can benefit from a few insider tips. These small adjustments can elevate your rum balls from good to truly exceptional.
- Crumb Consistency: For the best texture, ensure your Nilla wafer crumbs are finely processed. You can achieve this by pulsing them in a food processor or placing them in a zip-top bag and crushing them with a rolling pin. A coarser crumb will result in a slightly less cohesive ball.
- Rum Choice: While dark rum is traditional and offers a richer, more robust flavor profile, feel free to experiment with different types of rum. Aged or spiced rums can introduce exciting new aromatic notes. Just be mindful that stronger rums might impact the final flavor more intensely.
- Nut Nuances: The recipe calls for finely chopped pecans. For a more uniform texture, you can lightly toast the pecans before chopping. This enhances their flavor and makes them easier to chop finely. If pecans aren’t your favorite, walnuts or even almonds can be substituted, though they will impart a different flavor.
- The “Ripening” Factor: I cannot stress this enough: patience is key! The 3-day ripening period is not a suggestion; it’s the secret to unlocking the true potential of these rum balls. During this time, the alcohol continues to break down the wafer crumbs, creating a moist, melt-in-your-mouth texture, and the flavors meld beautifully. If you try them too early, they will likely be drier and the rum flavor will be too harsh.
- Handling Sticky Dough: If at any point the mixture feels unmanageably sticky, don’t be tempted to add more dry ingredients, as this can make the finished product too dry. Instead, lightly dampen your hands with water or a bit of rum when shaping. A minute or two in the refrigerator can also help firm up the dough if it becomes too soft.
Serving and Storage: Keeping the Goodness Going
Once your rum balls have reached their peak ripeness, they are ready to be savored.
Serving: These rum balls are perfect as an after-dinner treat, a festive holiday indulgence, or a delightful accompaniment to coffee or tea. They also make a wonderful homemade gift, presented in a decorative tin or cellophane bag, perhaps tied with a ribbon. Their inherent richness means they stand alone beautifully, but they also pair wonderfully with a glass of milk, a rich coffee liqueur, or even a small pour of the same dark rum used in the recipe.
Storage: Store the ripened rum balls in an airtight container at room temperature for up to 2 weeks. Due to the alcohol content, they tend to maintain their moisture and flavor for a considerable time. If you live in a very warm climate or anticipate longer storage, you can keep them in the refrigerator, though this might slightly firm up the texture. Allow them to come to room temperature for about 15-20 minutes before serving if refrigerated. These rum balls do not freeze particularly well, as the texture can become compromised upon thawing.
Nutritional Insights
While these rum balls are a decadent treat, understanding their nutritional profile can help in mindful enjoyment. The figures below are approximate and can vary based on specific ingredient brands and exact portion sizes.
| Nutrient | Amount per Serving (approx. 1 ball) | % Daily Value (approx.) |
|---|---|---|
| Calories | 150 – 180 kcal | 7.5% – 9% |
| Total Fat | 6 – 8 g | 7.7% – 10.3% |
| Saturated Fat | 2 – 3 g | 10% – 15% |
| Cholesterol | 0 mg | 0% |
| Sodium | 30 – 50 mg | 1.3% – 2.2% |
| Total Carbohydrate | 20 – 25 g | 7.3% – 9.1% |
| Dietary Fiber | 0.5 – 1 g | 1.8% – 3.6% |
| Sugars | 12 – 16 g | 24% – 32% |
| Protein | 1 – 2 g | 2% – 4% |
Note: The “Calories from Fat” and its percentage of the daily value are highly dependent on the specific chocolate chips and amount of butter/fat content in the Nilla wafers used. The above table provides a general estimate.
Variations and Creative Twists
While the classic recipe is hard to beat, here are a few ideas to customize your rum balls:
- Chocolate Variations: Experiment with different types of chocolate. Milk chocolate chips will result in a sweeter, milder flavor, while dark chocolate (70% cocoa or higher) will offer a more intense, less sweet profile. You could even mix chocolate types.
- Boozy Alternatives: While rum is traditional, other spirits can be used. A good quality bourbon or brandy can offer a sophisticated twist. For a non-alcoholic version, strong brewed coffee or a rum extract can be used, though the characteristic flavor will be different.
- Nut-Free Option: If you need to avoid nuts, simply omit the pecans. The rum balls will still be delicious, though they will lack the textural contrast the nuts provide.
- Spiced Rum Balls: Add a pinch of ground cinnamon, nutmeg, or even allspice to the dry ingredients for a warm, spiced flavor profile, perfect for the holiday season.
- Coconut Coating: Instead of rolling in powdered sugar, try rolling the finished balls in finely shredded unsweetened coconut for a tropical twist. This would pair wonderfully with a white rum.
Frequently Asked Questions
Q: Do I have to use Nilla wafers?
A: Nilla wafers are traditional because their mild, buttery flavor and specific texture break down beautifully when moistened. While other plain vanilla cookies might work, their results can vary. Stick to Nilla wafers for the classic Carl E. experience.
Q: Can I make these rum balls ahead of time?
A: Absolutely! In fact, they are meant to be made ahead. The 3-day ripening period is essential for developing their best flavor and texture. They can be made up to 2 weeks in advance and stored at room temperature.
Q: What kind of rum is best for rum balls?
A: Dark rum is generally preferred for its richer, more molasses-like flavor, which complements the chocolate and cookie base well. However, a good quality aged rum or even a spiced rum can also be delicious and offer a different flavor dimension.
Q: My rum balls seem too dry. What did I do wrong?
A: This is usually a result of not allowing sufficient ripening time or potentially over-mixing the dough, which can break down the crumbs too much. Ensure you are using the specified amount of Nilla wafer crumbs and follow the 3-day ripening period strictly.
Q: Can I add more rum to make them boozier?
A: You can add a little more rum, but be cautious. Adding too much liquid can make the mixture too soft to roll and may affect the overall texture and setting ability. The current ratio is designed to provide a noticeable rum flavor after ripening, without overpowering or compromising the structure.
A Sweet Ending
Carl E.’s Rum Balls are more than just a recipe; they are a small, edible piece of history, a testament to the power of simple ingredients and the magic of time. They embody the spirit of slow food, where patience is rewarded with unparalleled flavor and texture. The next time you’re looking for a treat that’s both incredibly easy to make and wonderfully impressive, consider whipping up a batch of these. Trust the process, give them their well-deserved ripening time, and you’ll be rewarded with a delightful confection that’s sure to become a cherished part of your own culinary memories. Enjoy every melt-in-your-mouth bite!