
Rosettes: Delicate Crisps of Sweetness
There’s a certain magic that happens when flour, eggs, and sugar transform into something ethereal, something that shatters with a delicate crunch and melts on the tongue. For me, rosettes have always evoked memories of bustling holiday kitchens and the quiet joy of creating intricate edible lace. I recall my grandmother, her hands dusted with a fine powder of confectioners’ sugar, carefully dipping the rosette iron into the shimmering oil. The scent of warm, sweet dough frying filled the air, a perfume that signaled celebration and togetherness. Each perfectly formed rosette was a tiny work of art, a testament to patience and a sprinkle of culinary alchemy.
Recipe Overview
- Prep Time: 20 minutes
- Cook Time: 30 minutes
- Total Time: 50 minutes
- Servings: 10-12
- Yield: 42 rosettes
- Dietary Type: Not specified (contains eggs, dairy, gluten)
Ingredients
This recipe, while seemingly simple, relies on precise ratios to achieve that signature crispness.
- 2 large eggs
- 2 teaspoons sugar
- 1/4 teaspoon salt
- 1 cup milk
- 1 cup all-purpose flour
- 1 tablespoon lemon extract
- Vegetable oil, for frying (approximately 3-4 cups, depending on your kettle)
- Confectioners’ sugar, for coating
Equipment Needed
While the ingredient list is short, having the right tools is crucial for success.
- Medium-sized bowl
- Whisk
- Small sifter (or fine-mesh sieve)
- Deep, heavy-bottomed kettle or Dutch oven (at least 3-4 inches deep)
- Deep-fry thermometer (highly recommended for temperature control)
- Rosette iron set (typically comes with different decorative shapes)
- Absorbent paper towels
- Wire cooling rack
- Small fine-mesh sieve or shaker for dusting confectioners’ sugar
Instructions
Crafting these delicate pastries is a dance between precision and intuition. Follow these steps closely for the best results.
- Begin by lightly beating the eggs in a medium bowl.
- Add the sugar to the beaten eggs and continue to whisk until just combined.
- Next, pour in the milk and whisk again until everything is smoothly incorporated.
- Now, for the dry ingredients. It’s important to sift your flour before measuring to ensure you have an accurate amount and to remove any lumps. Measure out 1 cup of sifted flour.
- Add the salt to the measured flour and whisk them together briefly.
- Gradually sift and stir the flour and salt mixture into the wet ingredients. Continue to stir until the batter is completely smooth. The batter should have the consistency of heavy cream; if it seems too thick, you can add a tiny splash more milk, but be sparing.
- Stir in the lemon extract. This adds a bright, fragrant note that beautifully complements the fried dough.
- Now, it’s time to prepare for frying. Pour enough vegetable oil into your deep kettle or Dutch oven to reach a depth of at least 3-4 inches. The oil is key to getting the rosettes to fry evenly and puff up properly.
- Heat the oil over medium-high heat to 370°F (188°C). A deep-fry thermometer is your best friend here, as maintaining a consistent temperature is critical.
- If you don’t have a thermometer, you can test the oil’s readiness by dropping a small piece of bread into it. If the bread turns golden brown in about 60 seconds, the oil is likely at the correct temperature.
- While the oil is heating, dip your rosette iron into the hot oil for a few seconds. This heats the iron, which helps the batter adhere to it.
- Carefully remove the heated iron from the oil and drain any excess oil by tapping it gently on absorbent paper towels. It’s crucial to have a clean, slightly oily surface for the batter to cling to.
- Now, dip the batter-coated iron into the hot fat. You want to dip the iron into the batter up to about 3/4 of its height. The batter should coat the iron evenly. If the batter doesn’t adhere well, it might mean the iron is too cool or too greasy.
- Immediately and carefully plunge the batter-coated iron into the hot fat. Fry for 2 to 3 minutes, or until the active bubbling around the rosette ceases. This indicates that the dough is cooked through.
- To remove the rosette, invert the iron over the hot fat, allowing excess oil to drain off. Then, gently slide the rosette off the iron and onto a prepared surface lined with absorbent paper towels. Invert the rosette on the paper towels as well, to ensure it drains completely.
- The rosette should be crisp as soon as it’s slightly cooled. If it’s not crisp, it’s a sign that your frying oil might have been too cool.
- If the rosette doesn’t drop off the iron easily, gently rap the handle of the iron sharply against a firm surface (like the edge of your cooling rack) to jar it loose.
- While the rosettes are still warm, sprinkle them generously with confectioners’ sugar using a fine-mesh sieve or shaker. This is the classic finishing touch.
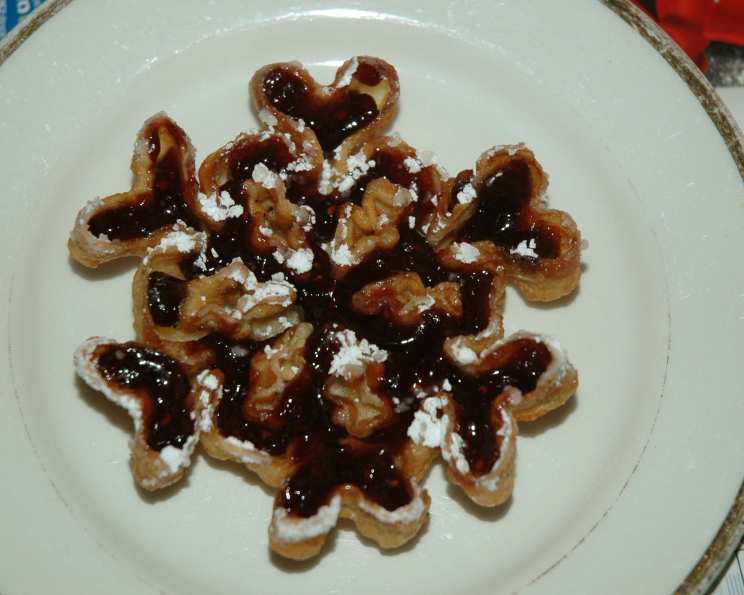
- For an extra touch of elegance and flavor, you can also fill the natural crevices of the warm rosettes with a small dollop of raspberry jam (or your favorite jam) before coating them with confectioners’ sugar.
Expert Tips & Tricks
- Temperature is Paramount: The temperature of your frying oil is the single most important factor in achieving perfectly crisp rosettes. Too cool, and they’ll be greasy and limp; too hot, and they’ll brown too quickly on the outside before cooking through. Use a thermometer and keep a close eye on it.
- Don’t Overcrowd the Batter: When dipping the iron into the batter, avoid submerging it completely. The batter should only come up to about three-quarters of the iron’s height. This allows for a cleaner release and a more delicate structure.
- Practice Makes Perfect: The first few rosettes might be a bit wonky as you get the hang of dipping and releasing. Don’t be discouraged! The batter is forgiving, and you’ll quickly find your rhythm.
- Cleanliness is Key: Ensure your rosette iron is clean and dry before heating and dipping. Any residual oil or batter can interfere with the dough adhering properly.
- Drainage is Crucial: Properly draining the rosettes on paper towels immediately after frying is essential for their crispness. Flipping them over on the paper also helps ensure even drainage.
Serving & Storage Suggestions
Rosettes are best enjoyed fresh, when their crisp texture is at its peak. They are a delightful addition to any dessert table, brunch spread, or as a light accompaniment to afternoon tea. Serve them simply dusted with confectioners’ sugar, or get creative with the jam-filled option.
For storage, allow the rosettes to cool completely before storing them in an airtight container at room temperature. They will retain their crispness for about 2-3 days. After that, they may begin to soften. Do not refrigerate them, as the humidity will make them soggy. If they do lose some crispness, you can try briefly warming them in a low oven (around 200°F/95°C) for a few minutes, but they are rarely as good as when freshly made.
Nutritional Information
Here’s an estimated nutritional breakdown for these delightful rosettes. Please note that these are approximate values and can vary based on specific ingredients and portion sizes.
| Nutrient | Amount per Serving (approx.) | % Daily Value |
|---|---|---|
| Calories | 82.2 kcal | |
| Total Fat | 2 g | 3% |
| Saturated Fat | 0.9 g | 4% |
| Cholesterol | 45.7 mg | 15% |
| Sodium | 84.4 mg | 3% |
| Total Carbohydrate | 11.6 g | 4% |
| Dietary Fiber | 0.3 g | 1% |
| Sugars | 0.9 g | 2% |
| Protein | 3.4 g | 7% |
(Note: Calculations are based on typical ingredient values and may vary.)
Variations & Substitutions
While the classic rosette is divine on its own, there are ways to put your own spin on this recipe:
- Citrus Zest: Instead of or in addition to lemon extract, you can add a teaspoon of finely grated lemon, orange, or lime zest to the batter for a brighter, more complex citrus note.
- Spices: A pinch of cinnamon or nutmeg can add a warm, comforting flavor, especially if you’re making these around the holidays.
- Nutty Undertones: For a subtle nutty flavor, you could try substituting a tablespoon or two of the all-purpose flour with almond flour.
- Different Extracts: Vanilla extract is a common and delicious substitute for lemon extract. You could also experiment with almond or even a hint of peppermint extract for a seasonal twist.
- Gluten-Free Option: While challenging due to the delicate nature of the dough, a gluten-free all-purpose flour blend might be experimented with, though it may affect the crispness and require adjustments to liquid. This is best approached by advanced bakers.
FAQs
Q: Why are my rosettes not sticking to the iron?
A: This usually happens if the iron isn’t hot enough, or if it’s too greasy. Ensure the iron is heated in the oil for a few seconds before dipping into the batter, and that excess oil is drained off by tapping on a paper towel.
Q: My rosettes are coming out greasy, what am I doing wrong?
A: Greasiness is almost always a sign that the frying oil is not hot enough. Make sure your oil is consistently at 370°F (188°C). If the oil temperature drops too much between batches, allow it to reheat before frying the next rosette.
Q: How long should I fry each rosette?
A: Fry each rosette for about 2 to 3 minutes, or until the active bubbling around it subsides. This indicates that the dough has cooked through.
Q: Can I make the batter ahead of time?
A: It’s best to make the batter just before you plan to fry. The consistency can change over time, and it’s ideal when freshly mixed.
Q: What if my rosette doesn’t release from the iron easily?
A: If the rosette is sticking, gently rap the handle of the iron sharply against a firm surface (like the edge of your cooling rack) to jar it loose.
Final Thoughts
There’s an undeniable charm to rosettes, a whisper of tradition and a promise of simple, sweet delight. They are a perfect example of how a few humble ingredients, combined with a touch of technique and a dash of patience, can create something truly special. Whether you’re a seasoned baker or just starting your culinary journey, I encourage you to try your hand at crafting these edible lace creations. They are wonderful served simply with a dusting of confectioners’ sugar, or as a stunning accompaniment to a rich chocolate dessert or a vibrant fruit salad. I’d love to hear about your rosette-making adventures and any delightful variations you discover!