
Rosemary Parmesan Biscuits: A Savory Symphony for Your Table
There’s a certain magic that happens when the earthy, piney notes of fresh rosemary intertwine with the nutty, sharp embrace of aged Parmesan cheese, all baked into a tender, crumbly biscuit. I remember the first time I ventured beyond the sweet realm of biscuits, drawn by the promise of something more sophisticated, something that could stand proudly alongside a hearty stew or a crisp green salad. These Rosemary Parmesan Biscuits were that revelation. They transport me back to crisp autumn evenings, the aroma filling my kitchen, a warm invitation to gather and savor simple, yet profound, flavors. Each bite is a perfectly balanced bite of savory goodness, a testament to how a few well-chosen ingredients can create something truly extraordinary.
Recipe Overview
- Prep Time: 1 hour 15 minutes (includes refrigeration)
- Cook Time: 6 to 8 minutes
- Total Time: 1 hour 21 to 1 hour 23 minutes
- Servings: About 6 (based on disc size)
- Yield: 36 biscuits
- Dietary Type: Vegetarian
Ingredients
- 100g butter, chilled and chopped into small cubes
- 100g Parmesan cheese, finely grated
- 1 tablespoon fresh rosemary, finely chopped
- 3⁄4 cup plain flour
- Salt and freshly ground black pepper, to taste
Equipment Needed
- Food processor
- Greaseproof paper or parchment paper
- Rolling pin
- 2 round baking trays
- Baking paper
- 5cm (approximately 2-inch) round biscuit cutter
- Wire cooling rack
Instructions
Creating these exquisite Rosemary Parmesan Biscuits is a delightful journey that begins with the careful assembly of your ingredients. The key to their superior texture lies in keeping the butter cold and in precise measurements.
- Combine the Dry and Fatty Elements: In the bowl of a food processor, combine the chopped butter, grated Parmesan cheese, chopped rosemary, and plain flour. Season generously with salt and freshly ground black pepper. You’ll want to ensure your butter is well-chilled for this step; it’s crucial for achieving that signature flakiness.
- Process into Dough: Pulse the ingredients in the food processor until the mixture begins to resemble coarse breadcrumbs and then starts to clump together, forming a cohesive dough. Be careful not to over-process, as this can toughen the biscuits. The butter should still be in small, discernible pieces within the dough.
- Shape and Chill: Turn the dough out onto a lightly floured work surface. Gently knead and press the dough together, shaping it into a flat disc approximately 15cm (about 6 inches) in diameter. Once shaped, wrap the disc tightly in greaseproof paper or parchment paper. Refrigerate for at least 1 hour, or until the dough is firm to the touch. This chilling period is vital for the butter to firm up again, which will contribute significantly to the texture of the baked biscuits.
- Preheat and Prepare for Baking: When you’re ready to bake, preheat your oven to 180°C (350°F). Line two baking trays with baking paper. This prevents sticking and ensures even baking.
- Roll and Cut: Remove the chilled dough disc from the refrigerator. Place it between two sheets of baking paper or greaseproof paper. Using a rolling pin, carefully roll out the dough evenly to a thickness of 0.5cm (approximately 1⁄4 inch). The two sheets of paper will help prevent the dough from sticking to the rolling pin and your work surface.
- Create the Biscuits: Using a 5cm (2-inch) round biscuit cutter, cut out rounds from the rolled-out dough. Dip the cutter in a little flour between cuts if it starts to stick. Press the unused dough together gently and repeat the rolling and cutting process until all the dough has been used. Try to minimize re-kneading and re-rolling the scraps as much as possible to maintain a tender texture.
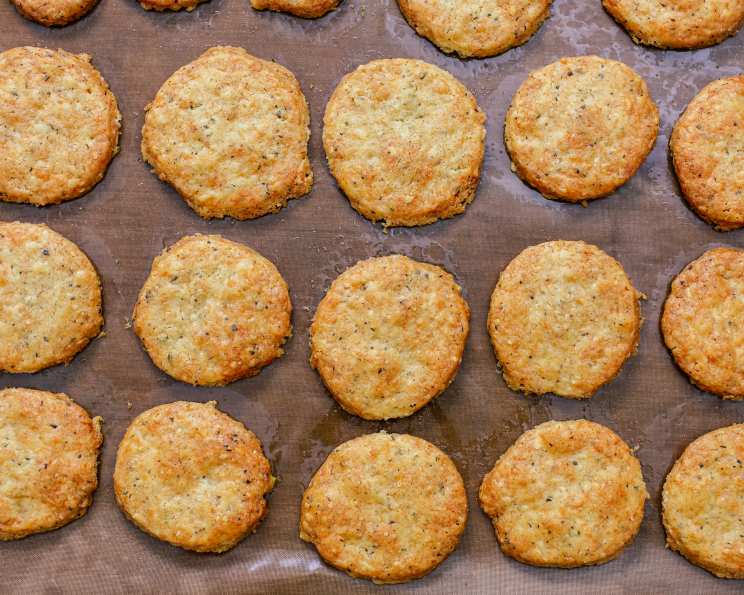
- Bake to Golden Perfection: Carefully arrange the biscuit rounds onto the prepared baking trays, leaving a little space between them. Bake the biscuits in the preheated oven for 6 to 8 minutes, or until they are a light golden brown color. The exact time will depend on your oven, so keep a close eye on them as they bake quickly.
- Cool and Serve: Once baked, allow the biscuits to stand on the baking trays for about 5 minutes. This allows them to firm up slightly before you move them. Then, carefully transfer them to a wire rack to cool completely.
Expert Tips & Tricks
- The Importance of Cold Butter: I cannot stress enough the significance of using cold, cubed butter. When the cold butter hits the hot oven, it melts, creating steam pockets that translate directly to flaky layers in your biscuits. If your kitchen is warm, pop your flour and butter mixture into the freezer for 10 minutes before processing.
- Don’t Overwork the Dough: Overworking the dough develops the gluten in the flour, leading to tough biscuits. Handle the dough as little as possible, especially when re-rolling scraps. Think of it as a gentle persuasion, not a vigorous workout.
- Rosemary Intensity: The amount of rosemary can be adjusted to your preference. If you’re a big fan, feel free to add an extra half tablespoon, but remember that its flavor intensifies as it bakes. Ensure it’s finely chopped so it distributes evenly.
- Parmesan Choice: While any good quality grated Parmesan will work, using a freshly grated, aged Parmigiano-Reggiano will provide a more robust and nuanced flavor.
- Biscuit Cutter Technique: When using your biscuit cutter, press straight down and pull straight up. Avoid twisting the cutter, as this can seal the edges of the dough, preventing proper rising and flakiness.
Serving & Storage Suggestions
These Rosemary Parmesan Biscuits are incredibly versatile. They are absolutely divine served warm, straight from the oven, as a delightful accompaniment to a steaming bowl of soup, a rich stew, or a vibrant salad. They also make an excellent base for canapés or a simple, elegant snack with a glass of wine.
When it comes to storage, for optimal freshness, store any leftover biscuits in an airtight container lined with foil at room temperature. They will keep well for up to 4 days. If you find they lose a bit of their crispness, a quick refresh in a low oven (around 150°C/300°F) for a few minutes can work wonders.
Nutritional Information
| Nutrient | Amount per Serving | % Daily Value |
|---|---|---|
| Calories | 41.3 kcal | |
| Calories from Fat | ||
| Total Fat | 3.1 g | 4% |
| Saturated Fat | 1.9 g | 9% |
| Cholesterol | 8.4 mg | 2% |
| Sodium | 62.2 mg | 2% |
| Total Carbohydrate | 2.1 g | 0% |
| Dietary Fiber | 0.1 g | 0% |
| Sugars | 0 g | 0% |
| Protein | 1.4 g | 2% |
Note: Nutritional information is an estimate and can vary based on specific ingredients used.
Variations & Substitutions
While these biscuits are fantastic as is, here are a few ideas to spark your creativity:
- Herbal Twist: Experiment with other fresh herbs. Thyme, chives, or a blend of herbs de Provence would also be delicious. Just be mindful of their intensity.
- Spicy Kick: For a subtle heat, add a pinch of cayenne pepper or red pepper flakes to the food processor along with the other dry ingredients.
- Seed Addition: Incorporate a tablespoon or two of toasted sesame seeds or poppy seeds into the dough for an added textural and flavor dimension.
- Cheesy Alternatives: If Parmesan isn’t your favorite, try finely grated Pecorino Romano for a sharper flavor, or a good quality sharp cheddar for a milder, but equally delicious, alternative.
FAQs
Q: Can I make these biscuits ahead of time?
A: Yes, you can prepare the dough and refrigerate it for up to 2 days before rolling and baking. The chilling time is beneficial for the texture.
Q: Why are my biscuits tough?
A: Tough biscuits are usually a result of overworking the dough or not using cold enough ingredients, especially the butter. Handle the dough as little as possible and ensure your butter is thoroughly chilled.
Q: How can I make them gluten-free?
A: You would need to experiment with a good quality gluten-free all-purpose flour blend that contains a binder like xanthan gum. The texture might vary slightly, so start with a small batch.
Q: Can I freeze the dough?
A: Yes, you can shape the dough into a disc, wrap it well, and freeze it for up to a month. Thaw it in the refrigerator overnight before rolling and baking.
Q: What’s the best way to get uniform biscuit shapes?
A: Using a biscuit cutter and pressing straight down without twisting is key. Ensure your dough is rolled to an even thickness before cutting.
Final Thoughts
These Rosemary Parmesan Biscuits are more than just a recipe; they are an invitation to elevate the everyday. They embody my philosophy that simple, high-quality ingredients, treated with care, can yield spectacular results. Whether you’re looking for an elegant addition to a dinner party or a comforting treat for a quiet afternoon, these savory delights are sure to impress. Serve them warm with a drizzle of good olive oil or alongside your favorite rustic soup – they are truly a testament to the enduring appeal of a well-made biscuit. I encourage you to try them, savor each aromatic bite, and share the joy they bring.