
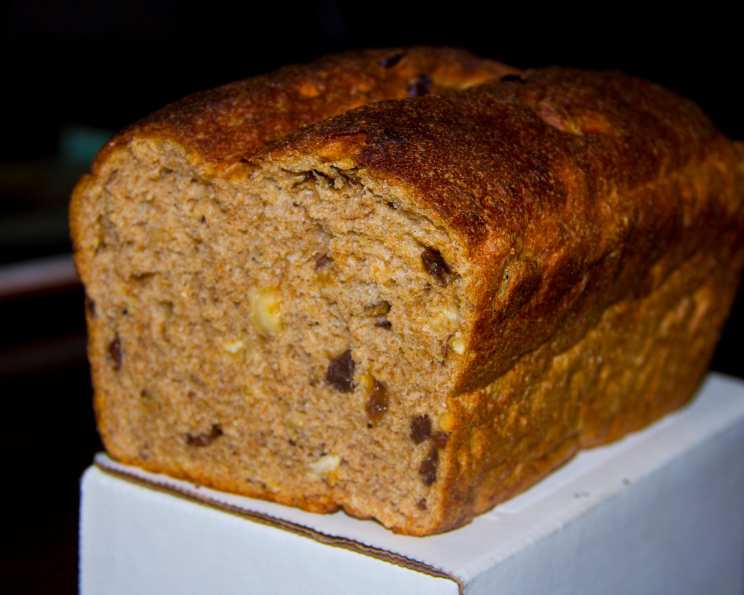
Roasted Hazelnut Raisin Whole Grain Wheat Bread: A Direct Method Masterpiece
There are some breads that just feel like home. For me, this Roasted Hazelnut Raisin Whole Grain Wheat Bread is one of them. I remember my grandmother, a woman whose kitchen always smelled of warm spices and baking dough, making a similar loaf. She didn’t have all the fancy equipment we have today, but she had patience and a deep understanding of flour, water, and yeast. The aroma of those roasting hazelnuts, nutty and sweet, wafting through the house as the bread baked, is a scent forever etched in my memory. It’s a bread that speaks of comfort, of simple pleasures, and of the joy that comes from creating something truly nourishing with your own two hands.
Recipe Overview
- Prep Time: 1 hour 15 minutes (includes autolyse and initial rise)
- Cook Time: 35 to 45 minutes
- Total Time: 2 hours 15 minutes (approximately, not including cooling)
- Yields: 2 medium loaves
- Serves: 32 (as 16 slices per loaf)
- Dietary Type: Vegetarian
Ingredients
This recipe relies on the simplicity of quality ingredients to create a deeply flavorful and satisfying loaf. The whole wheat flour provides a robust base, while the roasted hazelnuts and plump raisins add delightful bursts of texture and sweetness.
- 5 cups whole wheat flour (approximately 605 g; fresh ground wheat berries are excellent here if you have them)
- 2 cups water (443 g, room temperature)
- 2 teaspoons salt (11.4 g, table salt or fine sea salt)
- 2 ½ teaspoons instant yeast (8.5 g)
- 1 ½ tablespoons honey (18.9 g)
- 1 tablespoon butter, softened (14 g)
- 1 cup hazelnuts (113 g, roughly roasted and roughly crushed)
- 1 cup raisins (113 g)
Equipment Needed
- Large mixing bowl
- Measuring cups and spoons
- Bench scraper (optional, but helpful)
- Clean kitchen towels or plastic wrap
- Straight-sided, clear container (for monitoring dough rise)
- Two 8″ x 4″ loaf pans
- Oven
- Cooling racks
- Instant-read thermometer (highly recommended for checking doneness)
Instructions
This recipe utilizes a direct method, meaning all ingredients are combined at the beginning, with a crucial resting and folding period that builds the dough’s structure and flavor without extensive kneading.
-
The Autolyse: A Foundation of Flavor and Texture
In a large mixing bowl, combine the whole wheat flour and water. Mix them together by hand or using a stand mixer with a dough hook attachment until all the flour is just wetted. It doesn’t need to be perfectly smooth at this stage. Cover the bowl with a clean kitchen towel or plastic wrap and let it rest at room temperature for 1 hour. This step, known as autolyse, allows the flour to fully hydrate, initiating gluten development and making the dough more extensible and easier to work with later. -
Roasting and Preparing the Hazelnuts
While the dough is autolysing, preheat your oven to 375°F (190°C). Spread the hazelnuts in a single layer on a baking sheet. Roast them for 14 minutes, or until they are fragrant and their skins begin to loosen. Immediately after removing them from the oven, while they are still warm, rub the hazelnuts between your hands or in a clean kitchen towel. This will help to shed most of their skins. Once cooled enough to handle, roughly crush the nuts; you can do this by hand or give them a few pulses in a food processor. Set aside. -
Incorporating the Enhancements and Initial Knead
After the 1-hour autolyse, add the salt, instant yeast, honey, and softened butter to the dough. If using a stand mixer, knead with the dough hook on medium speed for 5 minutes. If kneading by hand, continue kneading on a lightly floured surface until these ingredients are well incorporated and the dough starts to develop some elasticity. -
Adding the Stars: Nuts and Raisins
Now, gently incorporate the crushed hazelnuts and raisins into the dough. Continue to knead for about 3 more minutes, ensuring they are distributed uniformly throughout the dough. Be gentle to avoid tearing the developing gluten structure too much. -
The First Rise and Stretch and Folds
Lightly oil a straight-sided, clear container. Remove the dough from the mixing bowl and place it into the prepared container. Note the level of the dough. Cover the container with oiled plastic wrap. Allow the dough to rise until it has doubled in volume. After the first 20 minutes of this rise, perform a series of “stretch and folds.” To do this, gently lift one edge of the dough, stretch it upwards, and fold it over to the opposite side, as if you were folding a letter. Repeat this process for all four sides (top to bottom, side to side). Return the dough to the container and continue with the rise until doubled. This gentle folding technique further strengthens the gluten network without excessive manipulation. -
Shaping the Loaves
Once the dough has doubled, gently turn it out onto a lightly floured surface. Divide the dough into two equal pieces. For each piece, gently shape it into a rough rectangle and then roll it up tightly into a log about 8 inches in length. Place each rolled dough log into an 8″ x 4″ loaf pan that has been thoroughly sprayed with oil. -
Preheating and Final Proof
Preheat your oven to 375°F (190°C). Cover the loaf pans loosely with oiled plastic wrap. Allow the loaves to rise until they have increased their volume by 1 ½ times their original size, or are about ½ inch above the rims of the pans. This final proofing is crucial for achieving a light and airy crumb. -
Baking to Perfection
Place the loaf pans into the preheated oven. Bake for 15 minutes. At this point, carefully rotate the loaves to ensure even baking and browning. Continue baking for an additional 20 to 30 minutes, for a total baking time of 35 to 45 minutes. -
Checking for Doneness
To confirm that the bread is fully baked, insert an instant-read thermometer into the center of each loaf. The internal temperature should register between 195°F and 205°F (90°C and 96°C). The crust should also be a deep golden brown and sound hollow when tapped on the bottom. -
Cooling: The Patience Game
Once baked, immediately tip the loaves out of their pans and onto wire cooling racks. Allow them to cool completely to room temperature before slicing. This is perhaps the hardest step, but it’s essential for the bread’s texture to set properly. Slicing too early can result in a gummy interior.
Expert Tips & Tricks
- Freshly Ground Flour: If you have access to wheat berries and a grain mill, grinding your own whole wheat flour just before baking will elevate this bread to another level in terms of flavor and freshness.
- Hazelnut Texture: For a more pronounced hazelnut crunch, you can leave some of the nuts whole or in larger pieces. If you prefer a more integrated nut flavor, crush them finer.
- Raisin Softness: If your raisins are on the drier side, you can plump them up by soaking them in warm water for about 10-15 minutes, then draining them thoroughly before adding them to the dough. Make sure they are well-drained to avoid adding excess moisture.
- Oven Quirks: Ovens can vary! Keep an eye on your loaves, especially during the latter half of the baking. If they are browning too quickly, you can loosely tent them with aluminum foil.
- Monitoring the Rise: The clear container for the first rise is incredibly helpful. It allows you to visually gauge when the dough has doubled, which is more reliable than just relying on time alone.
Serving & Storage Suggestions
This Roasted Hazelnut Raisin Whole Grain Wheat Bread is a delight served simply sliced with a generous smear of good quality butter. It also makes a fantastic base for avocado toast or a hearty sandwich. For a touch of indulgence, try it lightly toasted and served with a drizzle of honey or alongside a bowl of your favorite soup.
Storage: Once completely cooled, store the bread in a bread box or a paper bag at room temperature for up to 3 days. For longer storage, slice the cooled bread and freeze it in an airtight container or freezer bag. Frozen bread will keep well for up to 3 months. To reheat, simply toast slices directly from frozen or thaw at room temperature.
Nutritional Information
This table provides estimated nutritional values per slice.
| Nutrient | Amount per Slice | % Daily Value |
|---|---|---|
| Calories | 111 kcal | |
| Total Fat | 3.4 g | 5% |
| Saturated Fat | 0.5 g | 2% |
| Cholesterol | 0.9 mg | 0% |
| Sodium | 150 mg | 6% |
| Total Carbohydrate | 18.7 g | 6% |
| Dietary Fiber | 2.7 g | 10% |
| Sugars | 3.8 g | 15% |
| Protein | 3.4 g | 6% |
Note: Nutritional values are estimates and can vary based on specific ingredients used.
Variations & Substitutions
- Nut-Free Option: If you have nut allergies, you can omit the hazelnuts entirely. For added texture and flavor, consider adding toasted pumpkin seeds or sunflower seeds instead.
- Dried Fruit Swap: Feel free to experiment with other dried fruits! Cranberries, dried apricots, or chopped dates would be delicious additions.
- Sweetness Adjustment: The honey provides a subtle sweetness. If you prefer a sweeter loaf, you can increase the honey slightly or add a touch of maple syrup to the dough.
- Spiced Loaf: For a warmer, more autumnal flavor, add 1 teaspoon of cinnamon and ½ teaspoon of nutmeg to the dry ingredients.
FAQs
Q: Why is the autolyse step important in this recipe?
A: The autolyse allows the flour to fully absorb water, which begins the gluten development process, making the dough more pliable and easier to handle, and contributing to a better crumb structure.
Q: Can I use all-purpose flour instead of whole wheat flour?
A: While you can substitute, it will significantly change the texture and flavor of the bread. Whole wheat flour provides a heartier, more robust taste and denser crumb that is characteristic of this recipe.
Q: My dough seems very sticky. What should I do?
A: Whole wheat flour absorbs moisture differently than white flour. If the dough feels too sticky, you can add a tiny bit more flour, a tablespoon at a time, during the kneading process, but be careful not to add too much, which can make the bread dry.
Q: How can I tell if my hazelnuts are properly roasted?
A: Properly roasted hazelnuts will be fragrant and their skins will be visibly loose and peeling. They should also feel slightly warmer and more pliable than raw nuts.
Q: What is the best way to store this bread to keep it fresh?
A: For short-term storage, a bread box or a paper bag is ideal. For longer preservation, freezing is the best option to maintain freshness and prevent staling.
A Slice of Comfort
This Roasted Hazelnut Raisin Whole Grain Wheat Bread is more than just a recipe; it’s an invitation to slow down, to savor the process, and to create something truly wonderful. The direct method, with its emphasis on time and gentle handling, yields a loaf that is both rustic and refined, packed with wholesome goodness and delightful little bursts of flavor. Whether you’re a seasoned baker or just starting your bread-making journey, I encourage you to give this recipe a try. Imagine the aroma filling your kitchen, the satisfying weight of a warm loaf in your hands, and the sheer joy of that first, perfect slice. It’s a taste of tradition, a hug in bread form, and a testament to the simple magic of flour, water, and a little bit of patience. Enjoy every single crumb!