
The Sweet, Savory Magic of Roasted Garlic With Herbs and Olive Oil
There are certain aromas that, for me, instantly transport me back to my grandmother’s kitchen on a crisp autumn afternoon. The scent of garlic, slowly transforming in the oven, is one of them. It’s a humble ingredient, often relegated to a pungent supporting role, but when coaxed into succulence through roasting, it reveals a profound sweetness and a velvety texture that’s utterly captivating. I remember watching her carefully tuck whole garlic heads into a small oven-safe dish, drizzled with a generous glug of olive oil and a scattering of what seemed like the entire herb garden, before setting them to bake. The patient wait, the anticipation building with each passing minute, was almost as delicious as the final, spreadable, golden-brown marvel that emerged.
This isn’t just a recipe; it’s an invitation to experience garlic in its most sublime form. It’s a versatile creation that can elevate a simple crostini to an appetizer of dreams, enrich a pasta sauce with depth, or even add a secret layer of flavor beneath the skin of a roast chicken. The beauty lies in its simplicity and the inherent magic that heat works upon this often-fierce allium.
Recipe Overview
- Prep Time: 5 minutes
- Cook Time: 30 minutes
- Total Time: 35 minutes
- Servings: 8
- Yield: About 1/2 cup
- Dietary Type: Vegan, Gluten-Free, Dairy-Free
Ingredients
- 1 whole garlic head, roasted and removed from skins
- 1/4 teaspoon coarse salt
- 3 tablespoons fresh herbs, finely chopped (such as parsley, chives, thyme, or rosemary)
- Pepper to taste
- 1 pinch red pepper flakes, to taste (optional, for a hint of heat)
- 1 tablespoon olive oil
Equipment Needed
- Mortar and pestle (or a Molcajete y Tejolote for traditional grinding)
- Small bowl (if not using a mortar and pestle)
- Measuring spoons
- Cutting board
- Knife
Instructions
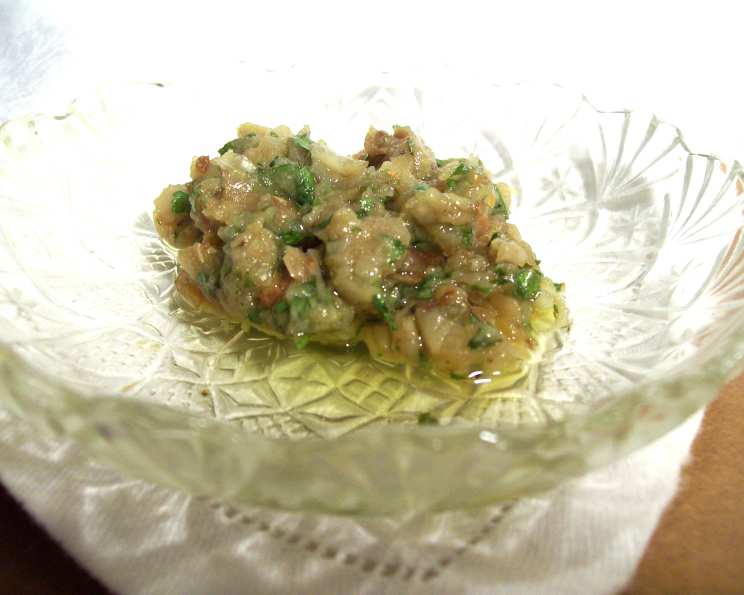
- Begin by ensuring your garlic head has been roasted and the individual cloves have been gently squeezed from their skins, yielding soft, yielding, roasted garlic.
- Place the softened roasted garlic cloves into your mortar. If you are not using a mortar and pestle, you can place the garlic cloves into a small bowl.
- Add the 1/4 teaspoon coarse salt to the mortar (or bowl) with the garlic.
- Incorporate the 3 tablespoons of fresh herbs, which should be finely chopped to ensure even distribution of flavor.
- Season with pepper to your liking.
- If using, add the 1 pinch of red pepper flakes.
- Drizzle the 1 tablespoon of olive oil over the ingredients in the mortar.
- Using the pestle, begin to grind the ingredients. Apply firm downward pressure and move the pestle in a circular motion. This action will effectively pulverize the garlic and herbs, releasing their oils and essence. Continue this process until a cohesive paste is formed.
- Once the desired consistency is achieved, your Roasted Garlic With Herbs and Olive Oil is ready to be used as you desire.
Expert Tips & Tricks
The true beauty of this roasted garlic spread lies in its simplicity, but a few nuances can elevate it further. For instance, the quality of your olive oil will significantly impact the final flavor. Opt for a good extra virgin olive oil with a robust, fruity profile. When chopping your fresh herbs, aim for a fine mince; larger pieces can be visually appealing but might throw off the texture of the paste. If you find your roasted garlic is a bit dry, a tiny splash more olive oil can help achieve a smoother consistency. Don’t be afraid to experiment with herb combinations – tarragon and basil can offer a different dimension than thyme and rosemary.
Serving & Storage Suggestions
This delightful roasted garlic spread is incredibly versatile. Serve it generously dolloped onto warm, crusty bread or toasted baguette slices for an instant appetizer. It’s also divine stirred into hot pasta, using a bit of the pasta cooking water and an additional drizzle of olive oil to loosen it into a creamy sauce. For a more intense flavor, it can be used as a rub, carefully placed under the skin of poultry before roasting.
Leftovers can be stored in an airtight container in the refrigerator for up to 3-4 days. The flavors tend to meld and deepen beautifully overnight. To reheat, gently warm it in a small saucepan over low heat, or place it in a small oven-safe dish in a low oven (around 250°F/120°C) until warmed through. Avoid microwaving if possible, as it can sometimes alter the texture.
Nutritional Information
| Nutrient | Amount per Serving (approx.) | % Daily Value |
|---|---|---|
| Calories | 20.7 kcal | |
| Calories from Fat | 15 g | 75% |
| Total Fat | 1.7 g | 2% |
| Saturated Fat | 0.2 g | 1% |
| Cholesterol | 0 mg | 0% |
| Sodium | 73.4 mg | 3% |
| Total Carbohydrate | 1.3 g | 0% |
| Dietary Fiber | 0.1 g | 0% |
| Sugars | 0 g | 0% |
| Protein | 0.2 g | 0% |
Note: Nutritional values are estimates and can vary based on the specific ingredients used.
Variations & Substitutions
While the classic combination of garlic, herbs, and olive oil is a winner, feel free to explore variations. For a touch of Mediterranean flair, add a finely minced anchovy fillet or a small amount of sun-dried tomatoes. A squeeze of lemon juice can brighten the flavor profile, especially if you’re using it with seafood. If you’re looking for a spicier kick beyond red pepper flakes, consider adding a small amount of finely minced fresh chili. For a richer, more decadent spread, you could substitute some of the olive oil with a high-quality infused oil, such as rosemary or lemon.
FAQs
Q: Can I roast the garlic myself for this recipe?
A: Absolutely! Roasting garlic is simple: cut off the top quarter of a whole garlic head, drizzle with olive oil, wrap in foil, and bake at around 400°F (200°C) for 45-60 minutes until soft and golden.
Q: What’s the best way to remove the roasted garlic from its skins?
A: Once roasted, the cloves should be very soft. Gently squeeze the bottom of each clove, and it should pop right out of its skin.
Q: How finely should I chop the fresh herbs?
A: For the best texture and flavor distribution, aim for a very fine mince. This ensures the herbs are well integrated into the garlic paste.
Q: Can I use dried herbs instead of fresh?
A: While fresh herbs are preferred for their vibrant flavor, you can use dried herbs. Use about one-third the amount of dried herbs as fresh (e.g., 1 tablespoon dried for 3 tablespoons fresh).
Q: What’s the difference between using a mortar and pestle versus a food processor?
A: A mortar and pestle allow for a more controlled grinding, which can release oils and flavors more effectively, resulting in a richer, more nuanced taste. A food processor can be faster but may sometimes over-process, potentially impacting texture and flavor.
Final Thoughts
This simple preparation of roasted garlic is a testament to how humble ingredients, treated with a little patience and care, can transform into something truly extraordinary. It’s a staple in my kitchen, a go-to for adding that certain je ne sais quoi to everyday meals. I encourage you to experiment with different herbs, discover your favorite pairings, and enjoy the unparalleled satisfaction of creating this delicious, golden paste. Share it with friends, slather it on your favorite bread, or simply savor it by the spoonful – its magic is yours to explore.