
The Irresistible Crunch: Mastering the Art of Roasted Cheese Crisps
There’s something primal and deeply satisfying about the crackle and melt of perfectly roasted cheese. I still recall a particular afternoon years ago, standing in a bustling restaurant kitchen during a particularly busy service. Amidst the clatter of pans and the urgent calls of orders, a small plate of these golden, lacy cheese crisps appeared on the pass, meant as a garnish for a rich butternut squash soup. The aroma alone was intoxicating – nutty, savory, and utterly irresistible. I snuck one, and the immediate shatter in my mouth, followed by the intense, concentrated cheese flavor, was a revelation. It was the simplest thing, yet it elevated the entire dish. Since then, these cheese crisps have become a secret weapon in my culinary arsenal, a go-to for adding texture and sophisticated flair to everything from elegant hors d’oeuvres to humble weeknight meals. They’re proof that sometimes, the most profound flavors come from the most unassuming ingredients.
Recipe Overview
- Prep Time: 15 minutes
- Cook Time: 14-15 minutes per batch
- Total Time: approximately 30 minutes (for two batches)
- Servings: 8 (as a garnish or appetizer)
- Yield: 2 large crisps or multiple smaller ones
- Dietary Type: Gluten-Free, Vegetarian
Ingredients
The beauty of these cheese crisps lies in their elegant simplicity. Just a few high-quality ingredients are all you need to achieve something truly special.
- 12 ounces aged Monterey Jack cheese, chilled, or 12 ounces Manchego cheese, chilled (in one piece)
- 2 tablespoons all-purpose flour
- 1/3 teaspoon ground red pepper (or to taste)
Chef’s Note on Cheese: The key here is a hard, well-aged cheese. Monterey Jack, especially an aged variety, offers a lovely melt and a slightly tangy profile. Manchego, a Spanish sheep’s milk cheese, brings a wonderful nutty depth. Avoid cheeses that are too soft or oily, as they will simply melt and spread into a uniform, less appealing sheet. Experimenting with other hard cheeses like aged cheddar, Gruyère, or even Parmesan (though Parmesan can burn more quickly) can yield delightful variations. It’s essential that the cheese is chilled for easier shredding.
Equipment Needed
You won’t need a long list of specialized gadgets for this recipe, but a few essential tools will make the process smooth:
- Box grater (with holes about 1/4-inch wide)
- Medium mixing bowl
- Fork
- 16 1/2-by-11 1/2-inch sheet pan (standard half-sheet pan)
- Silicone baking mat or parchment paper
- Paper towels
- Spatula (optional, for spreading)
- Oven
Instructions
The process of transforming a block of cheese into a delicate crisp is remarkably straightforward, but a few details can make all the difference.
- Preheat your oven to 375°F (190°C). Ensuring your oven is at the correct temperature is crucial for achieving that perfect golden-brown crisp.
- Shred the cheese. Using the large holes of a box grater, shred the chilled block of cheese lengthwise. You’re aiming for longer, finer shreds rather than short, stubby ones. These longer strands interlace more beautifully and create a more delicate crisp.
- Combine the dry ingredients with the cheese. Place the shredded cheese into a medium bowl. Sprinkle the 2 tablespoons of flour over the cheese. Toss gently with a fork to lightly coat the shreds. The flour acts as a binder and helps achieve the desired texture.
- Add the spice. Sprinkle the 1/3 teaspoon of ground red pepper over the cheese and flour mixture. Toss again gently with the fork to distribute the spice evenly. This is where you can adjust the heat to your preference; a pinch of sweet or hot chili powder, or even some lightly crushed cumin, fennel, or coriander seeds can be wonderfully incorporated here. Fresh or dried herbs like rosemary or thyme, finely chopped, can also add a delightful aromatic dimension.
- Prepare your baking surface. Lay a silicone baking mat or a sheet of parchment paper onto a 16 1/2-by-11 1/2-inch sheet pan. This prevents the cheese from sticking and makes for easy cleanup.
- Form the first crisp. Scatter half of the cheese mixture evenly over the prepared baking mat. You want to create a relatively thin, even layer.
- Even the cheese. Shake the pan gently to help even out the cheese into a uniform layer. Alternatively, if you prefer individual crisps or more controlled shapes, you can spread the cheese mixture into circles of your desired size, anywhere from 3 inches to 10 inches in diameter. Ensure the layer is not too thick, or it may not crisp evenly.
- Bake the crisps. Place the sheet pan in the preheated oven. Bake until the cheese is molten and golden brown, which should take about 14-15 minutes. Keep a close eye on them as ovens can vary; you’re looking for that beautiful, caramelized hue.
- Cool and blot. Carefully remove the pan from the oven. Allow the crisps to cool on the baking sheet for a few minutes until they are firm enough to handle but still pliable. Once slightly cooled, blot up any excess grease that may have surfaced with paper towels. This step is important for achieving a truly crisp texture rather than an oily one.
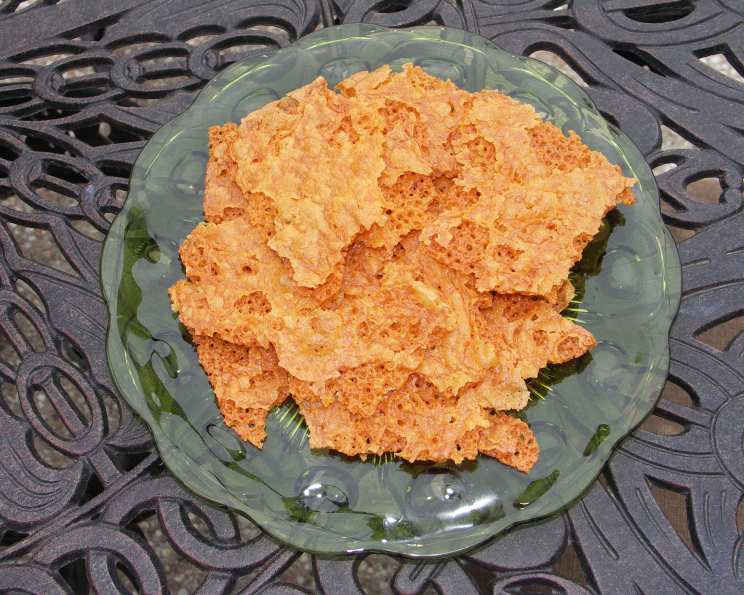
- Break and arrange. Once cool enough to handle, break the crisp into large, irregular pieces. Arrange them artfully on a platter.
- Repeat the process. Wipe off the baking mat or replace the parchment paper and repeat steps 6-10 with the remaining cheese mixture.
Expert Tips & Tricks
- Uniform Shredding is Key: For the most consistent and elegant crisps, take the time to shred the cheese lengthwise. This creates strands that overlap and fuse beautifully, resulting in a delicate, lacy texture.
- Don’t Overcrowd the Pan: Whether you’re making one large crisp or several smaller ones, ensure there’s enough space between them. This allows the heat to circulate properly, leading to even browning and crisping. If you’re shaping individual crisps, give them a little breathing room.
- Watch Like a Hawk: Cheese can go from perfectly golden to burnt very quickly. Your oven’s behavior is your best guide. Start checking around the 12-minute mark to avoid any precious crisps turning into charcoal.
- The Flour Whisper: The small amount of flour isn’t meant to make these doughy; it’s a subtle binder that helps the cheese crisp up rather than just melt into a puddle. Too much flour will alter the texture significantly.
- Make-Ahead Magic: While best enjoyed fresh, these crisps can be made a few hours ahead of time. Store them in an airtight container at room temperature. If they lose a little crispness, a few minutes in a very low oven (around 200°F/95°C) can revive them.
Serving & Storage Suggestions
Roasted cheese crisps are wonderfully versatile. Serve them as an elegant garnish for soups, a crunchy addition to salads, a delightful component of hors d’oeuvres, or simply as a sophisticated accompaniment to cocktails. They are particularly delightful alongside a vibrant green salad, adding a salty, savory crunch that beautifully contrasts with fresh greens and a tangy vinaigrette. They also make a stunning addition to a cheese board, offering a baked element alongside fresh and aged cheeses.
Storage: These crisps are truly at their peak when served fresh from the oven. If you find yourself with leftovers, store them in a cool, dry place in an airtight container at room temperature for up to 2 days. Humidity is their enemy, so avoid refrigerating them, as this can make them soggy. If they do lose their crispness, as mentioned in the tips, a brief warming in a low oven can often revive them.
Nutritional Information
| Nutrient | Amount per Serving | % Daily Value |
|---|---|---|
| Calories | 179 kcal | 9% |
| Calories from Fat | 127 kcal | |
| Total Fat | 14.1 g | 21% |
| Saturated Fat | 9 g | 44% |
| Cholesterol | 44.6 mg | 14% |
| Sodium | 264.1 mg | 11% |
| Total Carbohydrate | 2.1 g | 0% |
| Dietary Fiber | 0.1 g | 0% |
| Sugars | 0.2 g | 0% |
| Protein | 10.8 g | 21% |
Nutritional information is an estimate based on aged Monterey Jack cheese and may vary depending on the specific cheese used.
Variations & Substitutions
The possibilities for variations are as boundless as your imagination!
- Spicy Fiesta: Add a pinch of smoked paprika and a dash of cumin for a Tex-Mex inspired crisp. A finely minced jalapeño, seeded and deveined, can also be incorporated for a fresh heat.
- Herbal Garden: Finely chopped fresh rosemary, thyme, or chives can be mixed in with the cheese for an aromatic twist. Dried herbs work too, just use about half the amount.
- Parmesan Power: For an intensely savory and salty crisp, substitute some or all of the Monterey Jack with finely grated Parmesan cheese. Be extra vigilant as Parmesan browns more quickly.
- Gluten-Free Alternative: The base recipe is naturally gluten-free if you use a gluten-free flour, or omit it entirely if you’re comfortable with that risk, though the flour does aid in texture. Always ensure your shredded cheese has no anti-caking agents that might contain gluten if you have severe sensitivities.
FAQs
Q: Can I use pre-shredded cheese for this recipe?
A: While technically possible, it’s highly recommended to shred your own cheese from a block. Pre-shredded cheeses often contain anti-caking agents that can affect the texture and melt of the crisps, potentially making them less crisp.
Q: My cheese crisps are coming out oily. What am I doing wrong?
A: This usually happens when the cheese melts too quickly or the layer is too thick. Ensure your oven is at the correct temperature, and try to blot away any excess grease with paper towels after baking. Using a slightly firmer, drier cheese can also help.
Q: How can I make larger, uniform cheese crisps?
A: For larger, more controlled shapes, consider using a round cookie cutter to create your circles before baking, or use a stencil. Ensure the cheese is spread thinly and evenly within your desired shape.
Q: Can I add different flavorings to the cheese crisps?
A: Absolutely! This recipe is a fantastic base for experimentation. Spices like garlic powder, onion powder, smoked paprika, or even a touch of curry powder can be added. Finely chopped herbs, dried or fresh, are also wonderful additions.
Q: How do I store cheese crisps to keep them crispy?
A: Store them in an airtight container at room temperature. Avoid refrigerating them, as the moisture will make them soggy. If they lose their crispness, a few minutes in a warm oven can revive them.
Final Thoughts
These roasted cheese crisps are more than just a recipe; they are a testament to the power of simplicity and quality ingredients. They are the kind of dish that disappears from a platter in moments, leaving behind a lingering sense of pure, unadulterated delight. The satisfying crunch, the rich, concentrated cheese flavor – it’s a small indulgence that makes a big statement. I encourage you to embrace the versatility of these crisps, experiment with your favorite cheeses and flavorings, and discover your own signature variation. Share them with loved ones, use them to elevate your everyday meals, or simply savor them as a moment of quiet pleasure. Happy baking!