
Rich Refrigerator Rolls: A Timeless Dough for Every Occasion
The scent of freshly baked bread is one of the most comforting aromas in any kitchen, and for me, it’s inextricably linked to cherished family memories. I remember, as a young child, watching my mother, with flour dusting her apron and a gentle smile, transforming simple ingredients into warm, pillowy rolls. This particular recipe, a treasure from the Better Homes and Gardens Cookbook from 1953, was her go-to. It was the bedrock of countless family dinners, birthday celebrations, and even the foundation for delightful fried bread when we had unexpected guests. The sheer versatility of this dough, coupled with its remarkable ability to keep well in the refrigerator for a week or more, made it an indispensable part of her culinary repertoire, especially during the years she was raising us and running a bustling daycare.
Recipe Overview
- Prep Time: Not including rising time
- Cook Time: 15 to 20 minutes
- Total Time: Varies based on rising time, but dough is usable within hours
- Servings: 4 to 5 dozen medium rolls
- Yield: 4 Dozen Rolls
- Dietary Type: Vegetarian
Ingredients
This remarkable dough comes together with a handful of pantry staples, offering incredible flexibility.
- 2 packages active dry yeast
- 1 cup water, warm (110 degrees)
- 1 teaspoon sugar (for yeast activation)
- 2 cups milk, scalded and cooled to lukewarm
- 2⁄3 cup melted shortening
- 3⁄4 cup sugar
- 4 teaspoons salt
- 2 beaten eggs
- 10 to 11 cups all-purpose flour
Equipment Needed
- Large mixing bowl
- Measuring cups and spoons
- Whisk or fork
- Electric mixer with dough hook (optional, but recommended for ease)
- Clean bowl for dough storage (greased)
- Baking sheets
- Oven
Instructions
The magic of these refrigerator rolls lies in their simple preparation and the extraordinary convenience they offer. The dough can be made ahead and kept chilled, ready to be shaped and baked whenever a craving strikes.
- Begin by activating the yeast. In a small bowl, combine the active dry yeast, warm water (ensure it’s around 110 degrees Fahrenheit – too hot and you’ll kill the yeast, too cool and it won’t activate properly), and the 1 teaspoon of sugar. Give it a gentle stir and let it sit for about 10 minutes. You’ll know it’s ready when it becomes frothy and bubbly, indicating the yeast is alive and active.
- In a large mixing bowl, combine the scalded milk (allow it to cool to lukewarm before adding), melted shortening, the 3⁄4 cup of sugar, and the salt.
- Once the yeast mixture is frothy, pour it into the milk mixture.
- Add the beaten eggs to the bowl.
- Now, it’s time to introduce the flour. Start by adding about half of the flour and mixing it in until just combined. Gradually add the remaining flour, about a cup at a time, until a soft dough begins to form. The amount of flour needed can vary slightly depending on humidity and the absorption rate of your flour. You’re aiming for a dough that is soft but no longer excessively sticky.
- If you have an electric mixer with a dough hook, this is where it truly shines. Continue mixing until the dough is smooth and elastic. If you are mixing by hand, turn the dough out onto a lightly floured surface and knead until it is smooth and elastic. This typically takes about 8 to 10 minutes of vigorous kneading. The dough should spring back when gently pressed.
- Lightly grease a clean bowl. Place the kneaded dough into the greased bowl, turning it once to coat the entire surface. Cover the bowl tightly with plastic wrap or a clean kitchen towel.
- This is the unique step for refrigerator rolls: Store the dough in the refrigerator. It will keep well for a week or even longer, continuing to develop flavor as it chills.
- When you’re ready to bake, shape your rolls about 2 hours before serving. Remove the dough from the refrigerator. It will be firm. You can punch it down if it has risen significantly in the fridge.
- On a lightly floured surface, shape the dough into your desired rolls. You can make classic round rolls, cloverleaf rolls, or even cinnamon rolls.
- Place the shaped rolls onto greased baking sheets or into muffin tins. Cover them loosely and let them rise in a warm place until they have doubled in bulk. This typically takes about 1 to 2 hours, depending on the ambient temperature.
- While the rolls are rising, preheat your oven to a hot 425 degrees Fahrenheit.
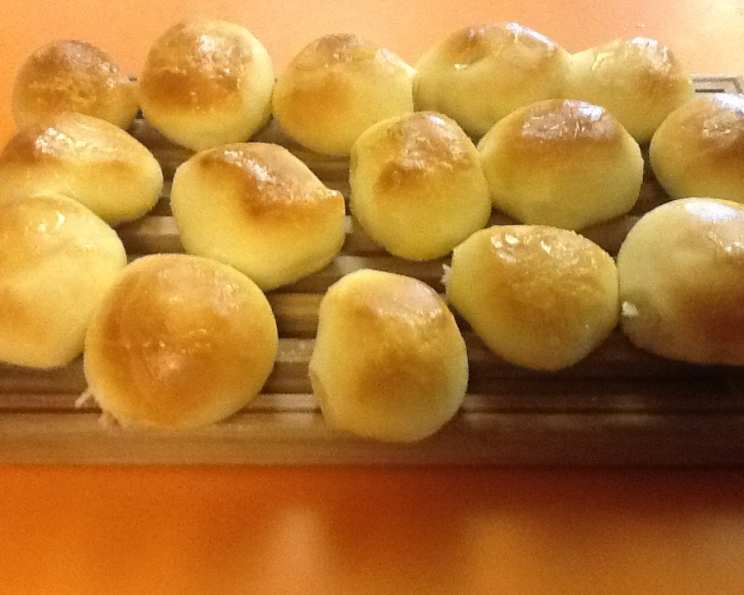
- Once the rolls have doubled and the oven is preheated, bake for 15 to 20 minutes, or until they are golden brown and sound hollow when tapped on the bottom.
- If you have unused dough after shaping your initial batch, punch it down gently and return it to the refrigerator. It will remain viable for further baking for several days.
Expert Tips & Tricks
The beauty of this adaptable dough is its forgiving nature. However, a few insider tips can elevate your roll-making experience from good to exceptional.
- Scalding the milk isn’t just about getting it to a certain temperature; it also helps to denature the whey proteins, which can interfere with gluten development and result in a tougher crumb. Ensure it cools to lukewarm before adding the yeast, as hot milk will kill it.
- Don’t be afraid of a soft dough. While sticky dough can be a challenge, a slightly softer dough often leads to lighter, more tender rolls. If it’s unmanageably sticky, add flour just a tablespoon at a time during kneading until it’s manageable.
- The refrigerator is your friend with this recipe. The slow, cold fermentation in the fridge develops a wonderful depth of flavor that you can’t achieve with a quick rise. It also makes the dough firmer and easier to handle when shaping.
- For the crispiest crust, try placing a shallow pan of hot water on the bottom rack of your oven during the initial baking phase. The steam will help create that desirable crunchy exterior.
- If you notice your rolls aren’t rising as much as expected, it could be due to inactive yeast or a too-cool rising environment. Ensure your yeast is fresh and find the warmest spot in your kitchen (often near a pilot light or in a slightly warmed, turned-off oven).
Serving & Storage Suggestions
These Rich Refrigerator Rolls are a true chameleon, perfect for a variety of occasions. Serve them warm, brushed with a touch of melted butter, alongside your favorite stews, soups, or roasted meats. They make an extraordinary base for French toast or even as a savory fried bread, dusted with a little sugar and cinnamon, when a sweet treat is in order.
Leftovers can be stored in an airtight container at room temperature for 1-2 days. For longer storage, refrigerate the rolls for up to a week. To reheat, simply warm them in a 350°F oven for 5-10 minutes until heated through. The dough itself, as mentioned, can be refrigerated for up to a week and is excellent for multiple baking sessions.
Nutritional Information
Please note that nutritional information is an estimate and can vary based on exact ingredient brands and preparation methods.
| Nutrient | Amount per Serving (approx.) | % Daily Value |
|---|---|---|
| Calories | 1715.8 kcal | |
| Calories from Fat | (Not specified, but significant) | |
| Total Fat | 44.5 g | 68% |
| Saturated Fat | 12.7 g | 63% |
| Cholesterol | 110.1 mg | 36% |
| Sodium | 2431 mg | 101% |
| Total Carbohydrate | 284.4 g | 94% |
| Dietary Fiber | 9.4 g | 37% |
| Sugars | 39.4 g | 157% |
| Protein | 40.9 g | 81% |
Variations & Substitutions
The adaptability of this dough is truly its superpower. While the classic recipe is divine, don’t hesitate to experiment!
- Cinnamon Rolls: After shaping the dough into a rectangle, spread it generously with softened butter, a mixture of granulated sugar and cinnamon, and a touch of brown sugar. Roll it up tightly, slice into rounds, and let them rise before baking. A cream cheese frosting is the perfect finishing touch.
- Garlic Herb Rolls: Knead in finely minced garlic, dried herbs like rosemary or thyme, and a sprinkle of Parmesan cheese into the dough before the final rise.
- Sweet Rolls: Incorporate a little more sugar into the dough itself, and consider adding a touch of vanilla extract or lemon zest for added flavor.
- Whole Wheat Variation: For a nuttier flavor and added fiber, you can substitute up to half of the all-purpose flour with whole wheat flour. You might need to add a little more liquid if the dough becomes too stiff.
FAQs
Q: How do I ensure my active dry yeast is still good?
A: Always check the expiration date. To test its viability, dissolve it in warm water with a pinch of sugar. If it becomes frothy and bubbly within 5-10 minutes, it’s active and ready to use.
Q: My dough is too sticky to handle. What should I do?
A: Resist the urge to add too much flour at once. Instead, lightly flour your hands and the work surface. Gradually add flour, a tablespoon at a time, until the dough is manageable but still soft.
Q: Can I freeze this dough?
A: Yes, you can freeze the prepared dough. Shape it into balls, place them on a baking sheet to freeze individually, then transfer to a freezer-safe bag. Thaw in the refrigerator overnight and let them rise as usual before baking.
Q: Why is the milk scalded in this recipe?
A: Scalding the milk helps to denature certain proteins that can interfere with gluten development, leading to a more tender crumb in the final rolls. Ensure it cools to lukewarm before proceeding.
Q: How do I achieve a really soft and fluffy roll?
A: The key is a soft dough, proper kneading to develop gluten, and allowing sufficient rising time. Baking at the correct high temperature also contributes to a light and airy texture.
Final Thoughts
This Rich Refrigerator Roll recipe is more than just a collection of ingredients and steps; it’s a testament to the enduring power of simple, quality baking. It’s a dough that works tirelessly for you, ready to transform from a humble disc in the fridge to warm, inviting rolls gracing your table. Whether you’re a seasoned baker or just embarking on your culinary journey, I encourage you to embrace the convenience and deliciousness this recipe offers. Bake a batch for your next family dinner, share them with neighbors, or simply enjoy them warm with a smear of butter – you won’t be disappointed. I’d love to hear about your own variations and how these rolls become a cherished part of your kitchen’s story.