
The Ultimate Reese’s Peanut Butter Brownie Experience
There are certain flavor combinations that simply transcend the ordinary, hitting a nostalgic sweet spot that transports you back to childhood. For me, peanut butter and chocolate is one of those sacred unions. I remember countless afternoons spent digging through my candy stash, inevitably gravitating towards those iconic orange wrappers. The magic of a Reese’s Peanut Butter Cup lies in its perfect balance of creamy, nutty goodness and rich, dark chocolate – a symphony of textures and tastes that’s utterly addictive. When the opportunity arose to translate that beloved candy bar experience into a decadent brownie, I knew it was a mission of utmost importance. These brownies aren’t just a dessert; they’re a full-blown homage to a classic, elevated into a fudgy, intensely chocolatey, and supremely peanut buttery masterpiece.
Recipe Overview
- Prep Time: 15 minutes
- Cook Time: 30 minutes
- Total Time: 45 minutes
- Servings: 12-16
- Yields: 3 Dozen (standard brownie squares)
- Dietary Type: Classic Indulgence
Ingredients
This recipe is a masterclass in bringing together simple ingredients to create something truly extraordinary. The beauty lies in the quality and balance of each component.
- 3/4 cup butter, melted (that’s 1 1/2 sticks!)
- 3/4 cup Reese’s creamy peanut butter (or crunchy peanut butter, if you prefer an extra textural surprise)
- 1 3/4 cups sugar
- 2 teaspoons vanilla extract
- 4 large eggs
- 1 1/4 cups all-purpose flour
- 1/2 teaspoon baking powder
- 1/4 teaspoon salt
- 1/4 cup Hershey’s cocoa powder
Equipment Needed
To bring these Reese’s Peanut Butter Brownies to life, you’ll want to have these tools ready:
- A 13x9x2 inch baking pan
- A large mixing bowl
- A whisk
- A spatula
- Measuring cups and spoons
- An oven preheated to 350°F (175°C)
Instructions
The process for creating these brownies is a delightful journey, beginning with the fudgy peanut butter base and culminating in the swirl of rich chocolate. Precision in your steps will ensure a perfect outcome every time.
- Preheat and Prepare: Begin by heating your oven to 350°F (175°C). Next, grease a 13x9x2 inch baking pan. This step is crucial for ensuring your brownies release cleanly and don’t stick.
- Melt and Combine: In a large mixing bowl, add the melted butter. Now, add the peanut butter to the melted butter and stir them together until the peanut butter is fully melted and the mixture is smooth. This creates the luscious, creamy foundation of your brownie.
- Sweeten and Enrich: Stir in the sugar and then the vanilla extract into the peanut butter and butter mixture. Continue to stir until everything is well combined.
- Incorporate the Eggs: One at a time, beat in the eggs. Ensure each egg is fully incorporated before adding the next. This emulsification process is key to the brownie’s texture.
- Add the Dry Ingredients: In a separate, smaller bowl, whisk together the all-purpose flour, baking powder, and salt. Then, add this dry mixture to the wet ingredients and beat well until just combined. Be careful not to overmix at this stage, as it can lead to tougher brownies.
- Create the Swirl: This is where the magic happens! Remove 1 3/4 cups of the batter from the main bowl. To this smaller portion of batter, stir in the Hershey’s cocoa powder. Mix thoroughly until you have a uniform chocolate batter.
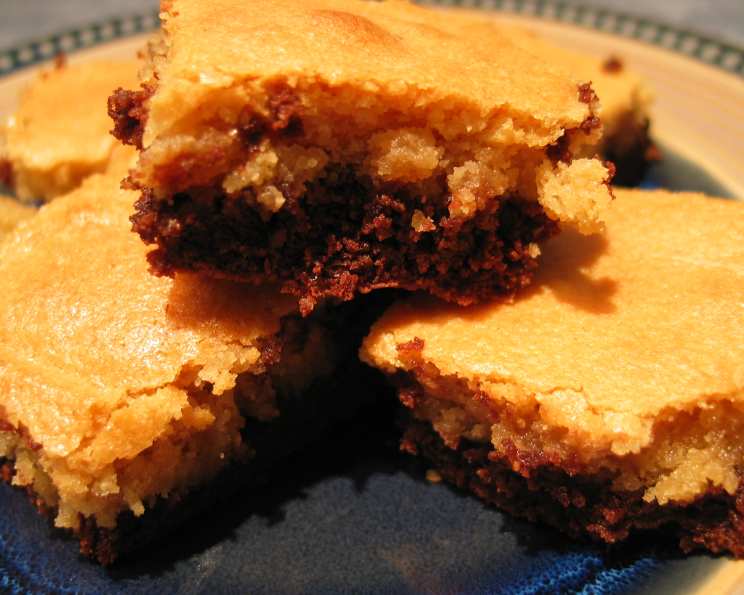
- Assemble the Layers: Spread the cocoa batter evenly into the prepared baking pan, creating the bottom layer. Then, carefully spread the remaining peanut butter batter over the top of the chocolate layer. You can use a spatula or the back of a spoon to gently spread it, creating a marbled effect if you desire, though a distinct layering is also wonderful.
- Bake to Perfection: Bake for 30 minutes, or until the brownies begin to pull away from the sides of the pan. A toothpick inserted into the center should come out with moist crumbs, not wet batter. Overbaking will result in dry brownies, so keep a close eye on them in the final minutes.
- Cool Completely: This is perhaps the hardest part, but it’s essential for achieving the perfect texture and clean cuts. Cool the brownies completely in the pan on a wire rack. Patience here will reward you with beautifully set brownies.
- Cut and Enjoy: Once completely cool, cut the brownies into bars. The size is up to your preference, but these are rich, so smaller, decadent squares are often a good choice.
Expert Tips & Tricks
As a chef, I’ve learned that a few small adjustments can elevate even the most beloved recipes. For these Reese’s Peanut Butter Brownies, consider these insights:
- Peanut Butter Choice: While creamy is classic, using crunchy peanut butter adds a delightful textural contrast to the fudgy brownie. If you opt for natural peanut butter, ensure it’s well-stirred as the oil separation can affect the batter consistency.
- Cocoa Quality: The better the cocoa powder, the more intense the chocolate flavor. If you have a high-quality Dutch-processed cocoa on hand, it will lend a deeper, smoother chocolate profile to the swirled layer.
- Doneness Test: The “pulling away from the sides” cue is a great indicator, but don’t underestimate the visual. A slight sheen on the top surface, even after 30 minutes, is often a sign of perfect fudginess. Aim for moist crumbs on a toothpick, not a completely clean one.
- Cooling is Key: I cannot stress this enough: allow the brownies to cool completely. This allows them to set properly. Trying to cut warm brownies is a recipe for a messy, crumbly disaster.
Serving & Storage Suggestions
These brownies are incredibly versatile. Serve them slightly warm or at room temperature. They are phenomenal on their own, but for an extra treat, consider serving them with a scoop of vanilla ice cream or a drizzle of extra melted peanut butter or chocolate sauce.
- Room Temperature: Store cooled brownies in an airtight container at room temperature for up to 3 days. They often taste even better on the second day as the flavors meld.
- Refrigeration: For longer storage, wrap them tightly and refrigerate for up to 1 week. Allow them to come to room temperature for about 30 minutes before serving for optimal texture.
- Freezing: These brownies freeze beautifully. Wrap individual squares or the entire pan tightly in plastic wrap, then in aluminum foil. They will keep in the freezer for up to 3 months. Thaw overnight in the refrigerator or at room temperature.
Nutritional Information
Please note that these are estimated values and can vary based on specific ingredients used.
| Nutrient | Amount per Serving | % Daily Value |
|---|---|---|
| Calories | 370-400 kcal | 19-20% |
| Total Fat | 20-23 g | 26-30% |
| Saturated Fat | 9-11 g | 45-55% |
| Cholesterol | 70-80 mg | 23-27% |
| Sodium | 150-180 mg | 6-8% |
| Total Carbohydrate | 45-50 g | 16-18% |
| Dietary Fiber | 2-3 g | 8-12% |
| Sugars | 30-35 g | 60-70% |
| Protein | 4-5 g | 8-10% |
Variations & Substitutions
While this recipe is a beloved classic, there’s always room for a personal touch.
- Peanut Butter Cup Pieces: For an extra layer of Reese’s joy, gently press chopped Reese’s Peanut Butter Cups onto the surface of the brownies just before baking.
- Chocolate Chip Boost: Stir 1/2 cup of chocolate chips into the peanut butter batter before spreading it over the cocoa layer for an even richer chocolate experience.
- Nutty Crunch: If you love nuts, consider adding 1/2 cup of chopped peanuts or pecans to the peanut butter batter for an extra layer of crunch.
FAQs
Q: Can I use a different type of peanut butter?
A: Yes, you can use crunchy peanut butter for added texture, or even natural peanut butter if it’s well-stirred.
Q: How do I know when the brownies are done?
A: They are ready when the edges begin to pull away from the sides of the pan. A toothpick inserted into the center should come out with moist crumbs.
Q: Can I make these brownies ahead of time?
A: Absolutely! They store well at room temperature for up to 3 days and can even be frozen for longer storage.
Q: What’s the best way to cut clean brownie squares?
A: Ensure the brownies are completely cooled before cutting. Use a sharp knife and wipe it clean between cuts for the neatest results.
Q: Why are my brownies dry?
A: This is usually due to overbaking or overmixing the batter. Be mindful of the baking time and mix the dry ingredients in only until just combined.
Final Thoughts
There’s a reason why the combination of peanut butter and chocolate holds such a special place in our hearts, and these Reese’s Peanut Butter Brownies are a perfect testament to that enduring appeal. They are the kind of dessert that brings smiles to faces, sparks conversations, and creates lasting memories. Whether you’re baking them for a special occasion, a family gathering, or just because, the sheer indulgence of these rich, fudgy, and intensely peanut buttery brownies is sure to be a hit. Pour yourself a cold glass of milk, settle in, and savor every decadent bite. I’d love to hear about your experience creating these – share your thoughts and any delightful variations you discover!