
Rainbow Pizza Pi: A Culinary Celebration of Pi Day (and Deliciousness!)
There’s something truly magical about a pizza that’s as visually stunning as it is delicious. I remember the first time I saw a pizza adorned with a vibrant spectrum of vegetables, cut into the unmistakable shape of pi. It wasn’t just a meal; it was a work of art, a playful nod to mathematical wonder, and an explosion of fresh, bright flavors. The idea of transforming humble pizza dough into a canvas for a rainbow, while simultaneously honoring everyone’s favorite irrational number, completely captured my imagination. It’s a dish that brings smiles to faces, sparks conversations, and proves that healthy eating can be utterly fun and celebratory.
Recipe Overview
- Prep Time: 40 minutes
- Cook Time: 22 minutes
- Total Time: 1 hour 2 minutes
- Servings: 8
- Yield: 8 Mini Pizzas
- Dietary Type: Vegetarian
Ingredients
For the Pizza Sauce
- 1 tablespoon olive oil
- 2 cloves garlic, minced
- 1 tablespoon Italian seasoning
- 1/2 tablespoon dried oregano leaves
- 1/4 teaspoon red pepper flakes
- 1 (15 ounce) can tomato sauce
- 1 (6 ounce) can tomato paste
- 1/4 teaspoon salt
- 6 leaves fresh basil, coarsely chopped
- 1 teaspoon honey (optional)
Rainbow Veggie Toppings
- 4-5 roma tomatoes
- 1 red bell pepper
- 1 orange bell pepper
- 1 sweet potato
- 1 yellow bell pepper
- 1 green bell pepper
- 1 zucchini
- 5-6 purple potatoes
- 1 red onion
- 1/2 tablespoon olive oil
Pizza
- 16 ounces ready to bake pizza dough
- 1/2 tablespoon olive oil
- 1 1/2 cups shredded mozzarella cheese
- 8 slices mozzarella cheese
- 1 sheet nori
Equipment Needed
- Saucepan
- Heatproof container
- Oven
- Baking sheets
- Parchment paper
- Cookie cutters (numbers and clouds)
- Rolling pin
- Pizza stone or baking sheet
- Small toothpick
Instructions
Begin by preparing the pizza sauce. Heat a saucepan over medium-low heat and add the olive oil and minced garlic. Sauté for 1 minute until fragrant, being careful not to burn the garlic. Next, stir in the Italian seasoning, dried oregano leaves, and red pepper flakes. Add the tomato sauce, tomato paste, and salt. Bring the mixture to a gentle simmer and cook, stirring occasionally, for 10 minutes to allow the flavors to meld. Remove the saucepan from the heat and stir in the fresh basil. Taste the sauce and add the honey, if desired, for a touch of sweetness. Transfer the sauce to a heatproof container and refrigerate until ready to use.
Preheat your oven to 400°F (200°C). Remove the pizza dough from the refrigerator about 30 minutes before you plan to bake, allowing it to come to room temperature. This will make it easier to work with.
Now comes the creative part: preparing your rainbow veggie toppings. You will need number cookie cutters (stainless steel works best for clean cuts) and a cloud cookie cutter. Wash and prepare your vegetables. Use the number cookie cutters to cut out shapes from the various vegetables. You can choose to cut out the digits “3”, “1”, and “4” to represent pi, or cut out a sequence of numbers. For a striking visual effect, I like to arrange my numbers so that each row of vegetables on the pizza displays a different color, but feel free to alternate the colors as you see fit. A helpful tip when using cookie cutters is to place a towel over your fingers when pressing down; this cushions your hands and makes the process more comfortable. Don’t hesitate to substitute any of these vegetables with your favorites!
To partially cook the root vegetables and ensure they are tender, transfer the sweet potato and purple potato cutouts to a parchment-lined baking sheet. Toss them with 1/2 tablespoon of olive oil, ensuring they are lightly coated, and spread the numbers out on the baking sheet so they don’t steam. Bake for 7 minutes. Allow these to cool while you prepare the pizza crust.
Increase the oven temperature to 425°F (220°C). Adjust your oven racks so that you can bake on the lowest rack for optimal crust crisping. Prepare your pizza stone or baking sheet by dusting it lightly with flour. If you are using a regular baking pan, you may need to grease it or use parchment paper to prevent sticking.
Divide the pizza dough into 8 equal sections. Gently roll each section into a ball, using a little flour on your hands and the dough as needed to prevent sticking. Stretch each ball of dough by hand and then use a rolling pin to roll it into a circle, approximately 1/4 inch thick. Brush the top of each pizza crust with the remaining 1/2 tablespoon of olive oil. Par-bake these crusts on the lowest rack in the preheated oven for 5 minutes.
Once the crusts have been par-baked, spread about 1 tablespoon of the prepared pizza sauce onto the top of each pizza. Sprinkle each with approximately 3 tablespoons of shredded mozzarella cheese. Return the pizzas to the lowest oven rack and bake for another 7 minutes.
Now, it’s time to bring your rainbow to life. Arrange the pre-cut number vegetables on top of the melted cheese. Return the pizzas to the oven for an additional 3-5 minutes, or until the cheese is bubbling and the crust is beginning to show a slight golden-brown color.
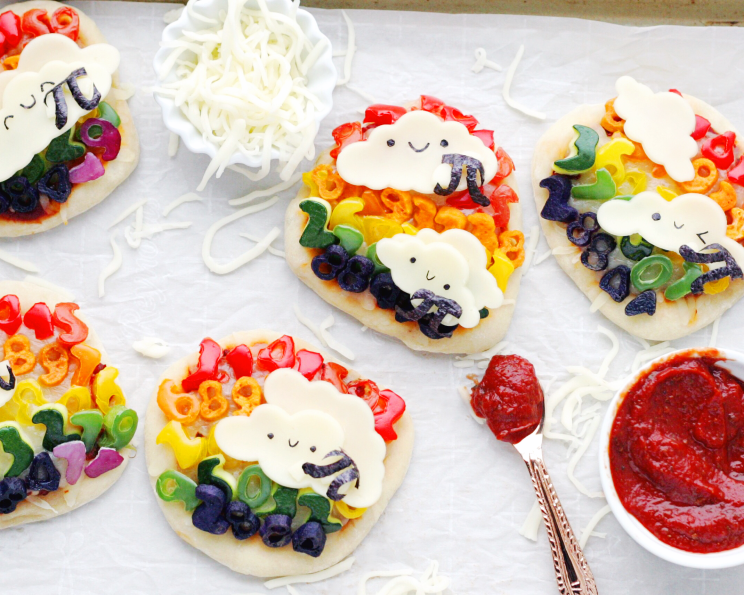
While the pizzas are cooling just enough to handle, you can prepare the charming cloud decorations. Use your cloud cookie cutters to press out shapes from the mozzarella slices. You can even use a sharp knife to cut out little arms for your clouds if you wish. I like to place 1-3 clouds on each pizza, allowing some to slightly overlap for a more dynamic look.
To create the faces and the Pi symbol, use the nori sheet. Cut out eyes and a smile for each cloud. A helpful technique here is to draw the designs onto parchment paper first and then use these as templates to cut the shapes from the nori. This ensures uniformity and ease of cutting. Repeat this process to cut out the Pi symbol from the nori. Making a template for the Pi symbol is particularly useful as it allows you to size it perfectly to fit your pizzas and clouds. For efficiency and to ensure your eyes match, fold the nori sheet a few times before cutting.
Carefully place the nori faces onto the mozzarella clouds. A toothpick dipped in a little water can help adhere them. Give each cloud a nori Pi symbol to hold. Arrange the decorated clouds on top of your pizzas, and voilà – you’re ready to celebrate Pi Day, or any day that calls for a little fun and deliciousness!
Expert Tips & Tricks
Creating a beautiful and delicious pizza like this one is all about paying attention to the details. For perfectly uniform vegetable cutouts, ensure your vegetables are sliced to a consistent thickness before using the cookie cutters. If your dough is sticking, don’t be afraid to use a little extra flour on your hands and work surface. When par-baking the crust, keeping it on the lowest rack helps achieve that desirable crisp bottom. If you find your vegetables are browning too quickly during the final bake, you can loosely tent the pizzas with foil. For a deeper flavor in your sauce, you can let it simmer for a few extra minutes, stirring more frequently.
Serving & Storage Suggestions
Serve your Rainbow Pizza Pi immediately while the cheese is gooey and the crust is warm and crisp. These mini pizzas are perfect for individual servings, making them ideal for parties or family meals. Leftovers can be stored in an airtight container in the refrigerator for up to 2 days. To reheat, place the pizza slices on a baking sheet in a 350°F (175°C) oven for 5-7 minutes, or until warmed through and the cheese is melted again. Freezing is also an option; wrap individual pizzas tightly in plastic wrap and then in aluminum foil. They can be frozen for up to 1 month and reheated directly from frozen in a 375°F (190°C) oven for about 10-15 minutes.
Nutritional Information
| Nutrient | Amount per Serving | % Daily Value |
|---|---|---|
| Calories | 362.4 kcal | 18% |
| Total Fat | 15.2 g | 23% |
| Saturated Fat | 7.2 g | 35% |
| Cholesterol | 39.4 mg | 13% |
| Sodium | 858.9 mg | 35% |
| Total Carbohydrate | 42.3 g | 14% |
| Dietary Fiber | 7.2 g | 28% |
| Sugars | 10.8 g | 43% |
| Protein | 17.1 g | 34% |
Variations & Substitutions
This Rainbow Pizza Pi is wonderfully adaptable! For a gluten-free version, use your favorite gluten-free pizza dough. If you’re dairy-free, swap the mozzarella for a good quality dairy-free shredded mozzarella and use dairy-free cheese slices for the clouds. You can also get creative with your vegetable selection based on seasonality and availability. Broccoli florets, corn kernels, and chopped red cabbage can all add vibrant color and nutrition. For a spicier kick, increase the red pepper flakes in the sauce or add some sliced jalapeños to your topping selection.
FAQs
Q: Can I make the pizza sauce ahead of time?
A: Absolutely! The pizza sauce can be made a day or two in advance and stored in an airtight container in the refrigerator.
Q: What is the best way to cut the vegetable numbers evenly?
A: Ensure your vegetables are sliced to a uniform thickness before using the cookie cutters. A mandoline slicer can be helpful for consistent results.
Q: My oven doesn’t have a “lowest rack” setting. What should I do?
A: Position your oven racks as low as they can go and use a preheated pizza stone or baking sheet for a crispier crust.
Q: Can I make larger pizzas with this recipe?
A: Yes, you can divide the dough into fewer, larger sections. Adjust the baking times accordingly, keeping an eye on the crust and cheese.
Q: How do I get the nori to stick to the mozzarella clouds?
A: A tiny bit of water dabbed on the back of the nori with a toothpick is usually enough to help it adhere.
Final Thoughts
This Rainbow Pizza Pi is more than just a recipe; it’s an invitation to play in the kitchen and to celebrate the joy of food. It’s a dish that delights the senses, sparking conversation and bringing a unique sense of fun to any gathering. Whether you’re a math enthusiast, a creative cook, or simply someone who loves a delicious pizza, this recipe is sure to become a favorite. I encourage you to gather your loved ones, get your hands a little saucy, and create your own edible masterpiece. Share your creations, your variations, and your joyful moments – that’s what cooking is all about!