
Overnight Cake 1964: A Timeless Treasure from the Kitchen
There are recipes that whisper of tradition, and then there are those that sing. “Overnight Cake 1964” is one of the latter, a melody of comfort and simple elegance that has resonated through generations. I first encountered this cake not through a printed page, but through the warm, flour-dusted hands of my grandmother. She’d speak of it with a twinkle in her eye, a testament to its enduring appeal. The magic of letting the batter rest overnight, she’d explain, was akin to coaxing a shy secret out of humble ingredients, transforming them into something truly sublime. It’s the kind of cake that reminds you of cozy afternoons, a steaming cup of tea, and the quiet joy of a home filled with the scent of baking.
Recipe Overview
- Prep Time: 15 minutes
- Cook Time: 50 minutes (total, in stages)
- Total Time: 8 hours 50 minutes (includes overnight resting)
- Servings: 12-15
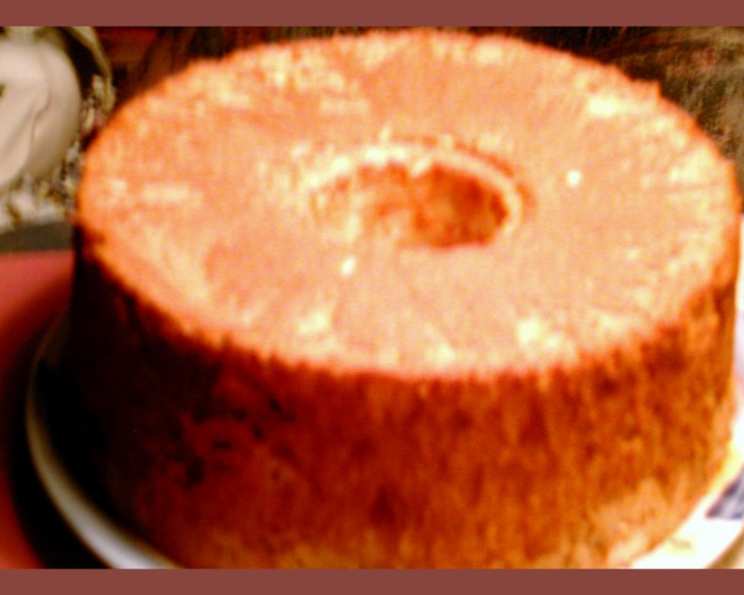
- Yield: 1 tube cake pan
- Dietary Type: Standard
Ingredients
This recipe relies on a few pantry staples, coming together with a delightful simplicity that belies its wonderful texture and flavor.
- 2 cups flour, sifted
- 2 cups granulated sugar, sifted
- 1/2 teaspoon salt
- 1 cup boiling water
- 2 teaspoons baking powder
- 2 teaspoons vanilla
- 1 teaspoon almond extract
- 1 cup egg white (approximately 8 large whites)
- 1 pinch salt
- 1 teaspoon cream of tartar
Equipment Needed
- Large mixing bowls (at least two)
- Sifter
- Whisk or electric mixer
- Rubber spatula
- Tube pan (preferably a two-part pan for easier removal)
- Oven
- Wire cooling rack
- Long skewer or toothpick for testing doneness
- Knife for releasing the cake from the pan
Instructions
The beauty of the “Overnight Cake 1964” lies in its two-stage process. The first stage, allowing the batter to rest, is where much of the magic happens.
- Early Preparation (The Night Before): In a large mixing bowl, thoroughly sift together the flour, granulated sugar, and salt. Ensure these dry ingredients are well combined.
- Adding the Boiling Water: Carefully add the boiling water to the sifted dry ingredients. Stir until the mixture is completely blended and smooth.
- The Overnight Rest: Cover the bowl tightly and leave the batter to rest at room temperature for at least 8 hours, or preferably overnight. This resting period allows the flour to hydrate fully, contributing to the cake’s unique texture.
- Preheating the Oven: When you are ready to bake the cake (later the same day or the next morning), preheat your oven to 250 degrees F (120 degrees C).
- Preparing the Egg Whites: In a separate, impeccably clean large bowl (for optimal whipping, you can wipe the bowl down with a bit of vinegar to ensure there are no residual oils), add the room temperature egg whites. Beat them until they become foamy.
- Stabilizing the Egg Whites: Add the pinch of salt and the cream of tartar to the foamy egg whites. Continue to beat until stiff peaks form. Be careful not to overbeat; the peaks should be firm but not dry.
- Revitalizing the Batter: While the egg whites are being whipped, return to your rested batter. Add the baking powder, almond extract, and vanilla extract. Stir these in well to ensure they are evenly distributed throughout the cold batter.
- Incorporating the Whites (First Fold): Gently fold a small portion of the whipped egg whites into the batter. This initial fold helps to lighten the batter, making it easier to incorporate the rest of the whites without deflating them.
- Incorporating the Whites (Final Fold): Now, carefully fold in all of the remaining egg whites into the batter. Work with a gentle hand, trying to fold them in thoroughly but without deflating the precious air you’ve incorporated. The goal is a light, airy batter.
- Pan Preparation: Pour the batter into an ungreased angel food tube pan. It’s crucial to use an ungreased pan for this type of cake, as the batter needs to cling to the sides to rise properly.
- Initial Bake: Place the filled tube pan into the preheated 250 degrees F (120 degrees C) oven on the medium center rack. Bake for 15 minutes.
- Increasing the Temperature (Stage 1): After 15 minutes, increase the oven temperature to 300 degrees F (150 degrees C). Do not open the oven door during this temperature change. Bake for an additional 20 minutes.
- Increasing the Temperature (Stage 2): After these 20 minutes, increase the oven temperature to 350 degrees F (175 degrees C). Again, do not open the oven door. Finish baking for another 15 minutes.
- Testing for Doneness: To check if the cake is completely cooked, test it with a long skewer or toothpick. Insert it into the thickest part of the cake; it should come out clean.
- Adjusting Heat if Necessary: If the skewer does not come out clean, reduce the heat to 325 degrees F (160 degrees C) and continue baking until the skewer tests done. The recipe notes that ovens vary, and while this has rarely been necessary, it’s a good precaution. Using a timer for each stage of temperature increase is highly recommended.
- Cooling the Cake: Once done, remove the cake from the oven and place it on a wire rack. Immediately turn the pan upside down to allow the cake to cool completely while inverted. This prevents the cake from collapsing.
- Releasing the Cake: After the cake has cooled completely, run a knife carefully around all the edges of the pan to loosen it. If using a two-piece tube pan, remove the bottom part of the pan first. Then, run the knife again under the bottom of the cake to release it entirely.
Expert Tips & Tricks
- The Power of Sifting: Don’t skip the sifting of the flour and sugar! This simple step aerates the dry ingredients, leading to a lighter cake texture and ensuring there are no lumps.
- Room Temperature Egg Whites: Ensure your egg whites are at room temperature before whipping. They will achieve greater volume and stability compared to cold egg whites. A quick trick to warm them up is to place them in a bowl set over warm (not boiling) water for a few minutes.
- The Importance of an Un-oiled Pan: The cake batter needs something to grip as it rises in the tube pan. Any oil or grease on the pan will prevent this, leading to a flatter cake.
- Gentle Folding: When incorporating the egg whites, think of it as “folding” rather than “stirring.” Use a spatula to cut down through the middle of the batter, sweep across the bottom, and bring the batter up and over the whites. Rotate the bowl as you go. The goal is to preserve as much air as possible.
- Oven Variations: As the recipe suggests, all ovens are different. Paying close attention to the skewer test and being prepared to adjust the temperature slightly is key to perfect results every time. Investing in an oven thermometer can also be very helpful.
- Flavor Boost: The recipe mentions increasing the almond and vanilla extracts. I find that a generous 1 ½ teaspoons of vanilla and 1 teaspoon of almond extract creates a beautifully balanced aroma and flavor profile that really sings. The combination is indeed a must!
Serving & Storage Suggestions
This “Overnight Cake 1964” is a remarkably versatile cake.
Serving: It’s delightful served simply on its own, perhaps with a dusting of powdered sugar. It also pairs beautifully with a cup of tea, a glass of cold milk, or a simple fruit sauce. Fresh berries or a dollop of lightly sweetened whipped cream also make excellent accompaniments.
Storage: Once completely cooled and removed from the pan, the cake can be stored at room temperature, well-covered, for up to 3 days. For longer storage, wrap it tightly in plastic wrap and then foil, and it can be kept in the refrigerator for up to a week, or frozen for up to 3 months. If frozen, thaw at room temperature before serving.
Nutritional Information
This is an estimated nutritional breakdown. Actual values may vary based on specific ingredients used.
| Nutrient | Amount per Serving | % Daily Value |
|---|---|---|
| Calories | 219.4 kcal | |
| Calories from Fat | 2 g | 1% |
| Total Fat | 0.2 g | 0% |
| Saturated Fat | 0 g | 0% |
| Cholesterol | 0 mg | 0% |
| Sodium | 205 mg | 8% |
| Total Carbohydrate | 49.8 g | 16% |
| Dietary Fiber | 0.6 g | 2% |
| Sugars | 33.6 g | 134% |
| Protein | 4.4 g | 8% |
Variations & Substitutions
While this recipe is a classic for a reason, a few playful tweaks can be made:
- Citrus Zest: For a bright, refreshing twist, add the zest of one lemon or orange to the dry ingredients before adding the boiling water.
- Spice it Up: A pinch of cinnamon or nutmeg can add warmth, especially if serving with fruit.
- Extract Alternatives: If almond extract isn’t your favorite, you could substitute it with an equal amount of orange extract for a different citrus note, or simply use more vanilla.
FAQs (Frequently Asked Questions)
Q: Why does the cake need to rest overnight?
A: The overnight rest allows the flour to fully hydrate, which significantly contributes to the cake’s moist texture and fine crumb.
Q: Can I use a standard round cake pan instead of a tube pan?
A: While you can try, a tube pan is highly recommended. The central tube allows for more even baking of this type of batter, and the ungreased sides are essential for the cake to rise properly.
Q: My egg whites didn’t whip up very well. What could be the reason?
A: Ensure your bowl and whisk are completely free of any grease or oil, as even a tiny amount can prevent egg whites from whipping to their full volume. Also, make sure your egg whites are at room temperature.
Q: The cake seems a bit dense. What might I have done wrong?
A: This can often happen if the egg whites were deflated during the folding process or if the oven temperature was too high at any stage, causing the cake to set too quickly before it could fully rise.
Q: How do I know if the cake is truly done?
A: The most reliable test is the skewer test. Insert a long skewer or toothpick into the thickest part of the cake. If it comes out clean, the cake is baked through.
Final Thoughts
The “Overnight Cake 1964” is more than just a recipe; it’s an invitation to slow down and savor the process. It’s a testament to the fact that sometimes, the most extraordinary results come from the simplest ingredients and a little bit of patience. I encourage you to embrace the overnight rest, to gently fold those whites, and to anticipate the delightful reward. Whether enjoyed with a quiet moment or shared with loved ones, this cake is sure to become a cherished part of your own culinary story. Happy baking!