
Oven-Fried Chicken: A Crispy, Lighter Take on a Classic
There are few things that evoke a sense of comfort and nostalgia quite like a plate of perfectly fried chicken. For me, it’s a scent that instantly transports me back to my grandmother’s kitchen, the air thick with the aroma of spices and the promise of a delicious meal. While I adore the traditional deep-fried version, sometimes life calls for a lighter touch without sacrificing that irresistible crunch. This oven-fried chicken recipe, born from a desire to capture that same satisfying texture with a fraction of the guilt, has become a cherished staple in my repertoire. It’s a testament to how thoughtful preparation can yield incredible results, proving that indulgence and mindful eating can indeed go hand-in-hand.
Recipe Overview
- Prep Time: 20 minutes
- Cook Time: 45-60 minutes
- Total Time: 1 hour 5 minutes – 1 hour 20 minutes
- Servings: 4-6
- Yield: 1 serving of chicken
- Dietary Type: Can be adapted to be dairy-free
Ingredients
This recipe, with its focus on creating a wonderfully crispy coating through oven-baking, requires a thoughtful assembly of ingredients. You’ll need:
- 1 1/3 cups cornflake crumbs (you can crush your own whole-grain cornflakes with a rolling pin for a rustic texture)
- 1/2 cup plus 2 tablespoons all-purpose flour
- 1/4 teaspoon salt
- 1/4 teaspoon cayenne pepper
- 1/4 cup fat-free buttermilk (or substitute with regular buttermilk or a dairy-free milk alternative mixed with a teaspoon of lemon juice or vinegar and allowed to sit for 5 minutes)
- 2 egg whites, lightly beaten
- 1 pound chicken, cut into serving pieces (such as thighs, drumsticks, or breasts cut in half)
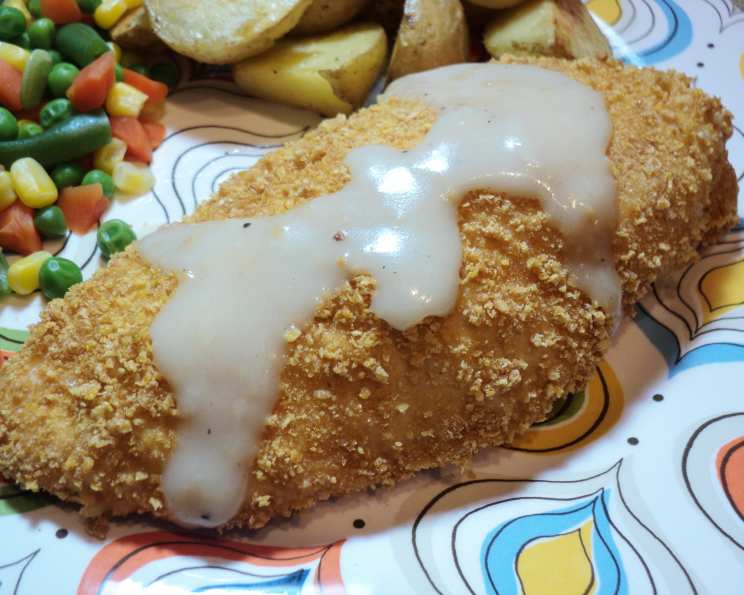
For the quick, pan-sauce gravy (optional, but recommended for an extra layer of flavor):
- 1 tablespoon butter
- 1 cup chicken broth
- 1/4 teaspoon dried sage
- 1/4 teaspoon black pepper
Equipment Needed
To achieve that perfect oven-fried finish, you’ll want a few essential pieces of equipment:
- A large baking pan (such as a 9×13 inch pan)
- Aluminum foil for lining the pan
- A wire cooling rack that fits inside the baking pan
- Cooking spray (like Pam)
- Three shallow dishes or pie plates for your dredging station
- A large bowl for tossing the chicken
- A saucepan for making the optional gravy
Instructions
Let’s get down to the delicious details. Follow these steps carefully to ensure your oven-fried chicken is golden, crispy, and utterly satisfying.
- Preheat Your Oven: Begin by preheating your oven to 375 degrees F (190 degrees C). This consistent temperature is crucial for achieving that even, golden-brown crust.
- Prepare Your Baking Station: Line a large baking pan with aluminum foil. This makes cleanup a breeze. Next, place a wire cooling rack directly on top of the foil-lined pan. This elevates the chicken, allowing air to circulate underneath, which is key for crispiness all around. Lightly spray the wire rack with cooking spray to prevent any sticking.
- Set Up the Dredging Trio: Arrange three shallow dishes or pie plates in a row.
- In the first dish, combine the 1/2 cup plus 2 tablespoons of all-purpose flour with the salt and cayenne pepper. Whisk them together to ensure the seasonings are evenly distributed.
- In the second dish, place the 2 lightly beaten egg whites.
- In the third dish, add the 1 1/3 cups of cornflake crumbs. If you’re crushing your own cornflakes, aim for a texture that’s fine enough to adhere well, but still offers a satisfying crunch.
- Season and Marinate the Chicken: Place the chicken pieces in a large bowl. Drizzle with the fat-free buttermilk, ensuring each piece is well coated. Toss to combine and let it sit for a few minutes to allow the buttermilk to work its magic, tenderizing the chicken and helping the coating adhere.
- The Art of Breading: Now, it’s time for the magic to happen. Working with one piece of chicken at a time:
- First, dip the buttermilk-coated chicken piece into the flour mixture, shaking off any excess.
- Next, dip it into the egg whites, letting any excess drip back into the dish.
- Finally, press the chicken piece firmly into the cornflake crumbs, ensuring the crumbs adhere all over. You want to create a good, even coating.
- Repeat this process for all the chicken pieces, ensuring each one is beautifully coated.
- Arrange and Bake: Carefully place the breaded chicken pieces onto the prepared wire cooling rack in the baking pan. Make sure there’s a little space between each piece to allow for proper air circulation and even cooking. Lightly spray the tops of the chicken with cooking spray. This final touch helps to enhance the crispiness and golden color.
- Bake to Perfection: Transfer the pan to the preheated oven. Bake for 45 to 60 minutes, or until the chicken is golden brown and cooked through. The exact time will depend on the size and type of chicken pieces you are using and your oven’s calibration. The internal temperature of the thickest part of the chicken should reach 165 degrees F (74 degrees C).
- Make the Gravy (Optional): While the chicken is baking, you can prepare the simple pan gravy. In a saucepan over medium-high heat, melt the 1 tablespoon of butter. Once melted, whisk in the remaining 2 tablespoons of flour. Cook, whisking constantly, for about 1 minute to cook out the raw flour taste. Gradually whisk in the 1 cup of chicken broth. Continue to cook, whisking, until the gravy comes to a boil and thickens, which should take about 2 to 5 minutes. Remove from heat and stir in the dried sage and black pepper.
Expert Tips & Tricks
- Crushing Your Own Cornflakes: While packaged cornflake crumbs are convenient, crushing your own allows you to control the texture. Use a rolling pin inside a sturdy bag or a food processor for a finer crumb. For a heartier texture, leave them a bit chunkier.
- Buttermilk Substitute: If you don’t have buttermilk on hand, a simple substitute can be made by mixing 1/4 cup of milk (dairy or non-dairy) with 1 teaspoon of white vinegar or lemon juice. Let it sit for 5-10 minutes until it slightly curdles.
- Even Coating is Key: The success of oven-fried chicken lies in the thoroughness of your breading. Ensure each piece is well-coated at each stage. This not only provides flavor but also creates that desirable crispy texture.
- Don’t Crowd the Pan: Resist the urge to overcrowd the baking pan. Leaving space between the chicken pieces is essential for air circulation, which is what helps the chicken crisp up in the oven. If necessary, use two baking pans.
- Internal Temperature is Your Friend: Rely on a meat thermometer to ensure your chicken is safely cooked. Overcooking can lead to dry chicken, so aim for that perfect 165°F (74°C) in the thickest part.
Serving & Storage Suggestions
This oven-fried chicken is best served hot, fresh from the oven, when its crust is at its peak crispiness. It pairs wonderfully with classic comfort food sides like creamy mashed potatoes, coleslaw, a fresh green salad, or steamed vegetables.
Leftovers can be stored in an airtight container in the refrigerator for 2-3 days. To reheat and regain some of that crispiness, place the chicken on a baking sheet in a 350°F (175°C) oven for about 10-15 minutes, or until heated through. Microwaving will tend to soften the coating, so oven reheating is highly recommended for the best texture.
Nutritional Information
| Nutrient | Amount per Serving | % Daily Value |
|---|---|---|
| Calories | 393 kcal | |
| Calories from Fat | 191 kcal | |
| Total Fat | 21.3 g | 32% |
| Saturated Fat | 6.9 g | 34% |
| Cholesterol | 92.7 mg | 30% |
| Sodium | 465 mg | 19% |
| Total Carbohydrate | 22.9 g | 7% |
| Dietary Fiber | 1.7 g | 6% |
| Sugars | 2.6 g | 10% |
| Protein | 27.5 g | 54% |
Note: Nutritional information is an estimate and can vary based on specific ingredients and portion sizes.
Variations & Substitutions
- Gluten-Free Option: For a gluten-free version, you can substitute the all-purpose flour with a gluten-free all-purpose baking flour blend. Ensure your cornflake crumbs are also certified gluten-free.
- Herbaceous Twist: Experiment with adding finely chopped fresh herbs like rosemary, thyme, or parsley to the flour mixture for an aromatic boost.
- Spicier Kick: If you enjoy more heat, increase the cayenne pepper, add a pinch of smoked paprika, or even some finely minced fresh jalapeño to the buttermilk marinade.
- Panko Power: For an extra-shatteringly crisp coating, consider using panko breadcrumbs in place of or in combination with the cornflake crumbs.
FAQs
Q: Why do I need to spray the chicken with cooking spray?
A: Spraying the chicken with cooking spray before baking helps to create a golden-brown, crispy exterior, mimicking the effect of frying oil.
Q: Can I use whole eggs instead of just egg whites for the breading?
A: While egg whites are typically used for their ability to create a lighter, crispier coating, you can use whole eggs. However, the texture might be slightly different and potentially less crisp.
Q: How can I make the coating extra crispy?
A: Ensure the chicken is well-coated at each stage of the breading process, use a wire rack for air circulation, and don’t overcrowd the pan. A final light spray of cooking spray also helps.
Q: What if I don’t have cornflakes?
A: You can use other finely crushed unsweetened breakfast cereals, panko breadcrumbs, or even regular breadcrumbs as a substitute for cornflake crumbs.
Q: Can I prepare the chicken ahead of time?
A: You can bread the chicken a few hours in advance and refrigerate it on a baking sheet. However, for the absolute best crispiness, it’s ideal to bake it fresh.
Final Thoughts
This oven-fried chicken recipe is a testament to the fact that you don’t need to compromise on flavor or texture to make a healthier choice. It’s a versatile dish that brings joy to any table, whether it’s a weeknight family dinner or a weekend gathering. I encourage you to give it a try, perhaps with a side of my quick pan gravy or your favorite comforting accompaniments. Share your creations and your own favorite twists – happy cooking!