
Oven Fried Chicken With Corn Flakes: A Crispy Classic, Reimagined
There’s a certain comfort that washes over me when I recall the first time I truly mastered oven-fried chicken. It wasn’t a fancy restaurant dish, nor a complex culinary experiment, but rather this surprisingly delightful recipe, a gem unearthed from the pages of Joy of Cooking. I remember the skepticism – corn flakes? For chicken? But the aroma that filled my kitchen, the shatteringly crisp exterior, and the juicy, tender meat within, all without the deep-fryer’s mess, was a revelation. It became a weeknight savior, a crowd-pleaser, and a testament to how simple ingredients, thoughtfully prepared, can create pure culinary magic.
Recipe Overview
- Prep Time: 20 minutes (allowing for skin removal and resting time)
- Cook Time: 45 to 60 minutes
- Total Time: 1 hour 5 minutes to 1 hour 20 minutes
- Servings: 4
- Yield: 1 platter of chicken pieces
- Dietary Type: Adaptable (can be made dairy-free by substituting milk)
Ingredients
This recipe is wonderfully straightforward, relying on pantry staples to achieve its signature crunch.
- 3 ½ pounds chicken parts (such as breasts, thighs, and drumsticks)
- Salt and black pepper, for seasoning
- 2 large eggs
- ¼ cup milk
- 2 ½ cups crushed corn flakes (about one 12-ounce box, crushed to fine crumbs)
- ½ teaspoon ground black pepper
- 2 teaspoons salt
- 2 tablespoons melted butter
Equipment Needed
Gathering your tools beforehand will ensure a smooth cooking process.
- Oven
- Baking sheet (a sturdy rimmed baking sheet is ideal)
- Wire cooling rack (optional, but recommended for even crisping)
- Small bowl or shallow dish (for the egg wash)
- Another shallow bowl or dish (for the cornflake mixture)
- Whisk
- Measuring cups and spoons
- Sharp knife (if trimming chicken)
- Paper towels
Instructions
Follow these steps carefully, and you’ll be rewarded with spectacularly crisp, flavorful oven-fried chicken.
-
Preheat and Prepare the Oven: Position an oven rack in the upper third of your oven. Preheat the oven to 350°F (175°C). This upper rack placement ensures that the chicken receives direct heat for optimal browning and crisping from above.
-
Prepare the Chicken: If you prefer, remove the skin from the chicken parts. This is a matter of personal preference; keeping the skin on will yield a richer flavor and even crispier result, while removing it offers a lighter option. Rinse the chicken pieces under cold water and then thoroughly pat them dry with paper towels. This drying step is crucial; moisture is the enemy of crispiness, so ensure each piece is as dry as possible.
-
Season the Chicken: Lightly season the chicken all over with salt and black pepper. Don’t be shy with the seasoning at this stage, as it will contribute significantly to the overall flavor profile.
-
Create the Egg Wash: In a large bowl, whisk together the eggs and the milk until well combined and frothy. This mixture will act as the binder for the cornflake coating.
-
Prepare the Cornflake Coating: In a separate shallow bowl or dish, combine the crushed corn flakes with the ½ teaspoon of ground black pepper and 2 teaspoons of salt. Stir these ingredients together thoroughly. Ensure the corn flakes are crushed to a fine, crumb-like consistency – this allows them to adhere better to the chicken and create a more uniform crust.
-
Coat the Chicken: Take each piece of chicken, dip it into the egg mixture, ensuring it is fully coated, and allow any excess to drip off. Then, transfer the egg-coated chicken to the corn flake mixture. Pat the corn flake mixture onto the chicken with your fingers, pressing gently to make sure the crumbs adhere well and create a thick, even coating. You want to ensure every surface is covered for maximum crispiness.
-
Advance Preparation (Optional): If you wish to get a head start, you can complete this coating step up to 3 hours in advance. Place the coated chicken pieces uncovered in the refrigerator. This allows the coating to adhere more firmly to the chicken, further enhancing the crispness during baking.
-
Arrange for Baking: Lightly oil a baking sheet. This will prevent the chicken from sticking. Arrange the coated chicken pieces on the greased baking sheet, ensuring they are not overcrowded. Overcrowding can lead to steaming rather than crisping, so give the chicken pieces some breathing room. Place the chicken skin-side up, if you have opted to leave the skin on.
-
Add Melted Butter: At this point, you can drizzle 2 to 3 tablespoons of melted butter over the chicken. This step is optional but highly recommended for an extra layer of richness and to further promote browning and a beautiful golden hue on the cornflake crust.
-
Bake to Perfection: Place the baking sheet in the preheated oven. Bake until the chicken is golden and crisp, which typically takes about 45 to 60 minutes. The exact baking time will depend on the size and type of chicken pieces you are using, as well as the efficiency of your oven. You can test for doneness by inserting a meat thermometer into the thickest part of a piece of chicken; it should register 165°F (74°C), and the juices should run clear.
-
Serve Immediately: Once the chicken is perfectly cooked and beautifully golden, serve it immediately. The crispiness is at its peak right out of the oven.
Expert Tips & Tricks
To elevate your oven-fried chicken experience even further, consider these professional insights:
- Corn Flake Consistency: For the ultimate crunch, ensure your corn flakes are crushed into fine crumbs. A food processor works wonderfully for this, but you can also place them in a sturdy plastic bag and crush them with a rolling pin. Avoid large flakes, which can burn unevenly.
- Double Coating: For an exceptionally robust crust, you can double-coat the chicken. After dipping in the egg wash and then the cornflake mixture, dip it back into the egg wash and then again into the cornflakes. This creates a thicker, more resilient coating.
- Wire Rack Advantage: If you have a wire rack that fits inside your baking sheet, placing the chicken on it elevates it from the pan. This allows air to circulate all around the chicken, ensuring even crisping on all sides and preventing the bottom from becoming soggy.
- Oven Hot Spots: If you notice your oven has hot spots, you may need to rotate the baking sheet halfway through the cooking time to ensure even browning.
Serving & Storage Suggestions
This oven-fried chicken is a star on its own, but it pairs beautifully with a variety of accompaniments.
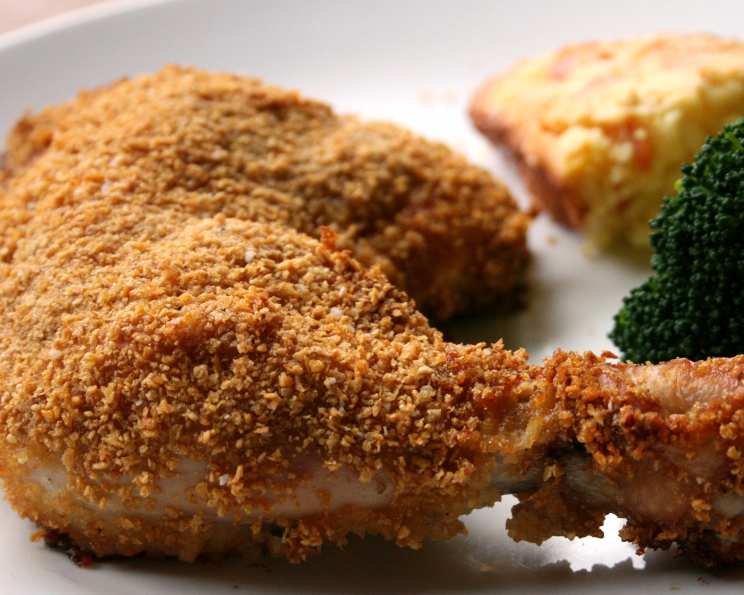
- Serving: Serve hot straight from the oven for the best crispy texture. It’s wonderful with classic sides like mashed potatoes, coleslaw, mac and cheese, or a fresh green salad. A dollop of your favorite hot sauce or a side of honey mustard for dipping is also a delightful addition.
- Storage: Leftovers can be stored in an airtight container in the refrigerator for up to 3 to 4 days. While it won’t retain its initial crispness, it’s still delicious. To reheat, place the chicken on a baking sheet in a 350°F (175°C) oven for about 10-15 minutes, or until heated through. This will help revive some of its crispiness. Freezing is not generally recommended for this dish, as the coating tends to become soggy upon thawing.
Nutritional Information
Here is an approximate nutritional breakdown for this recipe, based on typical ingredient values and standard serving sizes. Please note that these are estimates and can vary based on specific brands and portion control.
| Nutrient | Amount per Serving | % Daily Value |
|---|---|---|
| Calories | 997.9 kcal | |
| Calories from Fat | 508 kcal | |
| Total Fat | 56.5 g | 86% |
| Saturated Fat | 18.1 g | 90% |
| Cholesterol | 418.8 mg | 139% |
| Sodium | 1670.3 mg | 69% |
| Total Carbohydrate | 16.3 g | 5% |
| Dietary Fiber | 0.5 g | 2% |
| Sugars | 1.9 g | 7% |
| Protein | 100.6 g | 201% |
Variations & Substitutions
While this recipe is fantastic as is, feel free to explore these creative variations:
- Gluten-Free Crust: For a gluten-free option, substitute the corn flakes with gluten-free crushed cereal (like rice or almond-based options) or gluten-free breadcrumbs. Ensure all other ingredients are also certified gluten-free.
- Spicy Kick: Add a teaspoon or two of cayenne pepper or paprika to the cornflake mixture for a touch of heat.
- Herbaceous Notes: Incorporate dried herbs like thyme, rosemary, or parsley into the cornflake mixture for added complexity.
- Dairy-Free: If you need to make this dairy-free, simply substitute the milk in the egg wash with an unsweetened, unflavored non-dairy milk such as almond, soy, or oat milk.
FAQs
Q: Why is my oven-fried chicken not crispy?
A: Several factors can contribute to a lack of crispiness. Ensure the chicken was thoroughly patted dry before coating, that the corn flakes were finely crushed, and that the chicken pieces were not overcrowded on the baking sheet.
Q: Can I use chicken tenders or wings?
A: Absolutely! This recipe works wonderfully with chicken tenders and wings. Adjust the baking time accordingly, as smaller pieces will cook faster. Wings might be ready in as little as 30-40 minutes.
Q: Is it really necessary to remove the skin?
A: Removing the skin is optional. Keeping it on will contribute to a richer flavor and a crispier exterior due to its fat content. However, removing it offers a lighter, less fatty option that is still deliciously crispy.
Q: Can I use a different type of cereal for the coating?
A: While corn flakes are traditional and work exceptionally well, other plain, unsweetened cereals that can be crushed into crumbs might work. However, corn flakes provide a unique texture and flavor that is hard to replicate perfectly.
Q: How can I make the coating stick better?
A: Ensure the chicken is completely dry before dipping it in the egg wash. Press the cornflake mixture firmly onto the chicken with your fingers after dipping it in the egg wash. Allowing the coated chicken to rest uncovered in the refrigerator for a few hours before baking also helps the coating adhere more effectively.
Final Thoughts
This oven-fried chicken with corn flakes is a testament to the power of simple, accessible ingredients. It’s a dish that brings joy to the table without the fuss, offering a delightful balance of crunchy texture and tender, flavorful chicken. Don’t hesitate to experiment with the seasonings or serve it with your favorite sides. I encourage you to give this recipe a try; you might just find it becomes a cherished staple in your own culinary repertoire. It’s a dish that truly proves you don’t need a deep fryer to achieve that satisfyingly crispy, golden-brown perfection we all crave.