
Oven-Baked Crispy Chicken Tenders: A Golden Childhood Memory Reimagined
There are some flavors that just transport you back in time, to simpler days filled with scraped knees and the comforting aroma of home. For me, oven-baked crispy chicken tenders are one of those dishes. I remember vividly, on busy weeknights when the clock seemed to tick too fast, my mom would whip up a batch of these. The satisfying crunch as you bit into them, the hint of garlic and thyme, all coated in that perfectly seasoned cornflake crust – it was pure magic for a kid. Even as I’ve honed my culinary skills and explored more complex dishes, the pure, unadulterated joy of a well-made chicken tender remains a cherished memory and a reliable favorite.
Recipe Overview
- Prep Time: 15 minutes + 1 hour marinating time
- Cook Time: 15 minutes
- Total Time: 1 hour 30 minutes
- Servings: 4-5
- Yields: 12 chicken tenders
- Dietary Type: Not Specified
Ingredients
This recipe relies on a few pantry staples to create that irresistible crunch and savory flavor.
- 2 garlic cloves, smashed
- 1/4 teaspoon dried thyme
- 1 bay leaf
- 2 teaspoons salt
- 1/4 teaspoon red pepper flakes
- 1/2 cup fat-free buttermilk
- 1 lb chicken tenders (about 12)
- 1 1/2 cups corn flakes, crushed
- Nonstick cooking spray
Equipment Needed
You won’t need much in the way of fancy equipment for this straightforward recipe.
- Medium bowl
- Baking sheet
- Aluminum foil
- Plate
Instructions
The beauty of these chicken tenders lies in their simplicity. A short marinade infuses them with flavor, and a quick bake in a hot oven yields that sought-after crispiness without the mess of deep frying.
-
Preheat and Prepare: Begin by preheating your oven to 400 degrees Fahrenheit (200 degrees Celsius). Next, line a baking sheet with aluminum foil. This will make cleanup a breeze. Lightly spray the foil with nonstick cooking spray; this helps prevent the tenders from sticking and ensures a beautiful, even crust. Set this prepared baking sheet aside.
-
Marinate the Chicken: In a medium bowl, combine the smashed garlic cloves, dried thyme, bay leaf, salt, and red pepper flakes. Pour in the fat-free buttermilk and stir everything together to create your marinade. Add the chicken tenders to the bowl, ensuring each piece is coated in the marinade. Turn the chicken in the marinade to distribute it evenly. Cover the bowl and refrigerate for one hour. This marinating period is crucial for tenderizing the chicken and allowing the flavors to meld.
-
Coat the Tenders: While the chicken is marinating, place the crushed corn flakes onto a plate. Once the marinating time is complete, drain the chicken tenders, discarding the marinade. Now comes the fun part: pick up a chicken tender with one hand. Using your other hand, turn the tender in the cornflake coating, gently pressing additional coating onto the sides to ensure a thorough and even crust.
-
Arrange and Bake: Carefully place each coated chicken tender onto the prepared baking sheet. Ensure the tenders are arranged in a single layer, not overlapping, to promote even cooking and crisping. Repeat this coating process for all the chicken tenders.
-
Bake to Perfection: Once all the tenders are on the baking sheet, bake in the preheated oven for approximately 15 minutes. You’ll know they’re ready when they are firm to the touch and have achieved a beautiful golden-brown, crispy exterior.
Expert Tips & Tricks
To elevate your chicken tender game even further, consider these professional insights:
- Crushing Corn Flakes: For the crispiest coating, don’t just toss the corn flakes in a bag and hope for the best. For a finer, more adhered coating, pulse them in a food processor until they resemble coarse breadcrumbs, or place them in a sturdy zip-top bag and use a rolling pin to crush them. This ensures better adhesion to the chicken.
- Buttermilk Substitute: If you don’t have buttermilk on hand, you can create a quick substitute by adding 1 tablespoon of lemon juice or white vinegar to 1 cup of milk (dairy or non-dairy) and letting it sit for 5-10 minutes until it thickens slightly.
- Achieving Extra Crispiness: For an even crispier exterior, consider a double coating. After the initial cornflake coating, dip the tenders briefly back into a little more buttermilk (or an egg wash, if you prefer a different binder) and then back into the cornflakes.
- Even Baking: Make sure your oven temperature is accurate. Oven thermometers are invaluable kitchen tools for ensuring your bake times are spot on. If your oven tends to run hot or cool, adjust accordingly.
- Checking for Doneness: While the 15-minute mark is a good guideline, the best way to ensure chicken is cooked through is to check its internal temperature with an instant-read thermometer. The thickest part of the tender should reach 165 degrees Fahrenheit (74 degrees Celsius).
Serving & Storage Suggestions
These crispy chicken tenders are incredibly versatile and can be served in a multitude of ways.
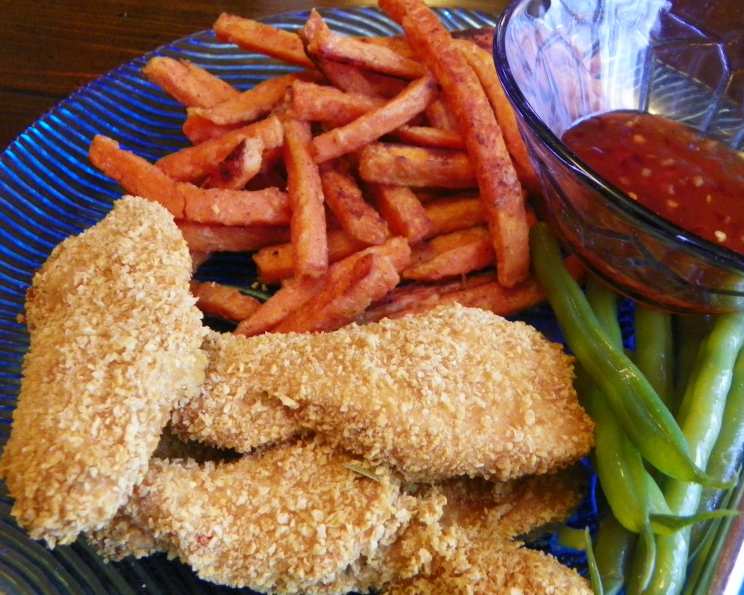
- Serving: They are fantastic served hot, straight from the oven, with a variety of dipping sauces. Classic choices include ketchup, barbecue sauce, honey mustard, or even a ranch dressing. For a more complete meal, pair them with french fries, coleslaw, a side salad, or steamed vegetables.
- Storage: Leftover chicken tenders can be stored in an airtight container in the refrigerator for 3-4 days. To reheat, the best method to preserve crispiness is to place them in a single layer on a baking sheet in a preheated oven at 350 degrees Fahrenheit (175 degrees Celsius) for about 8-10 minutes, or until heated through and re-crisped. Microwaving will make them soft and less appealing. They can also be frozen in a single layer on a baking sheet until firm, then transferred to a freezer-safe bag or container for up to 2-3 months. Reheat directly from frozen in the oven, adding a few extra minutes to the baking time.
Nutritional Information
Here’s an approximate nutritional breakdown for these delicious chicken tenders. Please note that these are estimates and can vary based on the specific brands and ingredients used.
| Nutrient | Amount per Serving | % Daily Value |
|---|---|---|
| Calories | 170.2 kcal | |
| Calories from Fat | 41.9 kcal | |
| Total Fat | 3 g | 4 % |
| Saturated Fat | 0.7 g | 3 % |
| Cholesterol | 72.6 mg | 24 % |
| Sodium | 1370.7 mg | 57 % |
| Total Carbohydrate | 9.8 g | 3 % |
| Dietary Fiber | 0.4 g | 1 % |
| Sugars | 1.1 g | 4 % |
| Protein | 24.9 g | 49 % |
Variations & Substitutions
While this recipe is a classic for a reason, feel free to experiment with these variations:
- Gluten-Free: For a gluten-free version, substitute the corn flakes with crushed gluten-free corn flakes, rice cereal, or even almond flour mixed with nutritional yeast for a cheesy flavor. Ensure your buttermilk is also gluten-free if necessary.
- Spicy Kick: Amp up the heat by increasing the red pepper flakes or adding a pinch of cayenne pepper to the marinade or cornflake coating.
- Herbal Infusion: Experiment with other dried herbs like oregano, basil, or rosemary in the marinade for a different flavor profile. Fresh herbs can also be finely chopped and added.
- Parmesan Crust: For a savory twist, add about 1/4 cup of finely grated Parmesan cheese to the crushed corn flakes.
- Different Binders: While buttermilk is traditional, you can also use egg wash (1 egg beaten with 1 tablespoon of water) or yogurt as the binder for the cornflake coating.
FAQs
Q: Can I make these chicken tenders ahead of time?
A: You can marinate the chicken up to 24 hours in advance, but it’s best to coat and bake them just before serving for optimal crispiness.
Q: My chicken tenders aren’t very crispy, what did I do wrong?
A: Ensure your oven is properly preheated, the tenders are in a single layer on the baking sheet, and that you haven’t overcrowded the pan. Overcrowding can lead to steaming rather than crisping.
Q: Can I use regular milk instead of buttermilk?
A: While not ideal, you can create a buttermilk substitute by adding 1 tablespoon of lemon juice or vinegar to 1 cup of regular milk and letting it sit for 5-10 minutes.
Q: How do I prevent the cornflakes from falling off?
A: Press the cornflakes firmly onto the chicken tenders after dipping them in the marinade. Using a binder like buttermilk or egg wash helps them adhere better.
Q: Is it safe to eat chicken tenders that are slightly pink inside?
A: No, chicken must be cooked to an internal temperature of 165 degrees Fahrenheit (74 degrees Celsius) to be safe for consumption. Always check with a meat thermometer if unsure.
Final Thoughts
These oven-baked crispy chicken tenders are a testament to the fact that sometimes, the most beloved dishes are also the simplest. They’re a fantastic option for a weeknight dinner that even the pickiest eaters will adore, and they make for a crowd-pleasing appetizer at any gathering. The satisfying crunch, the tender chicken, and the simple, savory flavors are sure to bring a smile to your face, just as they do mine. So gather your ingredients, get your oven preheated, and prepare for a truly delightful culinary experience. Don’t forget to share your creations and any favorite dipping sauce pairings – I’d love to hear how they turn out!