
Oven Baked Cobb of Corn: A Summer’s Sweet Symphony
The memory of summer holidays spent at my grandmother’s lake house is intrinsically tied to the scent of grilling and the bounty of fresh produce. Among the many delights, one stood out for its utter simplicity and profound flavor: corn, served simply, but with a technique that coaxed out every drop of its inherent sweetness. This oven-baked method, leaving the corn cradled in its natural husk, was a revelation – a way to achieve a perfectly tender, succulent ear of corn, infused with the subtle, earthy aroma of its own packaging, that still feels like a special occasion every time I prepare it.
Recipe Overview
- Prep Time: 5 minutes
- Cook Time: 35-40 minutes
- Total Time: 40-45 minutes
- Servings: 6
- Yield: 6 ears of corn
- Dietary Type: Vegetarian, Gluten-Free
Ingredients
- 6 ears of fresh corn
Equipment Needed
- Baking dish
- Oven
Instructions
The beauty of this preparation lies in its unfussy nature. It’s a method designed to highlight the pure essence of the corn itself, with minimal intervention.
- Prepare the Corn: Begin by ensuring your ears of corn are as fresh as possible. Do not remove the husk at this stage. The husk acts as a natural steaming vessel, locking in moisture and imparting a subtle, rustic flavor.
- Wet the Corn: This is a crucial step for optimal results. Thoroughly wet down each ear of corn. You can do this under a running faucet, ensuring water saturates both the kernels and the husk. Alternatively, you can briefly soak the entire ears in a large basin of water. The moisture within the husk is essential for creating steam during the baking process.
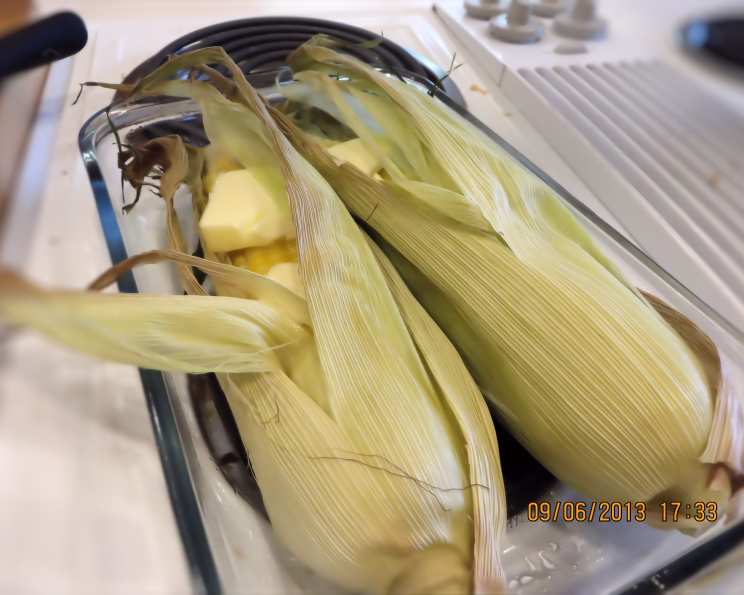
- Arrange in Baking Dish: Place the wet corn, still in their husks, directly into a baking dish. You can arrange them snugly, as they will shrink slightly during cooking.
- Bake: Preheat your oven to 350 degrees Fahrenheit (175 degrees Celsius). Carefully place the baking dish with the corn into the preheated oven. Bake for 35 to 40 minutes. The exact time will depend on the size and freshness of your corn, and your oven’s calibration.
- Butter and Finish: Once the baking time is complete, carefully remove the baking dish from the oven. Using oven mitts, carefully pull back the husks from each ear of corn. Be mindful of the steam that will escape. As you peel back the husks, immediately add butter to the exposed kernels.
- Melt the Butter: Once the butter has been added, peel the husks back over the buttered corn, effectively re-enclosing them. Return the corn to the oven for a few minutes more, just long enough for the butter to melt and thoroughly infuse into the kernels. This short second bake ensures every kernel is glistening and richly flavored.
- Serve: Serve hot. This corn is best enjoyed immediately, allowing you to savor the peak of its sweetness and the delightful texture.
Expert Tips & Tricks
This method is inherently simple, but a few culinary nudges can elevate it further.
- Corn Quality is Key: Since there are so few ingredients, the quality of your corn is paramount. Look for ears with bright green, tightly wrapped husks and silky, brown tassels. Avoid ears with dry or browning husks.
- Don’t Overbake: While the recipe specifies a time range, keep an eye on your corn. You want it tender, not mushy. The kernels should be plump and slightly yielding when squeezed gently.
- Butter Distribution: For maximum flavor, consider cutting small slits in the butter sticks before placing them on the corn. This allows the butter to melt and spread more evenly. Alternatively, you can melt the butter in a small saucepan and then brush it over the kernels after peeling back the husks.
- Husk as a Serving Vessel: The husks, once peeled back, can serve as natural holders for your buttered corn, keeping your fingers clean and adding to the rustic charm of the presentation.
Serving & Storage Suggestions
This Oven Baked Cobb of Corn is a quintessential summer side dish, perfect for barbecues, picnics, or a casual family meal.
- Serving: Serve the corn hot, directly from the oven. It pairs wonderfully with grilled meats, fish, or as a vibrant addition to a summer salad. A sprinkle of fresh chives or a dash of smoked paprika can add an extra layer of flavor.
- Storage: Due to its high moisture content and the fresh nature of the ingredient, this corn is best enjoyed immediately. If you happen to have leftovers, allow them to cool completely. Store them in an airtight container in the refrigerator for no more than 1-2 days. Reheat gently in the oven or microwave, being careful not to overcook.
Nutritional Information
(Note: Nutritional information can vary significantly based on corn variety, size, and amount of butter used.)
| Nutrient | Amount per Serving (approx.) | % Daily Value (approx.) |
|---|---|---|
| Calories | 249 kcal | 12% |
| Total Fat | 17.1 g | 22% |
| Saturated Fat | 9.9 g | 50% |
| Cholesterol | 40.7 mg | 14% |
| Sodium | 136.2 mg | 6% |
| Total Carbohydrate | 24.8 g | 9% |
| Dietary Fiber | 2.8 g | 10% |
| Sugars | 5.4 g | 11% |
| Protein | 4.2 g | 8% |
Variations & Substitutions
While the classic preparation is undeniably delicious, feel free to experiment.
- Spicy Kick: For a hint of heat, add a pinch of cayenne pepper or a finely minced jalapeño to the butter before melting.
- Herbaceous Notes: Infuse your melted butter with fresh herbs like rosemary, thyme, or cilantro before brushing it onto the corn.
- Cheesy Delight: After peeling back the husks and adding butter, sprinkle a bit of grated Parmesan or a crumbly cotija cheese over the kernels before the final short bake.
- Garlic Lover’s Dream: Add a clove or two of minced garlic to the melting butter for an extra aromatic punch.
FAQs
Q: Why is it important to wet the corn before baking?
A: Wetting the corn husk creates steam during the baking process, which helps to cook the corn gently and keep it incredibly moist and tender.
Q: Can I use frozen corn for this recipe?
A: This method is specifically designed for fresh corn on the cob, as the husk plays a vital role in the cooking process. Frozen corn will not yield the same results.
Q: What if I don’t have a baking dish?
A: You can place the corn directly on an oven-safe baking sheet, lined with parchment paper for easier cleanup, ensuring the husks don’t dry out too quickly.
Q: How do I know when the corn is cooked?
A: The kernels should appear plump and slightly translucent. You can test for doneness by carefully pulling back a small section of the husk and gently pricking a kernel with a fork; it should be tender.
Q: Can I prepare the corn ahead of time?
A: While best served fresh, you can wet and husk the corn a few hours in advance and keep it refrigerated. However, the butter addition and final melting step should be done just before serving for optimal flavor and texture.
Final Thoughts
This Oven Baked Cobb of Corn is more than just a recipe; it’s an invitation to slow down and savor the simple pleasures of the season. It’s a testament to how the most humble ingredients, treated with care and respect, can deliver unparalleled flavor. I encourage you to gather some beautiful ears of corn, embrace the unadorned approach, and experience this sweet, tender delight for yourself. Serve it alongside your favorite grilled fare, perhaps a juicy steak or some perfectly seared salmon, and enjoy a true taste of summer. Let me know how you make it your own!