
Oven-Baked, Best Ever, Juiciest Chicken
There are some dishes that etch themselves into your memory, not just for their taste, but for the feeling they evoke. For me, this chicken recipe is one of them. It reminds me of crisp autumn evenings, the kind where the air smells faintly of woodsmoke and fallen leaves, and a comforting meal is the absolute highlight of the day. My grandmother, a woman whose kitchen was a haven of warmth and delicious aromas, would often make a version of this, the resulting chicken so tender and flavorful it felt like a culinary miracle every single time. The aroma alone was enough to draw the whole family in, and the first bite? Pure, unadulterated joy.
This recipe is a refined take on a classic that originates from Clarks Outpost in Tioga, Texas. It’s a method that prioritizes moisture and deep flavor development, transforming ordinary chicken into something truly spectacular. The secret lies in a patient marination process that infuses every fiber of the meat with a delightful brine and subtle sweetness, setting the stage for an incredibly juicy outcome. While it requires a bit of foresight – starting the day before is highly recommended – the results are unequivocally worth the anticipation. Every single person who has tried this chicken has raved about it, and I’m confident you will too.
Recipe Overview
- Prep Time: 15 minutes, plus overnight marination
- Cook Time: 2 hours
- Total Time: 2 hours 15 minutes, plus overnight marination
- Servings: 8
- Yield: Entire chickens
- Dietary Type: Gluten-Free, Dairy-Free
Ingredients
This recipe calls for a few key components that work in harmony to create that exceptional flavor and texture.
For the Brine:
- 10 cups cold water
- 2 cups golden brown sugar, packed
- 1 tablespoon coarse salt (sea salt is excellent here)
For the Chicken:
- 2 roasting chickens, approximately 3.5 to 4 pounds each, halved lengthwise
- 1 cup barbecue sauce
For the Dry Seasoning Rub:
- 3 tablespoons fresh coarse ground black pepper
- 3 tablespoons dark brown sugar
- 3 tablespoons paprika
- 2 tablespoons salt
- 1 teaspoon cayenne pepper
Equipment Needed
- Large roasting pan or stock pot (big enough to hold the chicken and brine)
- Plastic wrap or a lid for the roasting pan/stock pot
- Heavy-duty large baking sheet with a rim
- Aluminum foil (preferably release foil)
- Pastry brush or silicone brush
- Basting spoon or ladle
Instructions
The magic of this chicken lies in a two-step process: a transformative brine and a carefully executed bake. Follow these steps precisely for the juiciest, most flavorful chicken you’ve ever had.
-
Prepare the Brine: In a large roasting pan or stock pot, combine the 10 cups of cold water, 2 cups of golden brown sugar, and 1 tablespoon of coarse salt. Stir until the sugar and salt are mostly dissolved.
-
Brine the Chicken: Place the chicken halves, skin side down, into the water mixture. If the chicken is not fully submerged, add more cold water as needed to ensure it is covered.
-
Refrigerate Overnight: Cover the roasting pan or stock pot securely with plastic wrap or a lid. Refrigerate the chicken in the brine overnight. This is a crucial step for infusing flavor and ensuring moisture.
-
Preheat the Oven: On the day you plan to cook, preheat your oven to 300 degrees Fahrenheit (150 degrees Celsius).
-
Drain and Dry: Carefully remove the chicken from the brine. Drain the chicken thoroughly and pat it completely dry with paper towels. This step is essential for achieving crispy skin.
-
Prepare the Baking Sheet: Line a heavy-duty large baking sheet with a rim with aluminum foil. It’s recommended to use release foil if you have it, as it makes cleanup a breeze and prevents sticking.
-
Arrange the Chicken: Place the chicken halves skin side down in a single layer on the prepared baking sheet.
-
Apply Barbecue Sauce and Rub (First Side): Using a pastry brush, brush each chicken half with approximately 2 tablespoons of barbecue sauce. Then, sprinkle each half evenly with about 1-1/4 teaspoons of the Dry Seasoning Rub.
-
Flip and Repeat: Carefully turn the chicken halves over so they are skin side up. Brush them again with 2 tablespoons of barbecue sauce and sprinkle them with another 1-1/4 teaspoons of the Dry Seasoning Rub, just as you did on the first side.
-
Bake and Baste: Place the baking sheet with the chicken into the preheated oven. Bake the chicken skin sides up for approximately 2 hours. Basting every 20 minutes with the pan juices is VERY IMPORTANT for maintaining moisture and developing a rich glaze. Continue this process until the chicken is cooked through.
-
Adjust for Chicken Parts or Convection Ovens: If you are using chicken parts such as breasts, thighs, or drumsticks, you will need to reduce the cooking time. Aim for roughly 1 hour and 30 minutes. For even quicker cooking, if you are using a convection oven, you may need to reduce the cooking time even more. Always check for doneness.
Expert Tips & Tricks
- Dry Brining Potential: While this recipe utilizes a wet brine for its deep penetration, for an even crispier skin, you can lightly salt the chicken after patting it dry from the brine and let it air dry in the refrigerator for a few hours before proceeding with the recipe.
- The Right Barbecue Sauce: Choose a barbecue sauce you genuinely enjoy. Its flavor will be concentrated during the baking process. A thicker sauce tends to cling better.
- Rub Consistency: Ensure your Dry Seasoning Rub is well-mixed. The coarse ground black pepper provides lovely texture and pops of flavor.
- Basting is Key: Don’t skip the basting! Those pan juices, enriched by the barbecue sauce and rub, are liquid gold. They keep the chicken incredibly moist and add layers of flavor.
- Checking for Doneness: The most reliable way to check if your chicken is cooked is by using an instant-read meat thermometer. Insert it into the thickest part of the thigh, avoiding the bone. The internal temperature should reach 165 degrees Fahrenheit (74 degrees Celsius). The juices should also run clear when pierced with a fork.
Serving & Storage Suggestions
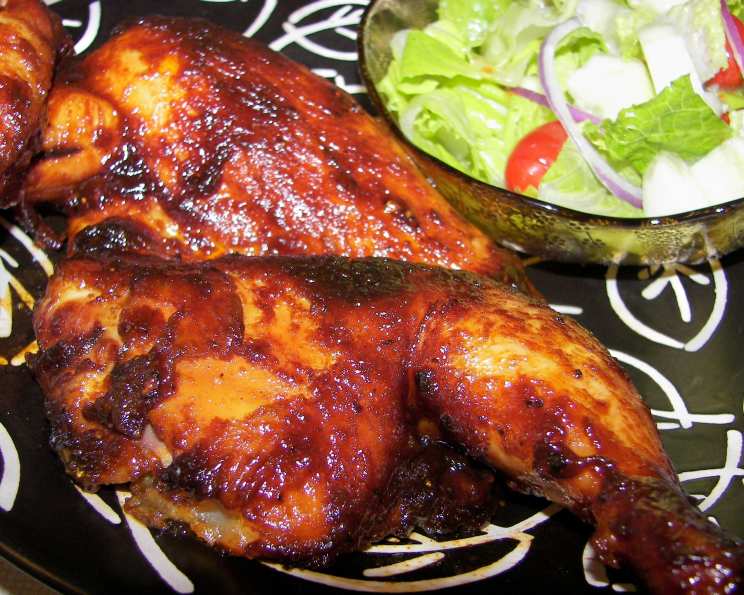
This juicy chicken is a showstopper on its own, but it pairs beautifully with a variety of sides. Serve it hot, allowing guests to admire the glistening, flavorful skin. It’s fantastic alongside classic barbecue accompaniments like creamy coleslaw, baked beans, corn on the cob, or a fresh green salad. For a more elegant presentation, consider a drizzle of extra warmed barbecue sauce or a sprinkle of fresh parsley.
Leftovers can be stored in an airtight container in the refrigerator for up to 3-4 days. To reheat, the best method is to gently warm it in a covered baking dish in a 300°F (150°C) oven with a splash of chicken broth or water to help retain moisture. Avoid microwaving if possible, as it can sometimes make the chicken a bit rubbery.
Nutritional Information
Please note that nutritional information is an estimate and can vary based on the specific ingredients used, including the type of barbecue sauce and the fat content of the chicken.
| Nutrient | Amount per Serving | % Daily Value |
|---|---|---|
| Calories | 772.5 kcal | |
| Calories from Fat | 370 g | 48 % |
| Total Fat | 41.2 g | 63 % |
| Saturated Fat | 11.7 g | 58 % |
| Cholesterol | 187.2 mg | 62 % |
| Sodium | 3078 mg | 128 % |
| Total Carbohydrate | 55.1 g | 18 % |
| Dietary Fiber | 1.8 g | 7 % |
| Sugars | 48.6 g | 194 % |
| Protein | 44.6 g | 89 % |
Variations & Substitutions
- Spice Level: For a milder rub, reduce or omit the cayenne pepper. For a spicier kick, increase the cayenne pepper or add a pinch of chili powder to the rub.
- Barbecue Sauce Choice: Experiment with different barbecue sauce flavors – a smoky mesquite, a sweet and tangy Carolina-style, or even a spicy chipotle can add a unique twist.
- Herbaceous Notes: While not traditional to this specific recipe, you could add dried rosemary or thyme to the Dry Seasoning Rub for a subtle herbal undertone.
- Honey Glaze: For an extra sticky and sweet glaze, consider mixing a few tablespoons of honey into your barbecue sauce during the final basting stages.
FAQs
Q: Why is it important to marinate the chicken overnight?
A: The overnight marination in the salt and sugar solution helps to tenderize the chicken and infuse it with moisture and subtle flavor, ensuring a juicier final product.
Q: Can I use boneless, skinless chicken parts?
A: Yes, but as the recipe notes, you will need to significantly reduce the cooking time. Boneless, skinless chicken cooks much faster and may not benefit as much from the full marination time, so monitor closely to avoid overcooking.
Q: What if I don’t have a rimmed baking sheet?
A: If you don’t have a rimmed baking sheet, you can use a standard baking sheet and place it inside a larger roasting pan or a foil-lined baking dish to catch any drippings.
Q: How do I know if the chicken is fully cooked?
A: The best method is to use an instant-read thermometer. The internal temperature in the thickest part of the thigh should reach 165°F (74°C). Visually, the juices should run clear when pierced.
Q: Can I make the Dry Seasoning Rub ahead of time?
A: Absolutely! The Dry Seasoning Rub can be mixed in a larger batch and stored in an airtight container at room temperature for several weeks.
Final Thoughts
This Oven-Baked, Best Ever, Juiciest Chicken is more than just a recipe; it’s an experience. It’s the kind of dish that brings people together, sparks conversation, and leaves everyone asking for seconds. Don’t be intimidated by the overnight marination – it’s the key to unlocking its incredible potential. So, gather your ingredients, embrace the patient approach, and prepare to impress yourself and your loved ones with a chicken that truly lives up to its name. Serve it with your favorite sides and a good glass of iced tea, and savor every succulent bite. I’d love to hear how yours turns out!