
The Irresistible Oreo Delight: A Symphony of Chocolate and Cream
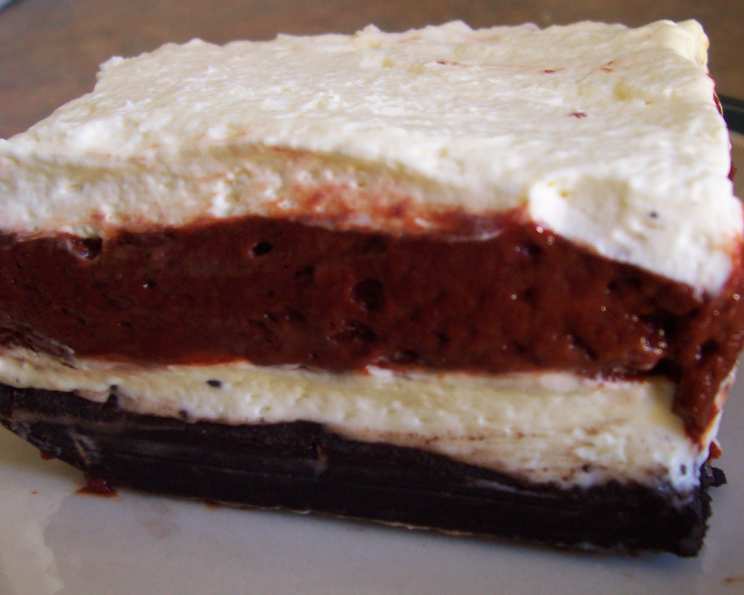
There are certain desserts that evoke immediate joy, a comforting hug in edible form. For me, that dessert is often a decadent, multi-layered creation, and the Oreo Delight holds a special place in that pantheon. I remember the first time I encountered this masterpiece; it was at a potluck, and amidst a sea of familiar treats, this chocolate-studded marvel stood out, a beacon of pure indulgence. The simple yet profound magic of crushed Oreos transformed into a luscious base, layered with a creamy, dream-like filling, and crowned with a cloud of whipped topping, is something that truly captures the essence of comfort food. It’s a dessert that doesn’t pretend to be overly complex; it simply aims to delight, and it succeeds with flying colors.
Recipe Overview
- Prep Time: 15 minutes
- Cook Time: None (Chilling time required)
- Total Time: 4 hours 15 minutes (including chilling)
- Servings: 24
- Yield: 1 (13×9 inch) dessert
- Dietary Type: Vegetarian
Ingredients
This recipe is a testament to the power of simple, accessible ingredients coming together to create something truly spectacular. The star, of course, is the beloved Oreo cookie, its chocolatey crunch forming the foundation of our delight.
For the Crust:
- 35 Oreo cookies, finely crushed
- 6 tablespoons butter or 6 tablespoons margarine, melted
For the Cream Cheese Layer:
- 1 (8 ounce) package cream cheese, softened
- 1/4 cup sugar
- 2 tablespoons cold milk
- 1 (12 ounce) container whipped cream, thawed
For the Pudding Layer:
- 3 1/4 cups cold milk
- 2 (3.5 ounce) packages chocolate instant pudding
For the Topping:
- The remaining whipped cream from the 12-ounce container (approximately 1.5 cups)
- Your choice of crushed candy, chopped chocolate, or extra crushed Oreos for garnish (optional)
Equipment Needed
To bring this Oreo Delight to life, you’ll need a few essential kitchen tools:
- A 13×9 inch baking dish for assembling the dessert.
- A medium bowl for preparing the crust.
- A medium bowl for beating the cream cheese mixture.
- A large bowl for preparing the pudding.
- A wire whisk for blending the cream cheese mixture and for beating the pudding.
- A spatula for spreading layers evenly.
- A measuring cup and measuring spoons.
- A food processor or a sturdy bag and rolling pin for crushing the cookies (if not using pre-crushed crumbs).
- A refrigerator for chilling the dessert to perfection.
Instructions
The assembly of this Oreo Delight is straightforward, making it an ideal dessert for both novice bakers and seasoned chefs alike. Each step builds upon the last, creating a harmonious blend of textures and flavors.
- Begin by preparing the crust. In a medium bowl, combine the 35 finely crushed Oreo cookies with the 6 tablespoons of melted butter or margarine. Stir until the cookie crumbs are evenly moistened.
- Press this mixture firmly onto the bottom of your 13×9 inch baking dish. Ensure an even layer, creating a sturdy foundation for the layers to come.
- Place the prepared crust in the refrigerator for 10 minutes to allow it to set while you prepare the next layer.
- In a separate medium bowl, beat together the softened cream cheese, 1/4 cup of sugar, and 2 tablespoons of cold milk using a wire whisk. Continue beating until the mixture is well-blended and smooth.
- Gently stir in 1 1/4 cups of the thawed whipped cream into the cream cheese mixture until just combined. Be careful not to overmix.
- Spread this cream cheese mixture evenly over the chilled crust.
- Now, it’s time to prepare the luscious chocolate pudding layer. In a large bowl, pour in 3 1/4 cups of cold milk.
- Add the 2 (3.5 ounce) packages of chocolate instant pudding to the milk. Beat with a wire whisk for 2 minutes, or until the pudding begins to thicken.
- Carefully pour the thickened pudding over the cream cheese layer, spreading it gently to cover the entire surface.
- Let the dessert stand for 5 minutes or until the pudding has visibly thickened further. This brief resting period is crucial for achieving the perfect pudding consistency.
- Using the remaining thawed whipped cream (approximately 1.5 cups), drop spoonfuls over the thickened pudding layer, spreading it to cover the pudding completely. This creates a beautiful, cloud-like topping.
- For an extra touch of indulgence, top with your choice of crushed candy, chopped chocolate, or additional crushed Oreos, if desired.
- Finally, refrigerate the Oreo Delight for at least 4 hours before serving. This extended chilling time is essential for all the layers to meld together and set properly, ensuring a delightful texture and flavor experience.
Expert Tips & Tricks
As a chef, I’m always looking for ways to elevate even the simplest of recipes. For this Oreo Delight, a few key insights can make a world of difference:
- Perfectly Crushed Cookies: For the smoothest crust, I prefer to pulse my Oreo cookies in a food processor until they resemble fine sand. If you don’t have a food processor, placing the cookies in a sturdy zip-top bag and crushing them with a rolling pin works just as well. The goal is a fine, even crumb.
- Softened Cream Cheese is Key: Ensure your cream cheese is truly softened to room temperature. Cold cream cheese will lead to a lumpy filling, and no one wants that in their dessert! A quick way to soften it is to remove the foil wrapper and microwave it on 50% power for about 15-20 seconds.
- Thawed Whipped Cream for Structure: Using thawed whipped cream, rather than freshly whipped, helps maintain the structure of the filling and topping. Be sure it’s fully thawed but not melted; a slightly slushy consistency is ideal.
- Instant Pudding Perfection: Follow the package directions for the instant pudding precisely. Over-mixing can sometimes lead to a gummy texture, while under-mixing can result in a pudding that doesn’t set properly. Two minutes of vigorous whisking is usually the sweet spot.
- Chilling is Crucial: Don’t rush the chilling process! The 4-hour minimum is there for a reason. It allows the flavors to meld and the dessert to firm up, making it easy to slice and serve. For an even better texture, I often prepare it the day before.
Serving & Storage Suggestions
This Oreo Delight is a showstopper on its own, but a few touches can make it even more impressive. Serve it chilled, directly from the refrigerator. A clean slice is best achieved with a sharp knife that has been dipped in hot water and wiped dry between cuts.
Leftovers can be stored in the refrigerator, covered tightly with plastic wrap or in an airtight container, for 3 to 4 days. The texture might soften slightly over time, but the flavor will remain delicious. This dessert is best enjoyed cold, so there’s no need to reheat it.
Nutritional Information
While this dessert is a celebration of pure indulgence, understanding its nutritional profile can be helpful. The following table provides estimated nutritional information per serving. Please note that these are approximations and can vary based on the specific brands of ingredients used.
| Nutrient | Amount per Serving | % Daily Value |
|---|---|---|
| Calories | 195.2 kcal | |
| Calories from Fat | ||
| Total Fat | 11 g | 16% |
| Saturated Fat | 5.7 g | 28% |
| Cholesterol | 25.1 mg | 8% |
| Sodium | 257.5 mg | 10% |
| Total Carbohydrate | 22 g | 7% |
| Dietary Fiber | 0.7 g | 2% |
| Sugars | 12.5 g | 50% |
| Protein | 2.9 g | 5% |
Variations & Substitutions
The beauty of the Oreo Delight lies in its adaptability. While the classic chocolate version is undeniably divine, don’t hesitate to experiment!
- Crust Variations: For a gluten-free option, try using gluten-free chocolate sandwich cookies for the crust. You could also experiment with a graham cracker crust or even a crumbled shortbread crust for a different flavor profile.
- Pudding Flavors: While chocolate is classic, other instant pudding flavors work wonderfully. Consider vanilla, French vanilla, or even cheesecake-flavored instant pudding for a twist.
- Cream Cheese Layer Additions: A touch of vanilla extract (1/2 teaspoon) can enhance the cream cheese layer. Some people also like to fold in mini chocolate chips or even some finely chopped strawberries for added flavor and texture.
- Topping Creativity: Beyond crushed Oreos or candy, consider a drizzle of hot fudge sauce, a dusting of cocoa powder, or fresh berries for a vibrant and fresh contrast.
FAQs
Q: Can I make this Oreo Delight ahead of time?
A: Absolutely! This dessert actually benefits from being made ahead, as the chilling time allows the flavors to meld beautifully. It’s best prepared the day before you plan to serve it.
Q: How do I get clean slices of the Oreo Delight?
A: For the cleanest slices, use a sharp knife that has been dipped in hot water and wiped dry between each cut. This will prevent the layers from sticking and smearing.
Q: What’s the best way to store leftovers?
A: Leftovers should be stored in the refrigerator, tightly covered with plastic wrap or in an airtight container, for up to 3-4 days.
Q: Can I use homemade pudding instead of instant?
A: While you could adapt the recipe with homemade pudding, it would significantly change the texture and the cooking process. Instant pudding is specifically chosen for its quick setting properties and smooth texture in this recipe.
Q: How do I ensure the cream cheese layer is smooth and not lumpy?
A: Make sure your cream cheese is fully softened to room temperature before you begin beating it. Cold cream cheese will not incorporate smoothly with the other ingredients.
Final Thoughts
The Oreo Delight is more than just a dessert; it’s an experience. It’s the crunch of the cookie crust, the velvety smoothness of the cream cheese layer, the rich intensity of the chocolate pudding, and the airy sweetness of the whipped topping, all coming together in perfect harmony. It’s the kind of treat that sparks conversation and brings smiles to faces, a guaranteed crowd-pleaser for any occasion. Whether you’re hosting a gathering or simply craving a bit of sweet comfort, this Oreo Delight is sure to satisfy. I encourage you to give it a try, and I can’t wait to hear about your own delightful experiences with this chocolatey masterpiece. Pair it with a tall glass of cold milk, or perhaps a hot cup of coffee for a truly decadent treat. Happy baking, or in this case, happy assembling!