
Oreo Blackout Cake: A Decade of Delicious Decadence
I remember the first time I encountered this Oreo Blackout Cake. It wasn’t in a fancy patisserie or a culinary school textbook; it was born from a reader’s request, a culinary whisper seeking an answer to a sweet craving. In my kitchen, amidst the comforting clatter of bowls and the scent of vanilla, I meticulously recreated it, and it became an instant legend. Each bite is a testament to the simple brilliance of crushed cookies and rich frosting, a reminder that sometimes, the most extraordinary desserts are born from the most humble of inspirations. This cake is more than just a dessert; it’s a memory made edible, a celebration of pure, unadulterated chocolatey joy that I’ve been thrilled to share with friends and family for years.
Recipe Overview
- Prep Time: 1 hour 10 minutes
- Cook Time: 30 minutes
- Total Time: 1 hour 40 minutes (plus chilling time)
- Servings: 12
- Yield: 1 two-layer cake
- Dietary Type: Not specified (can be adapted)
The Glorious Ingredients
This cake is a symphony of textures and flavors, starting with a sturdy, cookie-infused crust and culminating in a deeply chocolatey, layered masterpiece. Here’s what you’ll need to bring this dream to life:
For the Crust:
- 27 Oreo cookies, finely crushed (this forms the base of our delicious foundation)
- 5 tablespoons melted butter
For the Cake:
- 16 Oreo cookies, coarsely crushed (for delightful chocolatey pockets within the cake)
- 2 ¼ cups all-purpose flour
- 1 ½ teaspoons baking powder
- 1 ½ teaspoons baking soda
- ½ cup unsalted butter, softened
- 1 ⅓ cups granulated sugar
- 3 large eggs, separated (room temperature is best for whipping)
- ⅔ cup sour cream
- 2 ½ ounces semisweet chocolate, melted and slightly cooled
- 1 ½ teaspoons vanilla extract
- 1 ½ cups water
For the Filling:
- 5 tablespoons unsalted butter, softened
- 2 ½ cups powdered sugar, sifted
- 1 teaspoon vanilla extract
- ¼ cup milk (you may need a touch more or less, adjust for consistency)
For the Frosting:
- 5 tablespoons unsalted butter, softened
- 2 ⅓ cups powdered sugar, sifted
- ¼ cup unsweetened cocoa powder (use a good quality one for the best flavor)
- 1 teaspoon vanilla extract
- ¼ cup milk (again, adjust for desired consistency)
Essential Equipment
To craft this spectacular Oreo Blackout Cake, you’ll want to have these tools at the ready:
- Two 9-inch round cake pans
- Baking sheets
- Mixing bowls (various sizes)
- Electric mixer (handheld or stand mixer)
- Whisk
- Spatula
- Measuring cups and spoons
- Offset spatula or butter knife for frosting
- Cooling rack
- Piping bag and tips (optional, for garnish)
Crafting the Oreo Blackout Cake: A Step-by-Step Journey
This cake requires a bit of assembly, but each step builds upon the last to create something truly magnificent. Let’s get baking!
-
Prepare the Oven and Pans: Begin by preheating your oven to 350°F (175°C). Grease two 9-inch round cake pans thoroughly. Then, dust them with cocoa powder. This not only prevents sticking but also adds an extra layer of chocolatey goodness to the cake’s edges.
-
Forge the Crust: In a medium bowl, combine the 27 finely crushed Oreo cookies with the 5 tablespoons of melted butter. Stir until the crumbs are evenly moistened. This mixture will resemble wet sand. Pat this cookie mixture firmly into the bottom of one of the prepared cake pans. This is your foundation for one of the cake layers.
-
Bake the Crust: Place the pan with the cookie crust into the preheated oven and bake for 5 minutes. This brief bake helps to set the crust, making it more robust. After baking, carefully remove the pan from the oven and set it aside.
-
Prepare the Dry Cake Ingredients: In a separate large bowl, whisk together the 16 coarsely crushed Oreo cookies, 2 ¼ cups of flour, 1 ½ teaspoons of baking powder, and 1 ½ teaspoons of baking soda. This ensures your leavening agents are evenly distributed throughout the dry ingredients. Set this bowl aside.
-
Cream the Wet Base: In a separate, generous mixing bowl, cream together the ½ cup of softened butter and 1 ⅓ cups of granulated sugar until the mixture is light and fluffy. This process incorporates air, which contributes to the cake’s tender crumb.
-
Incorporate Yolks and Richness: Add the 3 egg yolks, one at a time, beating well after each addition until fully incorporated. Next, gently stir in the ⅔ cup of sour cream, the 2 ½ ounces of melted and slightly cooled semisweet chocolate, and the 1 ½ teaspoons of vanilla extract. Mix until just combined.
-
The Liquid Element: Gradually add the 1 ½ cups of water to the wet ingredients and stir until the batter is smooth and blended.
-
Achieve Cake Batter Perfection: With your electric mixer on medium speed, beat the batter for exactly one minute. This helps to further develop the batter’s structure.
-
Whip the Egg Whites: In a clean, dry bowl, whip the 3 egg whites until they reach soft peaks. This means when you lift the whisk, the peaks will gently curl over.
-
Fold with Care: Gently fold the whipped egg whites into the cake batter by hand using a spatula. Be careful not to overmix; you want to preserve the airiness of the egg whites, which will contribute to a lighter cake texture.
-
Divide and Conquer: Divide the cake batter evenly between the two prepared cake pans. Remember, one pan already has the baked cookie crust, and the other is plain.
-
Bake the Cakes: Place both pans back into the 350°F (175°C) oven. Bake until the cakes are done, which you can test by inserting a toothpick into the center – it should come out clean, or the top should spring back lightly when touched. The cake in the pan with the cookie bottom will take approximately 5 minutes longer to bake than the plain cake layer, so keep an eye on both. This typically takes 15-25 minutes for the plain layer and 20-30 minutes for the crust layer.
-
Cool and Chill: Once baked, remove the cakes from the oven. Allow them to cool in their pans for about 10-15 minutes before carefully inverting them onto a wire rack to cool completely. Once completely cool, wrap each cake layer tightly in plastic wrap and refrigerate for at least 30 minutes (or up to overnight). Chilling the cakes makes them much easier to handle and frost.
-
Craft the Luscious Filling: While the cakes are chilling, prepare the filling. In a medium bowl, combine the 5 tablespoons of softened butter, 2 ½ cups of sifted powdered sugar, 1 teaspoon of vanilla extract, and ¼ cup of milk. Beat with an electric mixer until the mixture is smooth and of spreading consistency. You may need to add a touch more milk, a teaspoon at a time, to achieve the perfect spreadable texture. Reserve some of this filling for garnish.
-
Assemble the Masterpiece: Place the cake layer with the cookie crust onto your serving plate or cake stand. Evenly spread the prepared filling over this layer, leaving a small border around the edge. Carefully top with the other cake layer.
-
Whip Up the Dreamy Frosting: For the frosting, combine the 5 tablespoons of softened butter, 2 ⅓ cups of sifted powdered sugar, ¼ cup of unsweetened cocoa powder, and 1 teaspoon of vanilla extract in a mixing bowl. Add ¼ cup of milk and beat with an electric mixer until the frosting is smooth, creamy, and of spreading consistency. Again, add milk a teaspoon at a time if needed to reach your desired texture.
-
Frost with Flair: Frost the entire cake generously with the prepared chocolate frosting, using an offset spatula or a knife to create a smooth or textured finish as you desire.
-
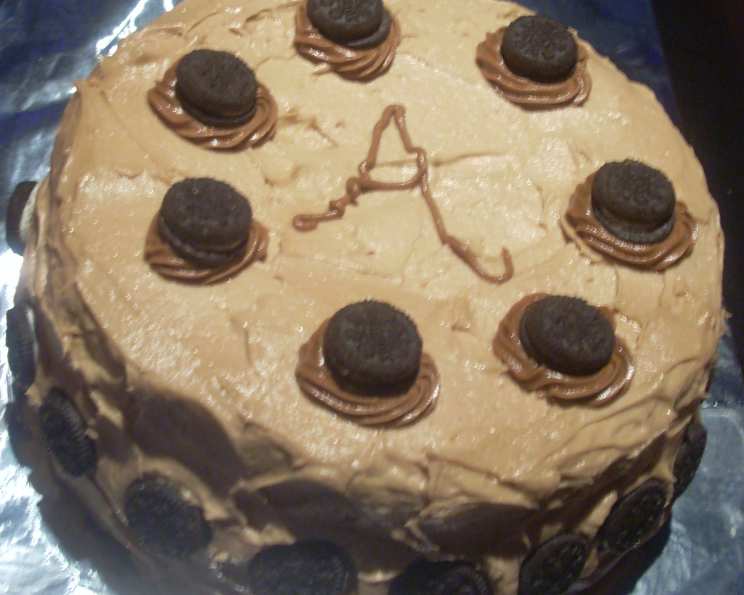
Garnish to Impress: For the final decorative touch, press additional crushed Oreo cookies onto the sides of the cake. Then, using a piping bag with a star tip (or a spoon), pipe the reserved filling onto the top of the cake in small dollops or “clouds.” Gently press a quarter Oreo or a mini Oreo into each puff of filling.
Chef’s Insider Tips & Tricks
- Oreo Crushing Technique: For the finely crushed Oreos for the crust, a food processor works wonders. For the coarsely crushed ones for the cake, place them in a zip-top bag and give them a few good whacks with a rolling pin – it’s surprisingly therapeutic!
- Chocolate Quality: Using a good quality semisweet chocolate for melting will elevate the flavor of the cake batter significantly. Avoid chocolate chips, as they can contain stabilizers that prevent them from melting as smoothly.
- Sour Cream Substitute: If you don’t have sour cream, full-fat Greek yogurt is an excellent substitute. Its tanginess and creaminess will lend similar richness to the cake.
- Chilling is Key: Don’t skip the chilling step for the cake layers. A cold cake is far easier to handle, stack, and frost without crumbling or sliding.
- Frosting Consistency: The key to a perfect frosting consistency is patience. Start with the recommended amount of milk and add more very gradually. It’s easier to add more liquid than to fix frosting that’s too thin.
- Cocoa for Dusting: Dusting the greased pans with cocoa powder instead of flour ensures that the edges of your dark cake won’t have a pale, floury residue.
Serving & Storage Suggestions
This Oreo Blackout Cake is best served at room temperature, allowing its rich flavors and creamy textures to truly shine. Slice it with a sharp knife that has been dipped in hot water and wiped dry between each cut for neat, clean slices.
- Storage: Leftover cake can be stored in an airtight container at room temperature for up to 2 days. If your kitchen is particularly warm, or if you prefer it chilled, it can be stored in the refrigerator for up to 4 days.
- Reheating: While this cake is delicious at room temperature, if you’ve refrigerated it and want to bring it back to a softer consistency, let it sit on the counter for about 30-60 minutes before serving. It’s not recommended to reheat this cake in the oven or microwave as it can affect the texture.
Nutritional Information
Here’s an approximate breakdown of the nutritional content for this decadent cake. Please note that these values are estimates and can vary based on specific ingredients and portion sizes.
| Nutrient | Amount per Serving (approx.) | % Daily Value |
|---|---|---|
| Calories | 785.1 kcal | – |
| Calories from Fat | 301 kcal | – |
| Total Fat | 33.5 g | 51% |
| Saturated Fat | 17.5 g | 87% |
| Cholesterol | 109.9 mg | 36% |
| Sodium | 542 mg | 22% |
| Total Carbohydrate | 118 g | 39% |
| Dietary Fiber | 3 g | 11% |
| Sugars | 84.4 g | 337% |
| Protein | 7.9 g | 15% |
Variations & Substitutions
- Gluten-Free Indulgence: For a gluten-free version, use a good quality gluten-free all-purpose flour blend in place of the regular flour. Ensure your Oreos are gluten-free as well, as many brands offer GF versions.
- Dairy-Free Delight: Opt for dairy-free butter alternatives, a plant-based milk (like almond or oat milk), and a vegan sour cream or yogurt. Many brands now offer delicious dairy-free Oreos as well.
- Intensify the Chocolate: Add a tablespoon or two of instant espresso powder to the dry ingredients for a subtle mocha undertone that enhances the chocolate flavor.
- Cream Cheese Twist: For a richer filling or frosting, you could substitute half of the butter in either with softened cream cheese. This adds a lovely tang and creaminess.
Frequently Asked Questions
Q: Can I make this cake ahead of time?
A: Yes! The cake layers can be baked a day in advance, cooled completely, wrapped tightly, and refrigerated. The frosting and filling can also be made a day ahead and stored in airtight containers in the refrigerator; allow them to soften slightly at room temperature before assembling.
Q: My frosting seems too thick. What should I do?
A: Gradually add more milk, about a teaspoon at a time, beating well after each addition, until you reach your desired spreading consistency.
Q: My frosting is too thin. How can I fix it?
A: Add more sifted powdered sugar, a tablespoon at a time, beating well after each addition until the frosting thickens to your liking.
Q: Can I use different types of Oreos?
A: Absolutely! Double Stuf Oreos would add extra richness, or you could experiment with flavored Oreos like mint or peanut butter for a fun twist.
Q: How long does the cake last once frosted?
A: Once frosted, the cake is best enjoyed within 2-3 days when stored at room temperature in an airtight container, or up to 4 days if refrigerated.
A Final Slice of Sweetness
This Oreo Blackout Cake is a celebration of simple ingredients transformed into something truly extraordinary. It’s the kind of cake that brings smiles, sparks conversations, and creates cherished memories around the dessert table. Whether you’re a seasoned baker or just starting, this recipe is a rewarding journey. Pair a generous slice with a cold glass of milk for the ultimate nostalgic treat, or a robust coffee to complement its deep chocolate notes. I can’t wait for you to experience this “blackout” of pure bliss!