
Orangen-Schokoplatzchen: A Symphony of Citrus and Chocolate
There’s a particular magic to the scent that fills my kitchen during the holiday season, a fragrant tapestry woven from spices, baked goods, and the comforting aroma of simmering citrus. Among these olfactory treasures, the Orangen-Schokoplatzchen hold a special place. I remember my grandmother, her hands dusted with flour, carefully rolling out dough, the air alive with the zesty perfume of fresh orange peel. It wasn’t just about the cookies; it was about the shared moments, the hushed anticipation, and the sheer joy of creating something delicious together. This German cookie recipe has truly become a cherished family tradition, a delightful reminder that the combination of bright orange and rich chocolate is simply wonderful, not just at Christmas, but year-round.
Recipe Overview
- Prep Time: 20 minutes + 2 hours chilling
- Cook Time: 8 to 10 minutes per batch
- Total Time: 2 hours 30 minutes
- Servings: 6
- Yields: 36-48 cookies
- Dietary Type: Contains Gluten, Dairy, Egg
Ingredients
- 100 grams semi-sweet chocolate baking squares
- 125 grams butter (or 125 grams margarine)
- 125 grams sugar
- 1 egg
- 1 orange, rind shredded (from approximately 1 medium orange)
- 200 grams flour
- 1 teaspoon baking powder
- 100 grams icing sugar (also known as powdered sugar or confectioners’ sugar)
- 2 teaspoons orange juice
Equipment Needed
To bring these delightful Orangen-Schokoplatzchen to life, you’ll find the following equipment helpful:
- Medium-sized mixing bowls
- Electric mixer (handheld or stand mixer) or a sturdy whisk and strong arm
- Grater (for the chocolate and orange rind)
- Measuring cups and spoons
- Spatula or wooden spoon
- Plastic wrap
- Rolling pin
- Cookie cutters of your desired shape (e.g., stars, circles, gingerbread figures)
- Baking sheets
- Wire cooling rack
- Small bowl (for the glaze)
- Sieve or fine-mesh strainer (for sifting icing sugar)
Instructions
Bringing these delightful cookies from dough to delectable takes a few careful steps, each contributing to their unique charm.
-
Prepare the Chocolate: Begin by grating the semi-sweet chocolate baking squares. Set this aside. Using a fine grater will ensure the chocolate distributes evenly throughout the dough.
-
Cream the Base: In a medium mixing bowl, cream together the butter (or margarine) and sugar until the mixture is light, fluffy, and pale in color. This process incorporates air, which contributes to the cookie’s texture.
-
Incorporate Wet Ingredients: Add the egg to the creamed butter and sugar mixture. Beat until well combined. Next, stir in the shredded orange rind. The vibrant zest will infuse the dough with a wonderful citrus aroma and flavor.
-
Combine Dry Ingredients: In a separate bowl, sift together the flour and baking powder. Sifting helps to aerate the flour and distribute the baking powder evenly, preventing dense spots in the finished cookie.
-
Form the Dough: Gradually add the sifted flour and baking powder mixture to the creamed butter and egg mixture. Add the grated chocolate to the bowl as well.
-
Knead and Chill: At this stage, you may find it easiest to knead the dough together by hand. Work it just until all the ingredients are incorporated and a cohesive dough forms. Be careful not to overwork the dough, as this can lead to tough cookies. Form the dough into a ball, wrap it tightly in plastic wrap, and refrigerate for at least 2 hours. This chilling period is crucial for firming up the dough, making it easier to roll out and ensuring the cookies hold their shape during baking.
-
Preheat the Oven: When you’re ready to bake, preheat your oven to 400 degrees Fahrenheit (200 degrees Celsius). Ensure your oven racks are in the middle position for even heat distribution.
-
Roll and Cut: On a lightly floured surface, roll out the chilled dough to a thickness of approximately 5mm (about 1/5 inch). Use your favorite cookie cutters to cut out shapes of your desired size and design. Gently re-roll scraps as needed, but try to handle them minimally to avoid developing toughness.
-
Bake the Cookies: Transfer the cut cookies carefully to baking sheets. You don’t need to grease the baking sheets if they are non-stick, or you can line them with parchment paper for easier cleanup. Bake for 8 to 10 minutes, or until the edges are lightly golden and the centers are set. Keep a close eye on them, as oven temperatures can vary, and these cookies can go from perfectly baked to overdone quickly.
-
Cool: Once baked, remove the cookies from the baking sheets immediately and transfer them to a wire rack to cool completely. Allowing them to cool on the sheet can continue to cook them from residual heat.
-
Prepare the Glaze: While the cookies are cooling, sift the icing sugar into a small bowl. This ensures a smooth, lump-free glaze. Stir in just enough orange juice, a teaspoon at a time, until you achieve a pourable, yet thick enough to coat, glaze consistency.
-
Glaze the Cookies: Once the cookies are entirely cool, glaze the bottom of each cookie. You can do this by dipping the bottom directly into the glaze or by using a small spoon to spread it. Place the glazed cookies back on the wire rack, glaze-side up, to allow the glaze to set.
Expert Tips & Tricks
- Chocolate Quality Matters: For the best flavor, use good quality semi-sweet chocolate baking squares. The better the chocolate, the more pronounced its flavor will be in the finished cookie.
- Zest Wisely: When zesting your orange, aim to get only the colored part of the peel, avoiding the bitter white pith. A microplane zester is excellent for this.
- Dough Consistency: If the dough feels too sticky to roll after chilling, let it sit at room temperature for a few minutes. If it feels too crumbly, you might have over-floured; a tiny bit more butter or a splash of milk can sometimes help, but err on the side of a slightly firmer dough for easier handling.
- Baking Sheet Spacing: Give your cookies ample space on the baking sheet to prevent them from baking into each other.
- Glaze Consistency is Key: Too thin, and it will run off; too thick, and it will be difficult to spread. Start with a smaller amount of orange juice and add more gradually until you reach your desired consistency.
- Make Ahead Magic: The dough can be made a day in advance and kept chilled in the refrigerator, making your baking day more streamlined.
Serving & Storage Suggestions
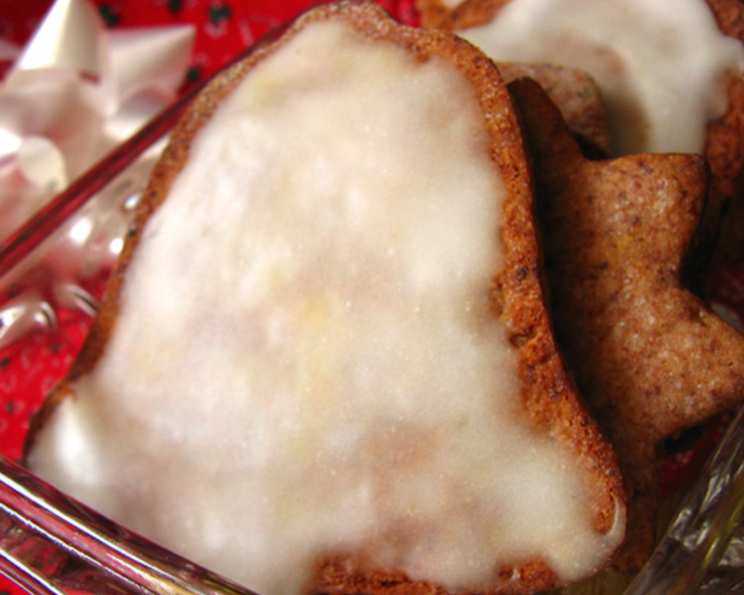
These Orangen-Schokoplatzchen are a delight to serve as they are, their vibrant glaze and rich chocolate making them visually appealing. They are perfect for an afternoon tea, alongside a steaming mug of coffee, or as a sweet finale to any meal. For a festive touch during the holidays, arrange them on a platter with other traditional Christmas cookies.
To store, ensure the glaze is fully set. Store the cookies in an airtight container at room temperature for up to 5 days. They do not typically require refrigeration, and refrigeration can sometimes affect the texture of the cookie and the glaze. If you find they become a bit stale, a few seconds in a warm oven can often revive their crispness.
Nutritional Information
Here’s an estimated nutritional breakdown for these delightful cookies. Please note that these values can vary based on the specific ingredients and brands used.
| Nutrient | Amount per Serving (approx. 1 cookie) | % Daily Value (based on a 2,000 calorie diet) |
|---|---|---|
| Calories | 71.7 kcal | — |
| Calories from Fat | — | — |
| Total Fat | 3 g | 4% |
| Saturated Fat | 1.8 g | 9% |
| Cholesterol | 13.3 mg | 4% |
| Sodium | 32.1 mg | 1% |
| Total Carbohydrate | 10.6 g | 3% |
| Dietary Fiber | 0.1 g | 0% |
| Sugars | 6.3 g | 25% |
| Protein | 0.8 g | 1% |
Variations & Substitutions
While this recipe is wonderfully traditional, here are a few ideas for variations:
- Dark Chocolate Lovers: For a more intense chocolate flavor, use dark chocolate baking squares instead of semi-sweet.
- Citrus Zing: If you have a Meyer lemon on hand, a touch of its zest alongside the orange can add a delightful layer of complexity.
- Nutty Addition: Finely chopped almonds or hazelnuts could be incorporated into the dough for an added crunch and nutty flavor.
- Gluten-Free Option: For a gluten-free version, carefully substitute the all-purpose flour with a high-quality gluten-free baking blend that contains xanthan gum. You may need to adjust the liquid slightly, as gluten-free flours can absorb moisture differently.
- Dairy-Free Option: If you opt for margarine, ensure it is a dairy-free variety. For the chocolate, choose dairy-free semi-sweet chocolate chips or baking squares.
FAQs
Q: Can I make the dough ahead of time?
A: Absolutely! The dough can be made a day in advance and kept refrigerated in plastic wrap. This makes your baking day much smoother.
Q: My dough is too sticky to roll. What should I do?
A: Lightly flour your work surface and rolling pin. If it’s still very sticky, you can try chilling it for an additional 15-30 minutes. You can also try placing the dough between two sheets of parchment paper to roll it out.
Q: How can I get perfectly even cookies?
A: Using a rolling pin with consistent thickness guides or rolling the dough between two strips of wood of the same thickness can help ensure evenness.
Q: What if I don’t have orange juice for the glaze?
A: You can substitute the orange juice with milk or a dairy-free milk alternative. A touch of lemon juice can also work if you want a slight tang.
Q: How do I store these cookies to keep them fresh?
A: Store them in an airtight container at room temperature. They will stay fresh for about 5 days.
Final Thoughts
There’s an undeniable comfort and joy that comes from creating these Orangen-Schokoplatzchen. They are more than just cookies; they are edible memories, little bundles of joy that carry the warmth of tradition and the brightness of citrus and chocolate. I encourage you to try this recipe, to let the zesty aroma fill your kitchen, and to share these delightful treats with your loved ones. They pair wonderfully with a strong cup of coffee, a fragrant cup of tea, or even a glass of mulled wine during the festive season. I’d love to hear about your own experiences and any creative twists you add to this classic!