
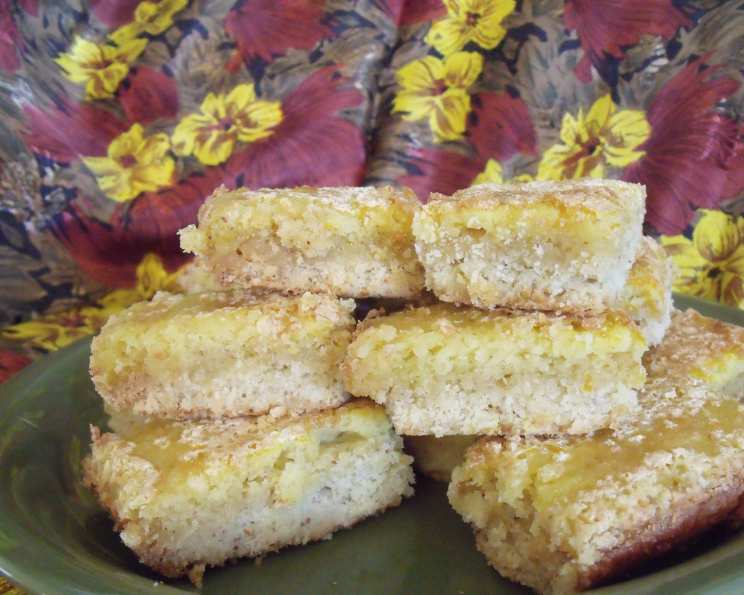
Sunshine in a Square: A Zesty Ode to Orange Squares
There are certain flavors that just transport me. For me, the bright, invigorating scent of fresh orange zest instantly conjures memories of my grandmother’s kitchen, a place perpetually filled with sunshine and the hum of her ancient stand mixer. She had a knack for turning the simplest ingredients into pure magic, and her orange squares were no exception. They weren’t overly complicated, but that’s precisely their charm. A perfectly crumbly, nutty base topped with a sweet, custardy orange filling that just sang with citrusy delight. I can still picture them cooling on the wire rack, a dusting of confectioners’ sugar like fresh snow, waiting to be cut into perfect little squares.
Recipe Snapshot
- Prep Time: 20 minutes
- Cook Time: 40 minutes
- Total Time: 1 hour
- Servings: 24
- Yield: 24 squares
- Dietary Type: Contains Gluten, Dairy, Eggs
Ingredients
This recipe sings with the vibrant essence of fresh oranges and the comforting embrace of a tender, nutty crust. Here’s what you’ll need to bring this ray of sunshine to your table:
For the Crust:
- 2 ¼ cups all-purpose flour
- ½ cup ground almonds
- ½ cup confectioners’ sugar
- 1 tablespoon fresh orange zest, divided (this is crucial for that intense citrus aroma!)
- 1 cup butter, softened
For the Filling:
- 1 ¾ cups sugar
- 4 large eggs
- ⅓ cup fresh orange juice
- ½ teaspoon orange extract (for an extra punch of orange flavor)
- ½ teaspoon baking powder
- ¼ cup all-purpose flour
For Garnish:
- Confectioners’ sugar, for dusting
Equipment Needed
You won’t need any particularly fancy gadgets for these delightful orange squares. The following will ensure a smooth baking experience:
- Large mixing bowl
- Medium mixing bowl
- Whisk
- Pastry blender or your fingertips
- Measuring cups and spoons
- 13x9x2-inch baking pan
- Wire cooling rack
- Oven
Crafting Your Orange Squares: A Step-by-Step Guide
The beauty of this recipe lies in its straightforward approach. You’ll find yourself creating two distinct layers, each contributing to the final glorious texture and flavor.
-
Prepare the Oven and Pan: Begin by preheating your oven to 350°F (175°C). This consistent temperature is key to achieving that perfect golden-brown crust and set filling. You’ll also need a 13x9x2-inch baking pan.
-
Assemble the Crust Base: In a large mixing bowl, combine the 2 cups of all-purpose flour, the ½ cup of ground almonds, the ½ cup of confectioners’ sugar, and 1 tablespoon of fresh orange zest. Give these dry ingredients a gentle whisk to ensure they are well incorporated.
-
Incorporate the Butter: Add the 1 cup of softened butter to the dry ingredients. Using a pastry blender or your fingertips, work the butter into the flour mixture until it resembles coarse crumbs. You want it to be well combined, but don’t overwork it to the point of being a paste. The crumbly texture is what will create that delightful base.
-
Press the Crust into the Pan: Carefully press the crumbly mixture evenly into the bottom of your prepared 13x9x2-inch baking pan. Ensure it’s packed down to form a solid base that will hold the filling.
-
First Bake of the Crust: Place the pan in the preheated oven and bake for 20 minutes, or until the crust is lightly browned. This initial bake will ensure the crust is firm and has a lovely texture.
-
Prepare the Luscious Filling: While the crust is baking, in a separate medium mixing bowl, whisk together the 1 ¾ cups of sugar, the 4 large eggs, the ⅓ cup of fresh orange juice, and the ½ teaspoon of orange extract. Whisk vigorously until the mixture is smooth and well combined.
-
Combine Dry Filling Ingredients: In a small bowl, whisk together the remaining ¼ cup of all-purpose flour and the ½ teaspoon of baking powder. This little step ensures the baking powder is evenly distributed, preventing any pockets of leavening.
-
Integrate Dry Ingredients into Filling: Add the flour and baking powder mixture to the sugar and egg mixture, whisking gently until just combined. Don’t overmix here; we just want everything to come together smoothly.
-
Pour the Filling: Once the crust has finished its initial 20-minute bake and is lightly browned, carefully remove it from the oven. Gently pour the prepared filling evenly over the hot crust.
-
Second Bake to Set the Filling: Return the pan to the oven and bake for another 20 minutes, or until the filling is set. You’ll know it’s ready when the center is firm and doesn’t jiggle excessively when the pan is gently nudged.
-
Cool and Garnish: Remove the pan from the oven and let the orange squares cool completely on a wire cooling rack. This is a crucial step; rushing this can lead to a messy cut. Once completely cooled, sprinkle generously with confectioners’ sugar, if desired, for a beautiful finishing touch that adds a hint of sweetness and visual appeal.
-
Cut and Serve: Once cooled and garnished, cut the orange squares into your desired serving size. Enjoy the bright, zesty goodness!
Chef’s Tips & Tricks for Orange Square Perfection
- Zest is Best: For the most vibrant orange flavor, use a microplane or fine grater to zest your oranges. Avoid the white pith, as it can be bitter. Reserve the remaining orange juice for another use or enjoy it as a refreshing drink.
- Butter Temperature Matters: Ensuring your butter is softened, not melted, is key to achieving that perfect crumbly texture for the crust. It should yield slightly when pressed.
- Don’t Overmix the Filling: Overmixing the filling can incorporate too much air, which might lead to a less smooth texture. Mix until just combined.
- Cooling is Crucial: Patience is a virtue when it comes to these orange squares. Allowing them to cool completely on a wire rack ensures the filling sets properly and makes for clean, beautiful cuts.
- Even Baking: If your oven tends to bake unevenly, consider rotating the pan halfway through both baking stages.
Serving & Storage Suggestions
These orange squares are delightful served chilled or at room temperature. They make a fantastic afternoon treat with a cup of tea or coffee, or as a bright finish to a meal.
For storage, keep the cooled, uncut orange squares covered tightly at room temperature for up to 2 days, provided your kitchen is not excessively warm. If you need to store them for longer, they can be refrigerated in an airtight container for up to 5 days. When ready to serve from the refrigerator, allow them to sit at room temperature for about 15-20 minutes for optimal texture. You can also freeze the uncut squares for up to 2 months. Thaw them overnight in the refrigerator before cutting and serving.
Nutritional Information (Estimated Per Serving)
| Nutrient | Amount per Serving | % Daily Value |
|---|---|---|
| Calories | 202.4 kcal | |
| Calories from Fat | 86 kcal | |
| Total Fat | 9.6 g | 14% |
| Saturated Fat | 5.2 g | 26% |
| Cholesterol | 55.6 mg | 18% |
| Sodium | 74 mg | 3% |
| Total Carbohydrate | 26.9 g | 8% |
| Dietary Fiber | 0.6 g | 2% |
| Sugars | 17.5 g | 70% |
| Protein | 2.8 g | 5% |
Note: Nutritional values are approximate and can vary based on specific ingredients used.
Variations & Substitutions
While this recipe is a classic for a reason, you can certainly put your own spin on it:
- Gluten-Free Crust: For a gluten-free option, you can experiment with a gluten-free all-purpose flour blend and ensure your ground almonds are certified gluten-free.
- Lemon-Orange Fusion: Substitute half of the orange zest and juice with lemon zest and juice for a more complex citrus profile.
- Almond Extract Boost: If you’re a fan of almond flavor, a tiny drop of almond extract added to the filling can complement the ground almonds in the crust beautifully.
- Candied Orange Peel: For an extra touch of elegance and intensified orange flavor, consider adding finely chopped candied orange peel to the filling.
FAQs
Q: Can I make these orange squares ahead of time?
A: Yes, these squares are excellent for making ahead. They store well at room temperature or in the refrigerator and the flavors meld beautifully over time.
Q: My filling is still a bit jiggly after 20 minutes. What should I do?
A: It’s perfectly normal for the center to be slightly jiggly. The filling will continue to set as it cools. If it’s very liquidy, give it an additional 5 minutes of baking time, keeping a close eye on it to prevent over-browning.
Q: Can I use bottled orange juice instead of fresh?
A: While fresh orange juice will yield the best flavor, you can use a good quality 100% pure orange juice if fresh is unavailable. Avoid juice from concentrate if possible.
Q: How long will these orange squares last?
A: Stored properly in an airtight container, they will keep at room temperature for about 2 days, and in the refrigerator for up to 5 days.
Q: What’s the best way to cut them for neat squares?
A: Ensure the squares are completely cooled before cutting. Use a sharp knife, wiping it clean between cuts if necessary, to achieve the cleanest lines.
A Zesty Farewell
There’s a simple, honest joy to be found in these Orange Squares. They are a testament to how a few well-chosen ingredients, handled with care, can create something truly memorable. They’re not fussy, they’re not complicated, but they are, without a doubt, utterly delicious. I encourage you to bake a batch, feel that wonderful aroma fill your kitchen, and share these little bites of sunshine with those you cherish. I’d love to hear how they turned out for you! Perhaps a cup of Earl Grey tea or a crisp white wine would be a perfect accompaniment to this delightful treat.