
The Sunbeam Swirl: Mastering Homemade Orange Rolls
There are certain aromas that instantly transport me back to my childhood kitchen, a place where my grandmother’s oven was a portal to pure comfort. The scent of cinnamon and sugar was a constant companion, but the day she unveiled these Orange Rolls, something shifted. It wasn’t just sweet; it was bright, zesty, and utterly intoxicating. The delicate citrus perfume mingling with warm, yeasty dough was unlike anything I had experienced. For me, these rolls aren’t just a recipe; they’re a tangible thread connecting me to those cherished moments, a reminder that the simplest ingredients, treated with care, can create something truly magical.
Recipe Overview
- Prep Time: 1 hour 20 minutes (includes rising time)
- Cook Time: 20-25 minutes
- Total Time: 1 hour 45 minutes (plus 20 minutes resting)
- Servings: 24
- Yield: 2 dozen
- Dietary Type: Contains Dairy, Eggs, Gluten
Ingredients
For the Dough:
- 1 (1/4 ounce) package dry yeast
- 1/2 cup warm water (100-110°F)
- 1 cup sugar, divided
- 1/2 cup light sour cream
- 2 tablespoons butter, softened
- 1 teaspoon salt
- 1 large egg, lightly beaten
- 3 1/2 cups flour, divided
For the Filling:
- 2 tablespoons butter, melted
- 2 tablespoons grated orange rind (from about 2-3 oranges)
For the Glaze:
- 3/4 cup sugar
- 1/4 cup butter
- 2 tablespoons fresh orange juice
- 1/2 cup light sour cream
Equipment Needed
- Large mixing bowl
- Electric mixer (hand or stand mixer)
- Measuring cups and spoons
- Wooden spoon
- Floured surface for kneading
- Plastic wrap or clean kitchen towel
- Two 12-inch round dough rolling guides (optional, but helpful for consistent circles)
- Pastry brush
- Small saucepan
- Whisk
- 13 x 9-inch baking pan
- Cooling rack
- Aluminum foil
Instructions
Let’s embark on the delightful journey of crafting these sun-kissed delights. The process, while requiring a little patience, is incredibly rewarding, culminating in rolls that are both tender and bursting with citrusy goodness.
-
Activate the Yeast: In a large mixing bowl, combine the dry yeast with the warm water. Let this mixture stand for about 5 minutes, allowing the yeast to awaken and become frothy. This initial step is crucial for ensuring your dough will rise beautifully.
-
Introduce the Sweetness and Richness: To the activated yeast, add 1/4 cup of the sugar, the light sour cream, the softened butter, salt, and the lightly beaten egg. Beat these ingredients together with a mixer on medium speed until the mixture is smooth and well combined.
-
Begin Building the Dough: It’s time to incorporate the flour. Lightly spoon the flour into your dry measuring cups and level them with a knife to ensure accurate measurement – this is a small but vital detail for dough consistency. Add 2 cups of the measured flour to the yeast mixture and beat with your mixer until a smooth dough forms.
-
Develop the Dough’s Structure: Gradually add 1 more cup of flour to the mixture. Stir this in with a wooden spoon until a shaggy dough begins to form.
-
Kneading to Perfection: Turn the dough out onto a lightly floured surface. Begin to knead the dough for approximately 10 minutes. You are aiming for a dough that is smooth and elastic. As you knead, gradually add the remaining flour, about 1 tablespoon at a time, only as needed to prevent the dough from sticking to your hands. The dough should feel slightly sticky, but manageable.
-
The First Rise: Lightly coat a large bowl with cooking spray. Place the dough into the prepared bowl, turning it once to ensure the entire surface is coated. Cover the bowl and let the dough rise in a warm place, ideally around 85°F, free from drafts. Allow it to rise for 1 hour and 15 minutes, or until it has doubled in size. To check if it’s ready, gently press two fingers into the surface of the dough; if the indentation remains, the dough is perfectly proofed.
-
Rest and Divide: Once the dough has doubled, punch it down to release the air. Cover it again and let it rest for 5 minutes. After the rest, divide the dough in half. Work with one portion of the dough at a time, keeping the other portion covered to prevent it from drying out.
-
Shaping the Circles: On a floured surface, roll out each portion of dough into a 12-inch round. Aim for an even thickness for consistent baking.
-
Brushing with Butter: Brush each round of dough with 1 tablespoon of melted butter. This creates a wonderful base for the filling and helps it adhere.
-
Infusing the Orange Flavor: In a small bowl, combine the remaining 3/4 cup sugar with the grated orange rind. Sprinkle half of this aromatic mixture evenly over each rolled-out dough circle, ensuring good coverage from edge to edge.
-
Cutting into Wedges: Using a sharp knife or a pizza cutter, cut each sweetened circle into 12 equal wedges. Think of cutting a pizza into 12 slices.
-
Rolling the Rolls: Carefully roll up each wedge tightly, starting from the wide end and rolling towards the point. This creates the characteristic spiral of the orange roll.
-
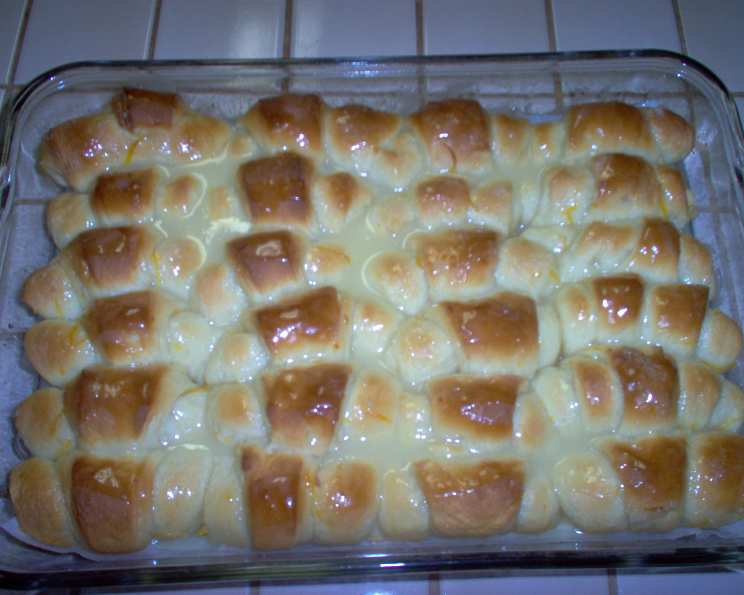
The Second Rise: Place the formed rolls, point side down, into a 13 x 9-inch baking pan that has been coated with cooking spray. Cover the pan and let the rolls rise for another 25 minutes, or until they have doubled in size again.
-
Preheat the Oven: While the rolls are enjoying their second rise, preheat your oven to 350°F.
-
Baking to Golden Perfection: Uncover the pan of rolls and bake in the preheated oven for 20-25 minutes, or until the tops are a beautiful golden brown. The aroma filling your kitchen at this stage is simply divine!
-
Crafting the Luscious Glaze: While the rolls are baking, prepare the glaze. In a small saucepan, combine 3/4 cup sugar, 1/4 cup butter, and the fresh orange juice. Bring this mixture to a boil over medium heat, cooking for 2 minutes or until the sugar has completely dissolved, stirring occasionally. Remove the saucepan from the heat and allow the glaze to cool slightly.
-
Finishing Touches: Once the glaze has cooled slightly, stir in the 1/2 cup of light sour cream. This addition creates a wonderfully tangy and creamy glaze.
-
Glazing and Resting: As soon as the rolls come out of the oven, drizzle the prepared glaze evenly over the hot rolls. This allows the glaze to melt and seep into the warm crevices. Let the rolls stand for 20 minutes before serving to allow the glaze to set and the flavors to meld.
Expert Tips & Tricks
- Orange Zest is Key: For the most vibrant orange flavor, use a microplane to zest your oranges. This tool breaks down the rind into fine, aromatic particles that distribute beautifully into the dough and filling. Avoid zesting the white pith, as it can be bitter.
- Proofing Environment: If your kitchen isn’t naturally warm, you can create a cozy environment for the dough to rise. Place the covered bowl in a slightly warmed oven (turned off!), or even near a sunny window. Just be sure it’s draft-free.
- Don’t Over-Flour: It’s tempting to add a lot of flour when the dough feels sticky, but too much flour can result in dry, dense rolls. Trust the process; a slightly sticky dough often yields the most tender results.
- Consistent Rolls: For perfectly uniform rolls, consider using a kitchen scale to divide the dough into equal portions before shaping. This ensures even baking and a more attractive presentation.
- Melted Butter for Brushing: Ensure your butter is fully melted when brushing the dough. This helps create distinct layers and allows the sugar-orange mixture to adhere effectively.
Serving & Storage Suggestions
These Orange Rolls are at their absolute peak when served warm, allowing the glaze to be slightly soft and the interior to be wonderfully tender. They are a perfect accompaniment to a morning cup of coffee or tea, or as a delightful afternoon treat.
For storing leftovers, keep any remaining rolls in the original baking pan. Cover the pan tightly with aluminum foil. Store them in the refrigerator. To reheat, place the foil-covered pan in a 300°F oven for approximately 15 minutes, or until they are warm throughout. This method gently re-warms them without drying them out.
Nutritional Information
Here’s an approximate breakdown of the nutritional content for these delectable orange rolls. Please note that these are estimates and can vary based on specific ingredients and portion sizes.
| Nutrient | Amount per Serving | % Daily Value |
|---|---|---|
| Calories | 174.7 kcal | |
| Calories from Fat | ||
| Total Fat | 5.3 g | 8% |
| Saturated Fat | 3.2 g | 15% |
| Cholesterol | 22.3 mg | 7% |
| Sodium | 134.5 mg | 5% |
| Total Carbohydrate | 29.6 g | 9% |
| Dietary Fiber | 0.6 g | 2% |
| Sugars | 14.8 g | 59% |
| Protein | 2.6 g | 5% |
Note: The “Calories from Fat” percentage is not directly provided in the source data as a percentage of daily value but is stated as “47 g 27 %”. This appears to be a misinterpretation or formatting issue in the original data. The Total Fat percentage is calculated based on a standard 2000-calorie diet.
Variations & Substitutions
While the classic orange roll is undeniably superb, there are always ways to personalize this delightful recipe.
- Citrus Swap: If you’re not a fan of oranges, or simply want to explore, try this recipe with lemon or grapefruit zest for a different citrusy twist. The tartness will create a wonderfully bright glaze.
- Spiced Undertones: For a touch of warmth, consider adding a pinch of cinnamon or nutmeg to the sugar-orange rind mixture. This will add another layer of complexity to the flavor profile.
- Cream Cheese Glaze: For a richer, tangier glaze, you can substitute the sour cream portion of the glaze with an equal amount of softened cream cheese. Ensure it’s well-whipped for a smooth consistency.
FAQs (Frequently Asked Questions)
Q: Why is my dough not rising?
A: Ensure your yeast is fresh and your water is the correct warm temperature (100-110°F). Also, check that the rising environment is warm and free of drafts.
Q: Can I make these rolls ahead of time?
A: Yes! You can prepare the dough, let it rise, punch it down, and refrigerate it overnight. In the morning, proceed with shaping, the second rise, and baking.
Q: How can I get a stronger orange flavor?
A: Use fresh, vibrant oranges for zesting, and ensure you are only zesting the colored outer peel, avoiding the bitter white pith. You can also add a few drops of orange extract to the glaze for an intensified flavor.
Q: My rolls are sticking to the pan. How can I prevent this?
A: Generously coat your baking pan with cooking spray or butter before placing the rolls in. You can also line the pan with parchment paper for extra assurance.
Q: Can I use milk instead of sour cream in the dough?
A: While sour cream contributes richness and tenderness, you can substitute it with an equal amount of whole milk or buttermilk. However, the texture might be slightly different.
Final Thoughts
There’s a profound satisfaction in pulling a pan of these golden, fragrant Orange Rolls from the oven. They are a testament to the magic that happens when simple, wholesome ingredients are treated with a little care and attention. Whether you’re sharing them at a brunch, enjoying them with a quiet moment of reflection, or simply treating yourself to a taste of sunshine, these rolls are sure to bring a smile. Don’t be afraid to experiment with the variations, and most importantly, savor every zesty, sweet bite. They pair beautifully with a strong cup of coffee or a refreshing glass of iced tea, making any moment a little brighter.