
The Irresistible Tang of Home: My Journey with Orange-Flavored Chicken
There are certain dishes that transport you back in time with just one bite, and for me, that’s undeniably true of a well-made orange chicken. I vividly recall my first encounter with this dish, not in a bustling restaurant, but in a modest home kitchen, where the air was thick with the sweet, zesty perfume of oranges and the savory aroma of frying chicken. It wasn’t just a meal; it was an experience, a revelation that comfort food could be both deeply satisfying and elegantly bright. This recipe, from the meticulous minds at America’s Test Kitchen, has been my benchmark, the closest I’ve come to replicating that magical restaurant-style flavor right in my own home, and it never fails to evoke that same sense of culinary wonder.
Recipe Snapshot
- Prep Time: 15 minutes (This does not include the marinating time)
- Cook Time: 30 minutes
- Total Time: 2 hours (Includes marinating time)
- Servings: 4
- Yield: 4 servings
- Dietary Type: Dairy-Free (Ensure soy sauce is gluten-free if needed for GF)
The Symphony of Ingredients: Bringing Orange Chicken to Life
This recipe is a beautiful interplay of sweet, savory, and citrusy notes, all coming together to create a truly harmonious dish. Each ingredient plays a crucial role, from the tender chicken thighs to the vibrant orange essence.
Marinade and Sauce: The Heart of the Flavor
- 1 ½ pounds boneless, skinless chicken thighs, trimmed and cut into 1 ½-inch pieces
- ¾ cup low-sodium chicken broth
- ¾ cup orange juice, plus 1 ½ teaspoons grated orange peel, and 8 pieces of orange peel (each about 2 inches long by ½ inch wide)
- 6 tablespoons distilled white vinegar
- ¼ cup soy sauce
- ½ cup packed dark brown sugar (approximately 3 ½ ounces)
- 3 medium garlic cloves, minced (about 1 tablespoon)
- 1 piece fresh ginger, grated (about 1 inch)
- ¼ teaspoon cayenne pepper
- 1 tablespoon cornstarch, plus 2 teaspoons cornstarch
- 2 tablespoons water (cold)
- 8 small whole dried red chilies (optional, for a touch of heat)
Coating and Frying Medium: Achieving that Perfect Crisp
- 3 large egg whites
- 1 cup cornstarch
- ¼ teaspoon cayenne pepper
- ½ teaspoon baking soda
- 3 cups peanut oil, for frying
Essential Tools for Success
To bring this orange chicken to life, you’ll want to have a few key pieces of equipment ready.
- 1-gallon zipper-lock bags
- Large saucepan (at least 3-quart capacity)
- Small bowl
- Pie plate (2 recommended)
- Fork
- Colander or large mesh strainer
- Paper towels
- Wire rack
- Baking sheet
- Dutch oven or straight-sided sauté pan (11- to 12-inch with at least 3-quart capacity)
- Instant-read or deep-fry thermometer
- Tongs
- Large plate
Crafting the Perfect Orange-Flavored Chicken: A Step-by-Step Guide
This recipe is designed to deliver that craveable, restaurant-quality orange chicken experience at home. The key lies in building layers of flavor and achieving that perfect crispy exterior.
FOR THE MARINADE AND SAUCE:
- Begin by placing the chicken pieces into a 1-gallon zipper-lock bag. Set this aside for the moment.
- In a large saucepan (it should have at least a 3-quart capacity to accommodate everything comfortably), combine the chicken broth, orange juice, the grated orange peel, distilled white vinegar, soy sauce, dark brown sugar, minced garlic, grated ginger, and cayenne pepper. Whisk these ingredients together thoroughly until the sugar is completely dissolved.
- Now, carefully measure out ¾ cup of this flavorful liquid mixture. Pour this reserved portion into the zipper-lock bag containing the chicken. Press out as much air as possible from the bag before sealing it securely. Ensure that all the chicken pieces are well-coated with the marinade.
- Place the bag of marinating chicken into the refrigerator. Allow it to marinate for at least 30 minutes, but do not exceed 60 minutes. Over-marinating can affect the texture of the chicken.
- While the chicken marinates, return to the saucepan with the remaining liquid. Bring this mixture to a rolling boil over high heat.
- In a small bowl, combine the 1 tablespoon of cornstarch with the 2 tablespoons of cold water. Whisk this together until you have a smooth slurry. Gradually whisk this cornstarch mixture into the boiling sauce in the saucepan.
- Continue to simmer the sauce, stirring occasionally, until it thickens and becomes translucent. This should take about 1 minute.
- Remove the saucepan from the heat. Stir in the 8 pieces of orange peel (the larger strips) and the whole dried red chilies, if you are using them for extra heat. The sauce should now measure approximately 1 ½ cups. Set this finished sauce aside.
FOR THE COATING:
- Prepare your coating stations. Pour the egg whites into a pie plate. Using a fork, beat the egg whites until they are frothy.
- In a second pie plate, whisk together the 1 cup of cornstarch, the ¼ teaspoon of cayenne pepper, and the ½ teaspoon of baking soda. Ensure these dry ingredients are well combined.
- Drain the marinated chicken using a colander or a large mesh strainer. It’s crucial to thoroughly pat the chicken dry with paper towels. This step is essential for achieving a crispy coating.
- Take half of the dried chicken pieces and place them into the egg whites. Turn the pieces to ensure they are fully coated.
- Next, transfer the egg-coated chicken pieces to the cornstarch mixture. Coat them thoroughly, ensuring each piece is well-dusted.
- Place the coated chicken pieces on a wire rack that has been set over a baking sheet. This allows excess coating to fall away and air to circulate, promoting crispiness.
- Repeat steps 4 through 6 with the remaining chicken pieces.
TO FRY THE CHICKEN:
- In a Dutch oven or a straight-sided sauté pan (ensure it’s at least 11 to 12 inches in diameter and has a capacity of at least 3 quarts), heat the 3 cups of peanut oil over high heat. Use an instant-read or deep-fry thermometer to monitor the oil temperature. You want the oil to reach precisely 350°F (175°C).
- Once the oil is at temperature, carefully add half of the coated chicken pieces to the hot oil. It’s important to add them one piece at a time to prevent them from clumping together and to maintain the oil temperature. Fry the chicken until it is golden brown, which should take about 5 minutes. Turn each piece with tongs about halfway through the cooking time to ensure even browning.
- Using tongs, transfer the fried chicken to a large plate that has been lined with paper towels to absorb any excess oil.
- Return the oil to 350°F (175°C) before proceeding with the next batch.
- Repeat the frying process with the remaining chicken, ensuring the oil is back to the correct temperature.
TO SERVE:
- Gently reheat the prepared orange sauce over medium heat until it begins to simmer. This will take about 2 minutes.
- Add the freshly fried chicken to the simmering sauce. Gently toss the chicken until it is evenly coated with the sauce and heated through.
- Serve your delicious Orange-Flavored Chicken immediately for the best texture and flavor experience.
Chef’s Insights: Elevating Your Orange Chicken Game
Achieving that perfect restaurant-style orange chicken is all about attention to detail. Here are a few tricks I’ve learned over the years that can make a significant difference:
- Don’t Skip the Drying Step: Thoroughly patting the chicken dry after marinating is non-negotiable. This is the secret to a truly crispy coating that won’t turn soggy when tossed in the sauce.
- Oil Temperature is Key: Maintaining the oil at a consistent 350°F (175°C) is crucial. If the oil is too cool, the chicken will absorb too much grease; if it’s too hot, the coating will burn before the chicken is cooked through. Use that thermometer!
- Fry in Batches: Overcrowding the fryer will significantly lower the oil temperature, leading to greasy, unevenly cooked chicken. Fry in smaller batches, allowing the oil to recover its temperature between each.
- Sauce Consistency: The cornstarch slurry is your friend for thickening the sauce. Whisk it in gradually and cook just until thickened and translucent to avoid a gummy sauce.
- Fresh is Best: While you can prep components ahead, the final tossing and serving should be done immediately. The contrast between hot, crispy chicken and the warm, glossy sauce is what makes this dish so irresistible.
Serving and Storage: Savoring Every Bite
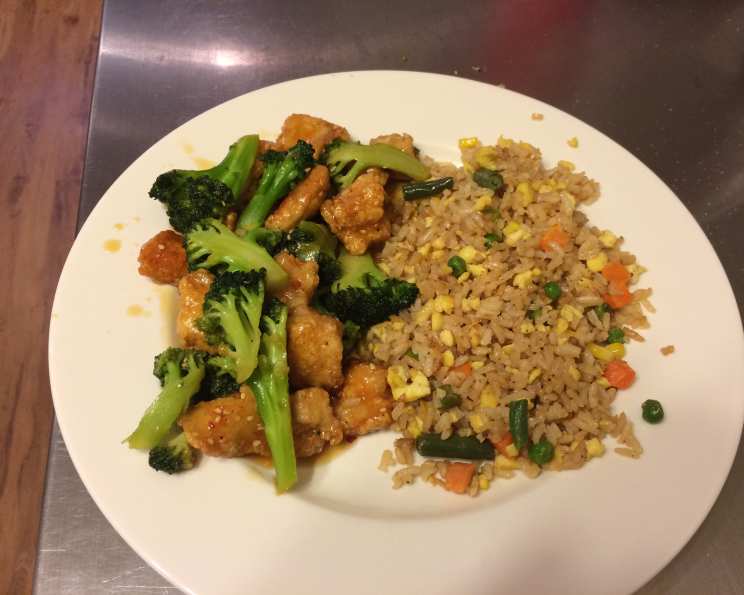
This Orange-Flavored Chicken is best enjoyed fresh off the stove, its crispy exterior giving way to tender chicken coated in a vibrant, zesty sauce. It pairs beautifully with steamed jasmine rice and a side of crisp, blanched broccoli or green beans to balance the richness.
Storage: Leftovers can be stored in an airtight container in the refrigerator for up to 2 days. The chicken will lose some of its crispness upon refrigeration, but the flavor will remain excellent.
Reheating: To reheat, gently warm the chicken and sauce together in a skillet over medium-low heat, stirring occasionally, until heated through. You can also reheat in the microwave, but be mindful not to overcook it, which can make the chicken tough. For a touch more crispness, you can briefly pan-fry the reheated chicken in a lightly oiled skillet for a minute or two after tossing with the sauce.
Nutritional Snapshot (Approximate per Serving)
| Nutrient | Amount per Serving | % Daily Value |
|---|---|---|
| Calories | 650-750 kcal | Varies |
| Total Fat | 35-45 g | Varies |
| Saturated Fat | 6-9 g | Varies |
| Cholesterol | 100-150 mg | Varies |
| Sodium | 800-1000 mg | Varies |
| Total Carbohydrate | 45-55 g | Varies |
| Dietary Fiber | 1-2 g | Varies |
| Sugars | 25-35 g | Varies |
| Protein | 30-40 g | Varies |
Note: Nutritional information is an estimate and can vary based on specific ingredients and portion sizes.
Variations and Creative Twists
While this recipe is fantastic as is, there’s always room for a little culinary adventure!
- Spicy Kick: For those who love heat, consider adding a few more dried red chilies to the sauce, or a pinch of red pepper flakes to the cornstarch coating.
- Citrus Swap: While orange is classic, a blend of orange and grapefruit juice can add an interesting tang.
- Gluten-Free Option: Use tamari or a certified gluten-free soy sauce alternative. Ensure all other ingredients are also gluten-free.
- Sesame Seed Garnish: A sprinkle of toasted sesame seeds just before serving adds a lovely nutty flavor and visual appeal.
- Vegetable Addition: For a more complete meal, stir-fry some broccoli florets or snap peas separately and toss them with the chicken and sauce at the very end.
Frequently Asked Questions
Q: Can I use chicken breast instead of thighs?
A: While chicken thighs are recommended for their tenderness and ability to stay moist during frying, you can use chicken breast. However, be very careful not to overcook it, as it can become dry quickly.
Q: How long should I marinate the chicken?
A: The recipe specifies marinating for 30 to 60 minutes. It’s crucial not to marinate for much longer than an hour, as the acidity in the marinade can start to break down the chicken too much.
Q: My sauce isn’t thickening. What did I do wrong?
A: Ensure your cornstarch slurry was mixed with cold water and whisked thoroughly into the simmering sauce. You might need to simmer it for a minute or two longer to allow the starch to activate and thicken the sauce.
Q: Can I make the sauce ahead of time?
A: Yes, you can prepare the sauce and store it in an airtight container in the refrigerator for up to 2 days. Reheat it gently before tossing with the fried chicken.
Q: Is peanut oil the only option for frying?
A: Peanut oil is ideal for its high smoke point and neutral flavor. However, you can substitute with other high smoke point oils like canola oil or vegetable oil if needed.
A Taste of Sunshine, Anytime
There’s a certain joy in recreating a beloved dish that usually requires a restaurant visit. This Orange-Flavored Chicken recipe is a testament to that – a gateway to those delightful sweet and savory flavors that can brighten any meal. It’s a dish that’s perfect for a weeknight treat or a weekend gathering, guaranteed to bring smiles to the table. I encourage you to try it, savor the process, and most importantly, enjoy the incredibly satisfying result. Happy cooking!