
Orange Creamsicle Swirl Fudge: A Nostalgic Treat for Grown-Ups
The scent of melted butter, sugar, and something citrusy instantly transports me back to hazy summer afternoons. For me, that scent is inextricably linked to the Orange Creamsicle Swirl Fudge. It’s more than just a confection; it’s a whisper of childhood joy, a tangible reminder of simpler times when a double-scoop ice cream cone was the pinnacle of culinary delight. I remember my grandmother making batches of fudge, the kitchen filled with a sweet, comforting aroma. This particular flavor, the vibrant orange and creamy vanilla swirl, always felt like pure magic, a sophisticated upgrade to the ice cream truck staple, and a treat I eagerly anticipated every time. It’s this enduring memory that inspired me to recreate that nostalgic bliss in a form that’s as delightful to make as it is to eat.
Recipe Overview
- Prep Time: 15 minutes
- Cook Time: 4 minutes (for boiling) + 10 minutes (for melting)
- Total Time: 25 minutes (plus chilling time)
- Servings: 10-20 (depending on cut size)
- Yield: One 13×9-inch pan of fudge
- Dietary Type: Standard
Ingredients
- 3 cups granulated sugar
- 3/4 cup butter, divided
- 3/4 cup heavy cream
- 12 ounces vanilla chips
- 3 teaspoons orange extract
- 12 drops yellow food coloring
- 9 drops red food coloring
- 7 ounces marshmallow cream
Equipment Needed
- A heavy-bottomed saucepan (at least 3-quart capacity)
- A 9×13-inch baking pan
- Parchment paper (optional, for easier removal)
- A heatproof spatula or wooden spoon
- A measuring cup and spoons
- A knife for swirling and cutting
Instructions
- Begin by preparing your baking pan. Grease a 13×9-inch pan with 1 1/2 teaspoons of butter or margarine. This initial greasing ensures the fudge won’t stick, making for a clean release later. If you like, you can also line the pan with parchment paper, leaving an overhang on the sides, which makes lifting the entire slab of fudge out much easier.
- In your heavy saucepan, combine the 3 cups of sugar, the remaining butter, and the 3/4 cup of heavy cream. It’s important to use a heavy-bottomed pan here to prevent scorching.
- Place the saucepan over low heat. Stir the ingredients continuously until the sugar is completely dissolved. You shouldn’t feel any grit when you rub a little of the mixture between your fingers.
- Once the sugar has dissolved, increase the heat to medium-high and bring the mixture to a rolling boil. Stir constantly for exactly 4 minutes. This controlled boiling is crucial for achieving the right fudge consistency. Be precise with your timing.
- After the 4 minutes of boiling, immediately remove the saucepan from the heat.
- Now, it’s time to incorporate the creamy elements. Stir in the 12 ounces of vanilla chips and the 7 ounces of marshmallow cream. Continue to stir until the mixture is completely smooth and all the chips and marshmallow cream have melted and incorporated into the base. This usually takes about 5-10 minutes of gentle stirring.
- Once the mixture is smooth, set aside 1 cup of this base fudge mixture in a separate, heatproof bowl. This will be for your vanilla swirl.
- To the remaining mixture in the saucepan, add the 3 teaspoons of orange extract, the 12 drops of yellow food coloring, and the 9 drops of red food coloring. Stir thoroughly until the color is evenly distributed, creating that signature creamsicle hue. You’ll be aiming for a vibrant, cheerful orange.
- Pour the orange-colored fudge mixture into the prepared greased 13×9-inch pan. Spread it evenly to the edges.
- Now, take the reserved 1 cup of plain white fudge mixture. Drop this mixture by tablespoons randomly over the top of the orange fudge in the pan. Don’t worry about making it perfect; the randomness adds to the charm.
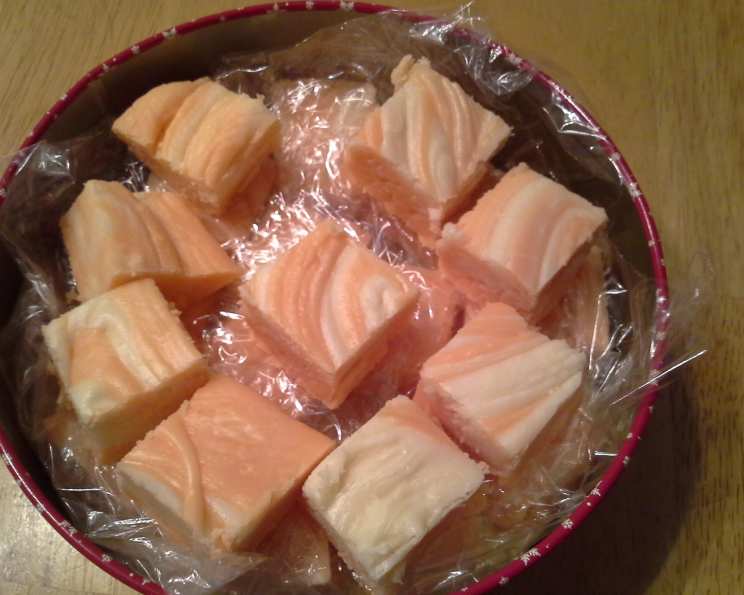
- Using a knife (a butter knife or a skewer works well), gently swirl the white mixture into the orange mixture. Make just a few passes, swirling in different directions to create a marbled effect. Avoid over-swirling, as you want distinct ribbons of both colors.
- Cover the pan with plastic wrap or a lid.
- Chill the fudge in the refrigerator until it has completely set. This will typically take at least 2-3 hours, but overnight is even better for optimal firmness.
- Once the fudge is firm, cut it into squares of your desired size. A warm knife can help make cleaner cuts through chilled fudge.
Expert Tips & Tricks
Achieving perfect fudge isn’t just about following the steps; it’s about understanding the nuances. For an extra smooth texture, ensure your sugar is completely dissolved before boiling – undissolved sugar crystals can lead to a grainy fudge. When boiling, use a candy thermometer if you have one, aiming for the soft-ball stage (around 235-240°F or 113-116°C), though the 4-minute boil specified is a reliable method for this recipe. If your fudge seems too soft, it might be undercooked; if it’s too hard, it might have been boiled too long or at too high a temperature. For a cleaner swirl, slightly warm the reserved white fudge mixture if it has cooled too much and thickened.
Serving & Storage Suggestions
This Orange Creamsicle Swirl Fudge is best served chilled, offering a delightful contrast between its creamy texture and refreshing flavor. It’s perfect for dessert platters, bake sales, or simply as a sweet treat with a cup of coffee or tea. Store any leftover fudge in an airtight container at room temperature for up to 3-4 days, or in the refrigerator for up to 2 weeks. If storing in the refrigerator, allow it to come to room temperature for about 15-20 minutes before serving for the best texture. For longer storage, you can freeze individual pieces, tightly wrapped in plastic wrap and then placed in a freezer-safe bag or container.
Nutritional Information
Here’s an estimated nutritional breakdown for this delightful fudge:
| Nutrient | Amount per Serving (approx. 1/20th of recipe) | % Daily Value (approx.) |
|---|---|---|
| Calories | 666.8 kcal | |
| Calories from Fat | 282 kcal | |
| Total Fat | 31.4 g | 48% |
| Saturated Fat | 19.5 g | 97% |
| Cholesterol | 65.8 mg | 21% |
| Sodium | 151.5 mg | 6% |
| Total Carbohydrate | 96.5 g | 32% |
| Dietary Fiber | 0 g | 0% |
| Sugars | 89.5 g | 358% |
| Protein | 2.7 g | 5% |
Note: Nutritional values are estimates and can vary based on specific ingredient brands and portion sizes.
Variations & Substitutions
While the classic orange and vanilla combination is divine, feel free to experiment! For a lemon-lime twist, use a combination of lemon extract and lime extract. You could also swap the vanilla chips for white chocolate chips for a richer creamy base. If you’re feeling adventurous, a hint of peppermint extract could add an unexpected yet delightful note. For a slightly different texture, you could try using sweetened condensed milk instead of heavy cream, though this may alter the cooking time and final consistency.
FAQs (Frequently Asked Questions)
Q: Why is my fudge grainy?
A: Grainy fudge is often caused by undissolved sugar crystals. Ensure the sugar is fully dissolved in the butter and cream mixture over low heat before bringing it to a boil.
Q: My fudge didn’t set. What went wrong?
A: This usually means it wasn’t cooked long enough or to a high enough temperature. For this recipe, the 4-minute boil is critical. Ensure it reaches a consistent rolling boil for the full duration.
Q: Can I make this fudge dairy-free?
A: This recipe relies heavily on dairy (butter, cream, vanilla chips). Adapting it to be dairy-free would require significant substitutions and testing of alternative ingredients, which may alter the texture and flavor significantly.
Q: How do I get a really defined swirl?
A: Don’t over-mix when swirling! Just a few gentle passes with the knife are enough to create beautiful marbled patterns without blending the colors completely.
Q: Can I make this without food coloring?
A: Yes, you can omit the food coloring. The fudge will have a beautiful creamy white and a more muted orange hue from the extract itself, still tasting delicious.
This Orange Creamsicle Swirl Fudge is a testament to the enduring power of simple flavors and sweet memories. It’s a recipe that bridges the gap between childhood nostalgia and grown-up indulgence, offering a delightful escape with every bite. I encourage you to gather your ingredients, embrace the process, and let the sweet aroma fill your kitchen. It’s a treat that’s sure to bring a smile to your face and a touch of sunshine to your day. Enjoy!