
The Irresistible Aroma of Home: Crafting Olive Bread in Your Bread Machine
There are certain aromas that, for me, are inextricably linked to the warmth of a kitchen and the comfort of home. The smell of baking bread is paramount, of course, but when that yeasty perfume mingles with the briny, herbaceous notes of olives and garlic, it transcends mere deliciousness and becomes an olfactory masterpiece. I remember a particular bakery, tucked away on a quiet street in my neighborhood, that occasionally produced an olive bread so divine it haunted my dreams. I’ve spent countless hours in my own kitchen, striving to recreate that magic, and while perfection remains elusive, this bread machine recipe comes remarkably close. It’s a testament to the power of good ingredients, particularly the olives themselves; the better the olives, the more profound the flavor, transforming a simple loaf into something truly special.
Recipe Overview
- Prep Time: 15 minutes
- Cook Time: 3 hours 10 minutes (Bread Machine Cycle)
- Total Time: 3 hours 25 minutes
- Servings: 6-8
- Yield: 1 loaf
- Dietary Type: Vegetarian
Ingredients
This recipe sings with the robust flavors of olives, softened onions, and aromatic herbs, all brought together in a beautifully textured bread.
- 4 cups white bread flour
- 1 1/3 cups water, lukewarm
- 1 teaspoon sugar
- 1 teaspoon salt (feel free to add a touch more if you adore a saltier crust)
- 7-8 grams dried yeast (or equivalent active dry yeast)
- 1 1/2 tablespoons olive oil
- 2/3 cup Kalamata olives, pitted (ensure they are whole, not sliced, for the best texture and flavor distribution)
- 2 slices onion (approximately 2 tablespoons when chopped)
- 1/2 teaspoon oregano
- 1 garlic clove, pressed
- 1 teaspoon tomato paste
- Black pepper to taste
Equipment Needed
- Bread machine
- Sharp knife
- Measuring cups and spoons
- Small bowl
Instructions
The beauty of this recipe lies in its simplicity, thanks to the trusty bread machine. The real work is in preparing the flavor-packed olive mixture.
- Prepare the Onion: Take your two slices of onion and sprinkle them lightly with salt. Allow them to sit for about 5 minutes. This step helps to soften the onion and mellow its sharp, pungent flavor, making it more agreeable in the bread. After resting, rinse the salted onion slices thoroughly under cool water. Then, squeeze them firmly to drain out as much excess moisture as possible. You should end up with approximately 2 tablespoons of finely chopped, softened onion.
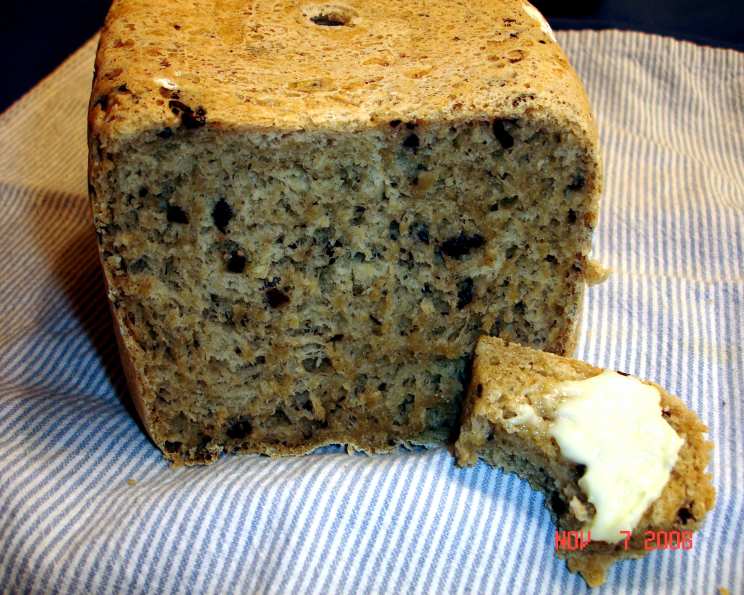
- Prepare the Olives: Using a sharp knife, carefully pit your Kalamata olives. Once pitted, give them a rough chop. You don’t want a fine mince, as chunks of olive add delightful bursts of flavor and texture throughout the bread.
- Create the Olive Mixture: In a small bowl, combine the chopped olives, the prepared chopped onion, the oregano, the pressed garlic, and the tomato paste. Grind in a little fresh black pepper to your liking. Stir everything together until well combined. This mixture is the heart and soul of your olive bread, infusing every bite with its savory goodness.
- Load the Bread Machine: Refer to your bread machine’s manual for the recommended order of ingredients. Generally, it’s liquid first, then solids. Add the lukewarm water, olive oil, sugar, and salt to the bread pan. Next, add the white bread flour, ensuring it covers the liquids. Finally, place the dried yeast in its designated dispenser or on top of the flour (again, consult your machine’s instructions).
- Add the Olive Mixture: Once the machine is set and ready to begin its cycle, wait for the “add extras” beep. This is your cue! At this point, carefully add the prepared olive mixture into the bread machine pan. This ensures the olives and aromatics are incorporated evenly without being overworked by the initial kneading stages, which can sometimes break them down too much.
- Bake the Bread: Close the lid and select the basic cycle on your bread machine. This cycle typically runs for around 3 hours. Choose your preferred crust setting – medium is a good starting point, but if you enjoy a deeper, more caramelized crust, opt for dark.
- Cool and Enjoy: Once the baking cycle is complete, carefully remove the bread pan from the machine. Invert the pan onto a wire rack to release the loaf. Allow the olive bread to cool completely before slicing. This is crucial for the texture to set properly, ensuring clean slices and preventing a gummy interior.
This bread is absolutely wonderful served alongside a fresh Greek salad, or it makes a superb base for dips like tarama or smoky eggplant dip.
Expert Tips & Tricks
- Quality Olives Matter: I can’t stress this enough – the flavor of your olive bread is directly tied to the quality of your olives. Opt for good-quality Kalamata olives, preferably from a Greek producer, for the most authentic and robust taste. Avoid pre-sliced olives as they can become mushy.
- Onion Prep is Key: Don’t skip the step of salting and draining the onion. It truly transforms its flavor profile from sharp to sweet and mellow, integrating seamlessly into the bread without overpowering other notes.
- Machine Nuances: Bread machines can vary slightly in their cycles and heating elements. Pay attention to how your machine bakes. If your usual setting tends to burn the top, you might consider using the medium crust setting even if you prefer a darker loaf. Conversely, if your crusts are consistently pale, lean towards the darker setting.
- Checking for Doneness: While bread machines are generally foolproof, a golden rule for any bread is to check for doneness by tapping the bottom. A hollow sound indicates it’s perfectly baked. You can do this by carefully removing the loaf (if your machine allows mid-cycle access, or at the end) and giving it a gentle tap.
Serving & Storage Suggestions
This fragrant olive bread is a showstopper on its own, but it truly shines when paired with other Mediterranean delights. Serve it warm, sliced thickly, with a drizzle of good quality extra virgin olive oil, or alongside a platter of antipasti. It’s the perfect accompaniment to hearty stews, roasted vegetables, or as a side for grilled meats and fish.
Storage: Once completely cooled, store the olive bread in an airtight container or a bread bag at room temperature for up to 3 days. For longer storage, slice the bread and freeze it in a freezer-safe bag or container for up to 3 months. To reheat, you can toast slices directly from frozen, or thaw slices at room temperature and then warm them in a toaster oven or a regular oven at 350°F (175°C) for a few minutes until heated through.
Nutritional Information
| Nutrient | Amount per Serving | % Daily Value |
|---|---|---|
| Calories | 360 kcal | |
| Total Fat | 15 g | 19% |
| Saturated Fat | 3 g | 15% |
| Cholesterol | 0 mg | 0% |
| Sodium | 650 mg | 28% |
| Total Carbohydrate | 50 g | 18% |
| Dietary Fiber | 3 g | 11% |
| Sugars | 2 g | 4% |
| Protein | 9 g | 18% |
Note: Nutritional values are estimates and can vary based on specific ingredients used.
Variations & Substitutions
- Herbal Twist: Feel free to experiment with other dried herbs. A pinch of rosemary or thyme can add a different aromatic dimension.
- Spicy Kick: For those who enjoy a bit of heat, a pinch of red pepper flakes in the olive mixture will add a subtle warmth.
- Cheese Lover’s Dream: Incorporate about 1/2 cup of crumbled feta cheese or shredded Parmesan cheese along with the olive mixture for a cheesy, briny variation.
- Whole Wheat Blend: For a heartier loaf, you can substitute up to half of the white bread flour with whole wheat flour. You might need to adjust the liquid slightly, adding a tablespoon at a time if the dough seems too dry.
FAQs
Q: Why should I use whole Kalamata olives instead of sliced ones?
A: Whole olives, when roughly chopped, provide better bursts of flavor and a more pleasing texture throughout the bread, preventing them from breaking down too much during the kneading process.
Q: Can I use fresh yeast instead of dried yeast?
A: Yes, you can substitute fresh yeast for dried. Generally, you’ll need about three times the amount of fresh yeast as dried yeast by weight (so, roughly 21-24 grams of fresh yeast for this recipe). Crumble it and dissolve it in the lukewarm water before adding other liquids.
Q: My bread machine doesn’t have an “add extras” beep. What should I do?
A: If your machine lacks this feature, add the olive mixture about 10-15 minutes into the kneading cycle, just as the dough is becoming smooth and elastic but before it starts its significant rise.
Q: How can I ensure my bread doesn’t stick to the bread pan?
A: Always ensure your bread pan is clean and lightly greased, especially if it’s an older or non-stick model. Sometimes, a small amount of extra olive oil around the edges of the pan can help.
Q: Is this recipe suitable for a gluten-free diet?
A: This specific recipe uses wheat flour and is not gluten-free. You would need to use a specialized gluten-free bread flour blend and likely adjust liquid and yeast quantities significantly.
Final Thoughts
This olive bread recipe is more than just a set of instructions; it’s an invitation to experience the profound satisfaction of creating something delicious from simple ingredients. The aroma that will fill your home as it bakes is an unparalleled pleasure. I encourage you to try this recipe, savor its Mediterranean charm, and perhaps even share a slice with someone you cherish. It’s the perfect companion for a glass of robust red wine or a refreshing crisp white. Happy baking!