
Old Widow Walker’s Ziploc Omelettes: A Lesson in Culinary Magic and Childhood Memories
My earliest culinary adventures weren’t in a gleaming professional kitchen, but rather in the slightly-too-warm, perpetually fragrant church basement. Mrs. Walker, my Sunday school teacher, was a woman as enigmatic as she was kind. Her age was a whispered legend, a number rumored to be well over a century, and her spirit, sharp as the formidable Bowie knife she inexplicably kept in her purse, was legendary. It was during those cherished lessons, with the comforting aroma of simmering water and the excited chatter of children, that I first encountered the humble, yet utterly brilliant, Ziploc omelette. This wasn’t just cooking; it was a small act of creation, a tangible reward for young hands, and a memory I hold dear, now over three decades later. Mrs. Walker, bless her ageless heart, was tickled pink that I remembered our little kitchen caper and, with a speed that belied her rumored years, rattled off the instructions as if she were dictating a grocery list. She’s even delighted that I’m passing this on, a testament to the enduring power of a simple, shared meal.
Recipe Overview
- Prep Time: As needed for ingredient prep, approximately 15-20 minutes
- Cook Time: Exactly 13 minutes
- Total Time: Approximately 28-33 minutes
- Servings: 5
- Yields: 5 omelettes
- Dietary Type: Adaptable (e.g., Gluten-Free, can be made Vegetarian)
Ingredients
The beauty of Mrs. Walker’s Ziploc Omelettes lies in its adaptable nature. The core components are simple, but the additions are where the magic truly happens, allowing for personal expression and catering to even the pickiest eaters.
- 10 large or extra-large eggs
- 2 cups grated cheese (a blend of cheddar and Monterey Jack is a personal favorite, but feel free to experiment with your preferred melting cheeses)
- 1 cup chopped ham (fully cooked, diced ham works best)
- 1 cup crumbled bacon (pre-cooked and cooled bacon offers convenience)
- 1 chopped onion (finely diced for even distribution)
- 1 chopped green pepper (finely diced for a fresh, crisp bite)
- 1 cup chopped tomatoes (seeded and diced for less moisture)
- 1 cup purchased hash browns, thawed (ensure they are fully thawed and any excess moisture is patted away)
Equipment Needed
The genius of this recipe is its minimal equipment requirement. It’s designed for accessibility, making it perfect for a church kitchen, a camping trip, or even a fun activity at home.
- Quart-size Ziploc freezer bags (ensure they are sturdy freezer bags for durability in boiling water)
- Permanent marker (for labeling)
- Large pot (for boiling water, big enough to hold multiple bags without crowding)
- Tongs (for safely handling the hot bags)
- Cutting board and knife (for ingredient preparation)
- Measuring cups and spoons
Instructions
This is where the culinary alchemy truly takes place. The process is straightforward, engaging, and remarkably forgiving, allowing for a high success rate even with novice cooks.
- Personalize Your Vessel: Begin by having each child, or participant, write their name clearly on a quart-size Ziploc freezer bag using a permanent marker. This not only identifies their creation but also instills a sense of ownership.
- The Egg Foundation: Carefully crack 2 eggs (large or extra-large) directly into the labeled bag. It’s crucial to not add more than 2 eggs per bag to ensure even cooking. Once the eggs are in, gently shake the bag to combine them, creating a vibrant yellow liquid.
- A World of Flavors: Present a delightful array of prepared ingredients. This is where the fun truly begins! Offer a selection of cheeses, ham, bacon, onion, green pepper, tomatoes, and hash browns, all chopped or crumbled into manageable, bite-sized pieces.
- Construct Your Culinary Masterpiece: Encourage each participant to add their prepared ingredients of choice to their bag. They can be as adventurous or as classic as they wish. Once they’ve added their desired fillings, it’s time to shake the bag again to distribute the ingredients evenly within the egg mixture.
- Seal the Deal: This is a critical step for successful cooking. Carefully press out as much air as possible from the bag before sealing it securely. Ensure the ziploc is fully and tightly closed to prevent any water from seeping in.
- The Boiling Bath: Bring a large pot of water to a rolling boil. Gently, using tongs, place the sealed bags into the boiling water. It is important to cook the bags for exactly 13 minutes. You can typically cook 6 to 8 omelettes in a large pot at a time. If you are preparing more, you will need to make another pot of boiling water to ensure consistent cooking temperatures and times for all omelettes.
- The Grand Reveal: After the precise 13 minutes of cooking, carefully remove the bags from the boiling water using tongs. Place them on a heat-proof surface.
- Unveiling the Omelette: To serve, carefully open the bags. The cooked omelette should roll out easily onto a plate. Don’t be surprised if it takes a gentle nudge or a little maneuvering.
- A Moment of Triumph: Be prepared for the sheer delight and often, squeals of triumph, from children as they witness their very first self-cooked meal emerge from the bag. This is a moment that truly solidifies a lifetime memory.
Expert Tips & Tricks
As a chef, I appreciate any shortcut that enhances flavor or streamlines the process. While this recipe is already wonderfully simple, a few touches can elevate the experience.
- Pre-Cooked Perfection: For maximum efficiency, especially when cooking for a group, having the bacon crumbled and ham chopped ahead of time is a significant time-saver. Similarly, ensure your hash browns are fully thawed.
- Moisture Control: When adding ingredients like tomatoes, it’s a good idea to seed them and pat them dry with a paper towel. Excess moisture can sometimes make the omelette slightly watery.
- Ingredient Harmony: Encourage a balance of flavors. Too many ingredients can weigh down the omelette. A good starting point is usually a combination of protein (ham/bacon), cheese, and a vegetable.
- Bagging Strategy: For a neater presentation, encourage participants to distribute their chosen ingredients evenly within the egg mixture before shaking. This helps prevent clumping.
- Temperature Vigilance: While the recipe calls for rolling, boiling water, ensure your stove maintains a consistent, vigorous boil. A weak simmer won’t cook the eggs properly in the allocated time.
Serving & Storage Suggestions
The Ziploc omelette is a wonderfully self-contained dish, making serving and cleanup a breeze.
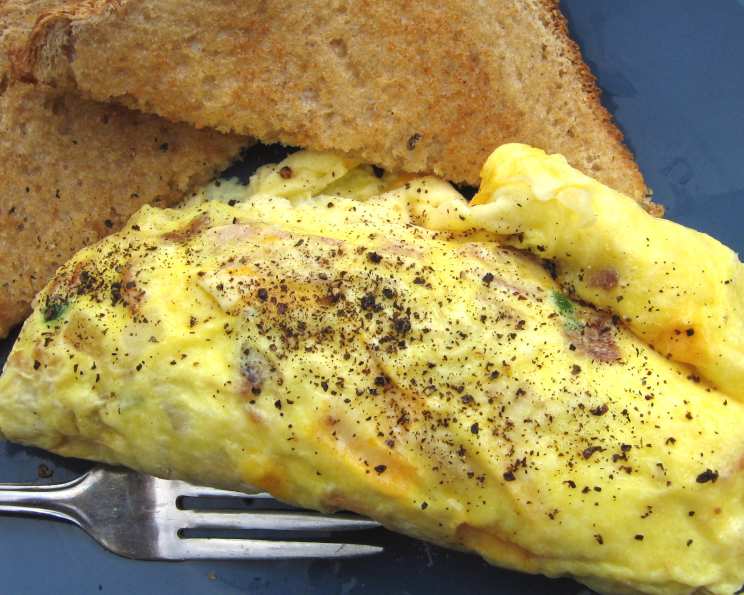
- Serving: The omelette is best served immediately after it’s released from the bag. It’s a complete meal on its own, but it pairs wonderfully with a side of fresh fruit, toast, or a simple green salad. The visual of the rolled omelette is charming and satisfying.
- Storage: Leftover omelettes (if there are any!) can be stored in an airtight container in the refrigerator for up to 2 days. Reheat gently in a microwave or a non-stick skillet over low heat. It’s important to note that the texture may change slightly upon reheating, becoming a bit firmer. This method is not designed for long-term freezer storage due to the nature of the cooked eggs in a sealed bag.
Nutritional Information
The provided nutritional information is an estimate and can vary significantly based on the specific ingredients and quantities used by each individual. This is a general approximation for a single omelette based on the core ingredients and a moderate amount of added fillings.
| Nutrient | Amount per Serving | % Daily Value |
|---|---|---|
| Calories | 554.8 kcal | |
| Calories from Fat | 351 kcal | |
| Total Fat | 39.1 g | 60% |
| Saturated Fat | 15.5 g | 77% |
| Cholesterol | 435.1 mg | 145% |
| Sodium | 1351.5 mg | 56% |
| Total Carbohydrate | 17 g | 5% |
| Dietary Fiber | 1.4 g | 5% |
| Sugars | 1.8 g | 7% |
| Protein | 32.3 g | 64% |
Note: Percent Daily Values are based on a 2,000 calorie diet. Your daily values may be higher or lower depending on your calorie needs.
Variations & Substitutions
The adaptable nature of the Ziploc omelette allows for a world of creative exploration.
- Vegetarian Delight: Omit the ham and bacon and load up on extra vegetables like mushrooms, spinach (wilted slightly before adding), or jalapeños for a kick. Add a variety of cheeses for richness.
- Spicy Kick: For those who enjoy a bit of heat, add finely diced jalapeños or a pinch of red pepper flakes to the egg mixture.
- Herbaceous Notes: Freshly chopped parsley, chives, or dill can add a wonderful aromatic dimension to the omelette.
- Breakfast Hash: Experiment with different pre-cooked breakfast meats like sausage or turkey bacon.
- Cheese Galore: Don’t be afraid to mix and match cheeses! Feta, goat cheese, or Swiss can offer unique flavor profiles.
FAQs (Frequently Asked Questions)
Q: Is it truly safe to cook food in Ziploc bags in boiling water?
A: Yes, as long as you use freezer-grade Ziploc bags, which are designed to withstand higher temperatures, and ensure they are properly sealed, this method is safe for cooking eggs and other ingredients. The key is to use bags specifically designed for freezer storage.
Q: What happens if I add more than 2 eggs per bag?
A: Adding more than 2 eggs to a single bag can lead to uneven cooking. The eggs might remain too liquidy in the center or the bag may not seal properly, compromising the cooking process.
Q: Can I use regular sandwich Ziploc bags instead of freezer bags?
A: It is strongly recommended to use freezer-grade Ziploc bags. Regular sandwich bags are not designed to withstand the heat of boiling water and could potentially melt or leach chemicals.
Q: My omelette didn’t roll out easily. What did I do wrong?
A: Ensure you’ve thoroughly shaken the bag to distribute ingredients and that the eggs have cooked through. Sometimes, a gentle squeeze from the bottom of the bag can help release it. Overcrowding the bag with too many fillings can also make it harder to release.
Q: How can I make these omelettes ahead of time?
A: While the cooking process is designed for immediate consumption, you can prepare all the chopped ingredients and store them in separate containers in the refrigerator. The eggs can be cracked into the bags just before the cooking process begins.
Final Thoughts
Old Widow Walker’s Ziploc Omelettes are more than just a recipe; they are a gateway to fond memories and a testament to the joy of simple, shared culinary experiences. This method, born out of necessity and perhaps a touch of Mrs. Walker’s unique brand of wisdom, proves that delicious and satisfying meals don’t require elaborate equipment or advanced techniques. It’s a fantastic way to engage children in the kitchen, fostering a sense of accomplishment and a lifelong appreciation for food. So, gather your ingredients, embrace the simplicity, and create your own cherished memories, one Ziploc omelette at a time. I encourage you to share this delightful recipe with the young chefs in your life, and perhaps even write to me with your own stories of culinary adventures!