
The Unsung Hero: My Devil’s Food Cake Reinvention (Cake Mix Doctor Style)
There are certain cakes that whisper stories of childhood, of birthday parties with slightly too-bright frosting and the hum of anticipation. For me, that cake is Devil’s Food. It’s the deep, dark, almost mysterious sibling to the more flamboyant chocolate cake, and when I first encountered the “Cake Mix Doctor” approach to this classic, it was like unlocking a secret. Suddenly, that humble box mix wasn’t just a shortcut; it was a canvas for something truly decadent, a testament to how a few thoughtful additions can elevate the ordinary into the extraordinary. The real magic, as the book rightly proclaims, lies in the frosting, but the cake itself, when treated with this much respect, sings.
Recipe Overview
- Prep Time: 10 minutes
- Cook Time: 30 minutes
- Total Time: 40 minutes
- Servings: 16
- Yields: 1 cake
- Dietary Type: Classic
Ingredients
This recipe relies on the foundation of a good quality devil’s food cake mix, but we’re going to build upon it with a few key additions to unlock its full potential.
- 1 (18 1/4 ounce) package devil’s food cake mix (look for one that does not have pudding in the mix)
- 2 tablespoons unsweetened cocoa powder
- 1 1/3 cups buttermilk
- 1/2 cup vegetable oil
- 3 large eggs
- 1 teaspoon pure vanilla extract
Equipment Needed
- Two 9-inch round cake pans
- Large mixing bowl
- Electric mixer (handheld or stand mixer)
- Rubber spatula
- Wire cooling racks
- Oven
Instructions
The beauty of this recipe lies in its simplicity, yet the execution is where the transformation happens. Follow these steps carefully, and you’ll be rewarded with a Devil’s Food cake that tastes anything but from a box.
-
Prepare Your Station: Position an oven rack in the center of your oven. Preheat your oven to 350°F (175°C). It’s crucial to have your oven at the correct temperature before your batter goes in. Next, grease and flour two 9-inch round cake pans. This ensures your cakes release cleanly and look pristine once baked. Don’t skip this step, or you risk torn edges.
-
Combine the Elements: In a large mixing bowl, add the devil’s food cake mix, the unsweetened cocoa powder, the buttermilk, the vegetable oil, the three large eggs, and the pure vanilla extract. These additions are what elevate this cake from good to spectacular. The cocoa powder intensifies the chocolate flavor, and the buttermilk adds a tender crumb and a subtle tang that balances the sweetness.
-
The Mixing Process: Begin by blending all the ingredients with an electric mixer on low speed for 1 minute. This initial low-speed mix helps to incorporate the ingredients without overworking the batter. Once the initial minute is up, stop the machine and scrape down the sides of the bowl with your rubber spatula. Ensure there are no dry pockets of cake mix clinging to the bottom or sides.
-
Develop the Batter: Increase the speed to medium and beat for 2 minutes more. Continue to scrape the sides of the bowl as needed during this stage. You’ll notice the batter transforming into a rich, glossy, and well-combined mixture. The goal here is to develop the gluten just enough for structure without making the cake tough.
-
Portioning the Batter: Divide the batter evenly between the two prepared cake pans. Use your rubber spatula to smooth the tops of the batter in each pan. This ensures even baking and a level surface for frosting later.
-
The Bake: Place the pans side by side in the preheated oven. Baking them side by side helps ensure even heat distribution. Bake for 28 to 30 minutes. The key indicator of doneness is when the cakes spring back when lightly pressed with your finger in the center. You can also insert a toothpick into the center; if it comes out clean or with a few moist crumbs attached, the cakes are ready.
-
Cooling the Cakes: Once baked, remove the pans from the oven and let them cool on wire racks for 10 minutes. This initial cooling period in the pans allows the cakes to firm up slightly, making them easier to handle. After 10 minutes, run a knife around the edges of each cake to loosen them from the pans. Carefully invert the cakes onto the wire racks. If they don’t slide out easily, a gentle tap on the bottom of the pan should do the trick. Allow the cakes to cool completely, which typically takes another 30 minutes. You want them entirely cool before frosting, otherwise, your frosting will melt.
Expert Tips & Tricks
While this recipe is straightforward, a few professional touches can elevate your Devil’s Food cake even further.
- Cocoa Quality Matters: Using a good quality unsweetened cocoa powder can make a noticeable difference in the depth of flavor. Dutch-processed cocoa will yield a darker, richer color and a smoother taste.
- Buttermilk Shortcut: If you don’t have buttermilk on hand, you can make a quick substitute: measure out 1 1/3 cups of regular milk and stir in 1 tablespoon of white vinegar or lemon juice. Let it sit for 5-10 minutes until it curdles slightly.
- Room Temperature Ingredients: While not explicitly called for, using room temperature eggs and ensuring your buttermilk isn’t ice-cold will help everything emulsify more smoothly.
- Don’t Overbake: Overbaking is the enemy of a moist cake. Trust the toothpick test and the spring-back method. It’s better to err slightly on the side of underbaked than overbaked.
Serving & Storage Suggestions
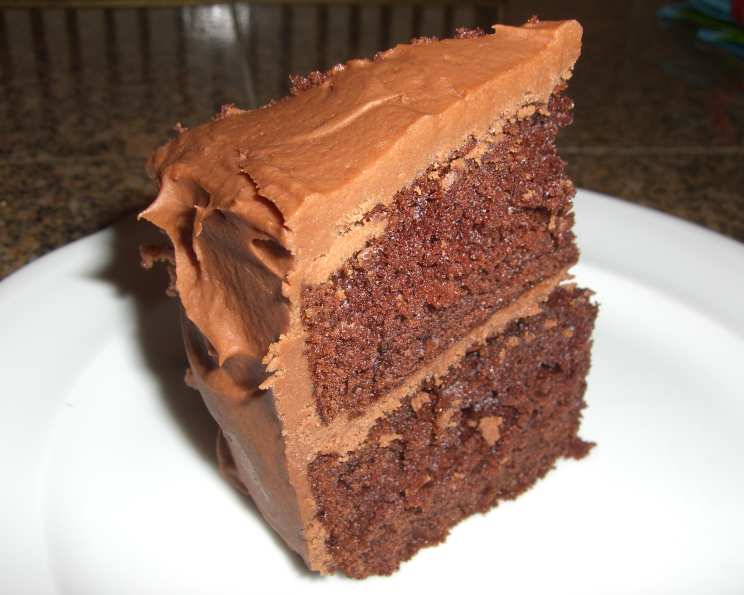
This Devil’s Food cake is a showstopper on its own, but it truly shines when paired with the “Perfect Chocolate Frosting” as suggested by the Cake Mix Doctor. Frosting the cooled cakes generously creates a beautiful contrast in texture and flavor. You can dust the top with a light dusting of powdered sugar for an elegant, unfussy finish if frosting isn’t your immediate plan.
For storage, once frosted, the cake can be kept at room temperature in an airtight container for up to 2-3 days, provided your kitchen isn’t excessively warm. If you live in a warmer climate, or if the cake is heavily frosted with a buttercream that contains dairy, refrigerating it is a safer bet. When storing in the refrigerator, let the cake come to room temperature for about 30 minutes before serving for the best texture and flavor. Unfrosted cake layers can be wrapped tightly in plastic wrap and then aluminum foil and stored at room temperature for a day or two, or frozen for up to 2 months.
Nutritional Information
Please note: This information is an estimation and can vary based on the specific brands of ingredients used. This is for one serving out of 16.
| Nutrient | Amount per Serving | % Daily Value |
|---|---|---|
| Calories | 223 kcal | 11% |
| Total Fat | 13 g | 17% |
| Saturated Fat | 2.4 g | 12% |
| Cholesterol | 36 mg | 12% |
| Sodium | 302 mg | 13% |
| Total Carbohydrate | 25 g | 9% |
| Dietary Fiber | 1 g | 4% |
| Total Sugars | 14 g | 53% |
| Protein | 4 g | 7% |
Variations & Substitutions
While this recipe is designed for classic Devil’s Food, here are a few ways to put your own spin on it:
- Mocha Magic: Add 1-2 tablespoons of instant espresso powder to the dry ingredients to create a rich mocha flavor.
- Orange Zest Twist: Incorporate the zest of one large orange into the batter for a subtle citrus undertone that pairs beautifully with chocolate.
- Boozy Indulgence: For an adult twist, add 2-3 tablespoons of a dark liqueur like Kahlua or Baileys to the batter. Adjust buttermilk slightly if needed.
FAQs
Q: Can I use a different type of oil?
A: Yes, while vegetable oil is recommended for its neutral flavor, you can also use canola oil or even melted coconut oil for a slightly different nuance.
Q: What if I don’t have buttermilk?
A: You can easily make a substitute by adding 1 tablespoon of white vinegar or lemon juice to 1 1/3 cups of regular milk and letting it sit for 5-10 minutes.
Q: How do I know if my cake is truly done?
A: The best indicators are a cake that springs back when gently pressed in the center and a toothpick inserted into the middle that comes out clean or with a few moist crumbs.
Q: Can I bake this in a different pan size?
A: Baking times will vary significantly with different pan sizes. If using a different size, adjust baking time accordingly and use the toothpick test to determine doneness.
Q: Why is the cocoa powder added separately?
A: Adding the extra cocoa powder intensifies the chocolate flavor and deepens the color of the Devil’s Food cake, enhancing the richness beyond what the cake mix alone provides.
A Final Note
There’s a profound satisfaction in taking something familiar, like a box cake mix, and transforming it into something deeply personal and utterly delicious. This Devil’s Food cake, enhanced by the thoughtful additions from the Cake Mix Doctor, is a testament to that principle. It’s a cake that’s perfect for celebrations, for quiet afternoons with a cup of coffee, or simply for when you need a little bit of chocolatey comfort. I encourage you to bake it, to frost it generously, and to savor every rich, moist bite. And do let me know how your own rendition turns out – happy baking!