
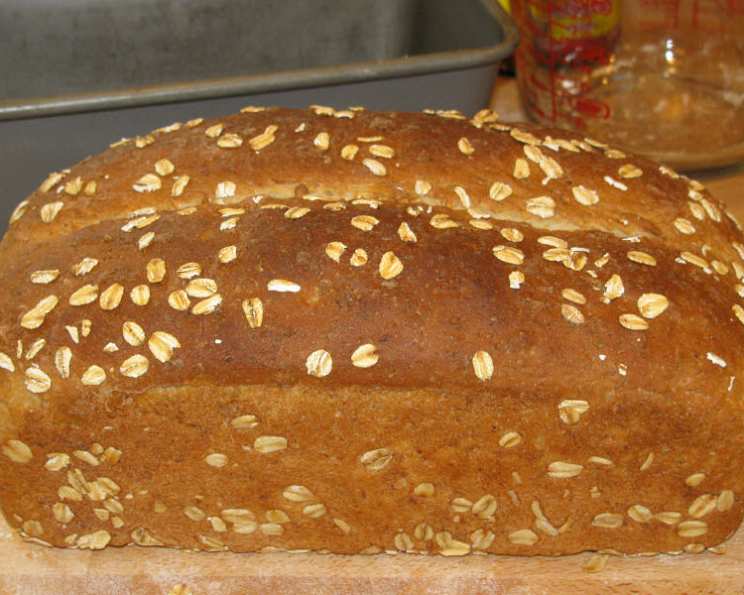
The Humble Heart of the Hearth: Mastering Oatmeal Bread
There’s a certain comfort that emanates from a loaf of warm, freshly baked oatmeal bread, a scent that instantly transports me back to my grandmother’s kitchen. I can still picture her, hands dusted with flour, patiently working the dough as the afternoon sun streamed through the window, illuminating the fine dusting of oats clinging to the countertop. It wasn’t just a bread; it was an act of love, a tangible expression of home and hearth. Each slice, with its subtly sweet, slightly chewy texture, felt like a warm embrace, a reminder of simpler times and the enduring power of honest ingredients.
Recipe Overview
- Prep Time: 15 minutes
- Cook Time: 40-45 minutes
- Total Time: Approximately 3 hours 35 minutes (including rising time)
- Servings: 12 slices per loaf
- Yield: 2 loaves
- Dietary Type: Contains Gluten, Dairy, Eggs
Ingredients
This oatmeal bread relies on a foundational set of pantry staples, enhanced by the wholesome goodness of rolled oats.
- 3 cups water
- 3 teaspoons salt
- 3 cups rolled oats
- 2⁄3 cup brown sugar
- 2 tablespoons butter
- 2 (1/4 ounce) packages active dry yeast
- 1⁄2 cup warm water (about 105-115°F)
- 6 to 6 1⁄2 cups all-purpose flour, plus more for dusting
Equipment Needed
To bring this beautiful loaf to life, you’ll want to have these essentials ready:
- Large mixing bowls
- Saucepan
- Measuring cups and spoons
- Whisk
- Wooden spoon or spatula
- Dough scraper (optional, but helpful)
- 2 (9×5 inch) loaf pans
- Clean kitchen towels or plastic wrap
- Wire cooling rack
- Aluminum foil
Instructions
Embarking on the journey of making homemade oatmeal bread is a rewarding experience, one that fills your kitchen with an irresistible aroma and results in a loaf far superior to anything store-bought. Follow these steps carefully, and you’ll be rewarded with a delicious, hearty bread.
-
Activate the Yeast: In a small bowl, combine the 1/2 cup of warm water with the dry yeast. Give it a gentle stir and let it sit for about 5-10 minutes. You’ll know the yeast is active and ready when it becomes foamy and bubbly on the surface. This is a crucial step for a well-risen loaf.
-
Prepare the Oat Mixture: In a medium saucepan, combine the 3 cups of water and 3 teaspoons of salt. Bring this mixture to a rolling boil. Once boiling, remove it from the heat and stir in the 3 cups of rolled oats. Do not continue to boil the oats at this stage; simply let them soften in the hot water.
-
Incorporate Sweetness and Richness: Add the 2⁄3 cup of brown sugar and 2 tablespoons of butter to the oat mixture. Stir everything together until the sugar is dissolved and the butter has melted. Allow this mixture to cool to a lukewarm temperature. This is important because water that is too hot will kill the yeast, and water that is too cold won’t activate it properly. Aim for a temperature that feels comfortably warm to the touch.
-
Combine Wet Ingredients: Once the oat mixture has cooled to lukewarm, gently stir in the activated yeast mixture. Mix everything thoroughly until well combined.
-
Develop the Dough: Begin adding the flour to the wet ingredients. Start with about 6 cups, mixing with a wooden spoon or spatula until a shaggy dough begins to form. Continue adding flour, about 1/2 cup at a time, until the dough is a good consistency for kneading. It should be slightly sticky but manageable, pulling away from the sides of the bowl.
-
Knead with Purpose: Turn the dough out onto a lightly floured surface. Now comes the satisfying work of kneading. Knead the dough for approximately 100 strokes. This process develops the gluten, which is essential for a good bread texture. You’ll feel the dough transform from sticky and rough to smooth and elastic under your hands. A dough scraper can be helpful here to lift the dough and prevent it from sticking too much.
-
First Rise: The Waiting Game: Lightly grease a large mixing bowl with butter or cooking spray. Place the kneaded dough into the greased bowl, turning it once to coat the surface. Cover the bowl tightly with plastic wrap or a damp kitchen towel. Allow the dough to rise in a warm place for about 1 to 1 1/2 hours, or until it has doubled in size. Patience is key here; a good, slow rise contributes significantly to the flavor and texture.
-
Punch Down and Divide: Once the dough has doubled, gently punch it down to release the trapped air. This process redistributes the yeast and prepares the dough for its second rise. Divide the dough evenly in half.
-
Shape for the Pan: Grease two 9×5 inch loaf pans. Shape each half of the dough into a loaf and place one into each prepared pan. Gently press the dough into the pan to ensure it fills the corners.
-
Second Rise: The Final Ascent: Cover the loaf pans loosely with kitchen towels or plastic wrap. Let the dough rise again in a warm place for about 1 hour, or until the dough has risen to almost double its size and is peeking over the edges of the pans.
-
Bake to Golden Perfection: Preheat your oven to 375°F (190°C). Place the loaf pans on the middle rack of the preheated oven. Bake for 40-45 minutes. To prevent the crust from browning too quickly, loosely cover the tops of the loaves with aluminum foil after about 25-30 minutes of baking. The bread is done when it sounds hollow when tapped on the bottom, and a wooden skewer or thermometer inserted into the center registers around 190-200°F (88-93°C).
-
Cool Completely: Once baked, carefully remove the loaves from the pans and place them on a wire cooling rack. It’s essential to let the bread cool completely before slicing. This allows the internal structure to set properly, preventing a gummy texture. Resist the urge to cut into it too soon!
Expert Tips & Tricks
- Water Temperature is Key: For activating yeast, aim for water that is between 105°F and 115°F (40°C to 46°C). Too hot will kill it, too cold and it won’t wake up. A good test is if it feels comfortably warm on your wrist.
- Don’t Skimp on Kneading: Those 100 strokes are vital for gluten development. You’re aiming for a dough that is smooth, elastic, and bounces back slowly when gently poked. If it feels too sticky after adding the initial flour, add a little more, a tablespoon at a time, until it’s manageable.
- A Warm Spot for Rising: If your kitchen is cool, you can create a warm environment for your dough to rise. Try placing the covered bowl in a slightly warmed (but turned off) oven, or near a sunny window.
- The Foil Trick: The foil is your best friend for achieving a beautifully browned crust without burning. Keep an eye on your bread in the last 15-20 minutes of baking; if the crust is darkening too rapidly, that’s when the foil comes into play.
- Listen to Your Loaf: The “hollow sound” test is a classic baker’s trick. A well-baked loaf will have a satisfyingly hollow sound when you tap its bottom.
- Patience with Cooling: I know it’s tempting, but letting the bread cool completely is non-negotiable for the best texture. Slicing hot bread can lead to a dense, gummy interior.
Serving & Storage Suggestions
This versatile oatmeal bread is a delight served in so many ways. It’s fantastic toasted and slathered with butter, or as a base for your favorite sandwich fillings. It also makes a wonderful accompaniment to hearty soups and stews.
For storage, once completely cooled, wrap the loaves tightly in plastic wrap or place them in an airtight container. At room temperature, it will stay fresh for about 2-3 days. For longer storage, consider freezing. Wrap individual slices or whole loaves tightly in plastic wrap, then in foil or a freezer bag. Frozen bread can last for up to 3 months. To reheat, you can toast slices directly from frozen, or let a whole loaf thaw at room temperature for a few hours before slicing and toasting.
Nutritional Information
Here’s an estimated nutritional breakdown for this hearty oatmeal bread. Please note these are approximations and can vary based on specific ingredients and brands used.
| Nutrient | Amount per Serving (approx.) | % Daily Value |
|---|---|---|
| Calories | 2275.8 kcal | |
| Calories from Fat | 222 g | |
| Total Fat | 24.8 g | 38% |
| Saturated Fat | 9.4 g | 47% |
| Cholesterol | 30.5 mg | 10% |
| Sodium | 3637.4 mg | 151% |
| Total Carbohydrate | 449.2 g | 149% |
| Dietary Fiber | 28.2 g | 112% |
| Sugars | 73.4 g | 293% |
| Protein | 63.6 g | 127% |
Variations & Substitutions
While this recipe is a classic for a reason, feel free to explore some variations to make it your own:
- Oat Variation: For a finer texture, you can use quick-cooking oats, but be aware that the texture of the final bread might be slightly softer. If you want a heartier loaf, try adding a small amount of steel-cut oats for extra chewiness.
- Sweetness Adjustment: If you prefer a less sweet bread, you can reduce the brown sugar slightly, perhaps to 1⁄2 cup.
- Add-ins: Consider adding a handful of raisins, chopped nuts (like walnuts or pecans), or even some seeds (like sunflower or flax seeds) during the kneading process for added flavor and texture.
- Molasses Magic: For a deeper, richer flavor and a darker hue, you can substitute some of the brown sugar with molasses. Start with about 1/4 cup of molasses and adjust the brown sugar accordingly.
FAQs (Frequently Asked Questions)
Q: Why is my oatmeal bread dense and heavy?
A: This is often due to insufficient kneading, not allowing the dough to rise properly, or slicing the bread while it’s still too warm. Ensure you knead thoroughly and give the dough adequate time to double in size.
Q: Can I use instant oats instead of rolled oats?
A: While you can, instant oats will result in a softer, less chewy bread. Rolled oats provide that signature texture that makes oatmeal bread so distinctive.
Q: My bread is browning too quickly. What should I do?
A: The foil trick is your best friend here. Tent the top of the loaf loosely with aluminum foil during the last 25-30 minutes of baking to prevent over-browning.
Q: How long does this bread typically stay fresh?
A: When stored properly at room temperature and tightly wrapped, this oatmeal bread will stay fresh for about 2-3 days. For longer storage, freezing is recommended.
Q: Can I make this bread ahead of time and freeze it?
A: Absolutely! Oatmeal bread freezes exceptionally well. Allow it to cool completely, wrap it tightly, and store it in the freezer for up to 3 months.
Final Thoughts
This oatmeal bread is more than just a recipe; it’s an invitation to create something truly wonderful in your own kitchen. It’s a testament to the beauty of simple ingredients coming together to form something extraordinary. The process itself is meditative, a chance to connect with the ancient art of baking. I encourage you to give this recipe a try, to embrace the warmth and aroma that will fill your home, and to savor each delicious, hearty slice. It’s particularly delightful served warm with a generous dollop of butter, or alongside a steaming mug of your favorite tea or coffee. Happy baking!