
The Creamy Dream: Crafting Your Own Silky Oat Milk
There’s a certain magic that happens when you transform humble ingredients into something truly nourishing and delicious. For me, that magic reached a new level when I first discovered how simple it is to make oat milk at home. I remember standing in my kitchen, the scent of toasted oats mingling with the subtle sweetness of plain water, feeling a profound sense of accomplishment. It wasn’t just about having a dairy-free alternative; it was about the satisfaction of creating a pure, clean, and versatile staple from scratch, a liquid gold that would grace my morning coffee, blend into my smoothies, and bake into my favorite treats for days to come.
Recipe Overview
- Prep Time: Overnight (for soaking) + 10 minutes
- Cook Time: 0 minutes
- Total Time: Overnight + 10 minutes
- Servings: N/A (Yields a volume of milk)
- Yield: Approximately 2 liters (or 8 cups)
- Dietary Type: Vegan, Dairy-Free, Lactose-Free, Cholesterol-Free
Ingredients
- 1 cup rolled oats
- 6 ½ cups cold filtered water (for a thicker milk, use less water; for a thinner milk, use more)
- 1 pinch salt (Himalayan salt is recommended, but sea salt works beautifully too)
Equipment Needed
- Large clean bowl
- Clean cloth
- Blender (high-speed blender or immersion blender)
- Fine sieve or muslin cloth (nut milk bag can also be used)
- Bowl for straining
- Clean glass jar for storage
Instructions
- Begin the process the night before you plan to make your oat milk. In a large clean bowl, combine the rolled oats, 6 ½ cups of cold filtered water, and the pinch of salt.
- Cover the bowl with a clean cloth. Allow the mixture to soak overnight. This soaking period is crucial for softening the oats and ensuring a smooth, creamy final product.
- The next day, drain off the soaking water.
- Transfer the soaked oats and the specified amount of cold filtered water (using the remaining 6 ½ cups, or adjusting as desired for thickness) into a blender or a large container if using a stick blender.
- Blend the ingredients thoroughly. Aim for about 2 minutes of blending. You want the mixture to be as smooth and emulsified as possible. Be mindful not to over-blend for too long, which can sometimes result in a gummy texture.
- Strain the milk through a fine sieve or a muslin cloth directly into a clean bowl. Gently press the pulp to extract as much liquid as possible. For an exceptionally smooth milk, you can strain it a second time.
- Pour the freshly made oat milk into a clean glass jar.
- Store the oat milk in the refrigerator. It will keep for several days.
Expert Tips & Tricks
Crafting perfect oat milk at home is surprisingly straightforward, but a few seasoned tips can elevate your creation from good to sublime. The key to avoiding that sometimes-reported “gummy” texture in homemade oat milk lies in the blending and, crucially, not over-processing. Blend just until the oats are fully incorporated and the liquid is creamy, typically around 60-120 seconds depending on your blender’s power. Furthermore, always use cold water when blending. Warm water can encourage the oats to release their starches, leading to that undesirable gummy consistency. When straining, don’t be tempted to squeeze the oat pulp too aggressively through the muslin or sieve; a gentle press is sufficient to extract the milk without pushing through too much starchy sediment. If you find your milk separating in the fridge, don’t worry – this is perfectly normal! A quick shake before each use will re-emulsify it beautifully.
Serving & Storage Suggestions
Your homemade oat milk is incredibly versatile. Enjoy it chilled straight from the jar, or use it as a delightful dairy-free base for your morning coffee, a rich addition to smoothies, or a creamy component in your favorite baked goods and sauces. Since it’s free from stabilizers and emulsifiers found in store-bought versions, you’ll notice it might separate in the refrigerator. This is entirely natural and easily remedied by giving the jar a good shake before each use. Stored in a clean, airtight glass jar in the refrigerator, your homemade oat milk should keep well for 3-5 days. It’s best to consume it within this timeframe to ensure optimal freshness and flavor.
Nutritional Information
While the exact nutritional profile can vary slightly based on the specific oats used and the ratio of water, here is an estimated breakdown per 8-ounce serving:
| Nutrient | Amount per Serving | % Daily Value |
|---|---|---|
| Calories | 120 | 6% |
| Total Fat | 2g | 3% |
| Saturated Fat | 0.3g | 2% |
| Cholesterol | 0mg | 0% |
| Sodium | 100mg | 4% |
| Total Carbohydrate | 23g | 8% |
| Dietary Fiber | 2g | 7% |
| Sugars | 0g | 0% |
| Protein | 3g | 6% |
| Vitamin E | – | – |
| Folate | – | – |
| Thiamin (B1) | – | – |
| Riboflavin (B2) | – | – |
| Niacin (B3) | – | – |
| Vitamin B6 | – | – |
| Calcium | – | – |
| Iron | – | – |
| Magnesium | – | – |
| Phosphorus | – | – |
| Potassium | – | – |
| Zinc | – | – |
| Copper | – | – |
| Manganese | – | – |
Note: Specific vitamin and mineral content can vary significantly and is not always added to commercial oat milk. Homemade versions will be richer in naturally occurring nutrients from the oats.
Variations & Substitutions
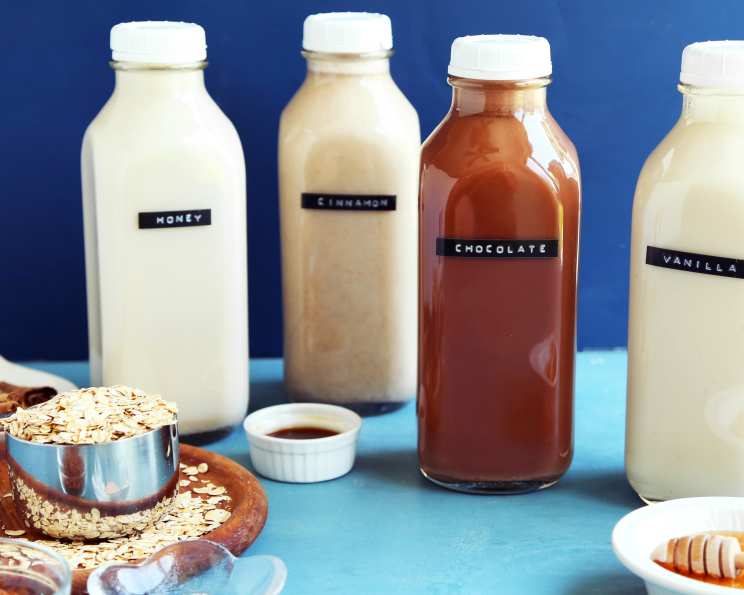
The beauty of homemade oat milk lies in its inherent simplicity, but that doesn’t mean you can’t play with its profile. For a sweeter, more dessert-like milk, consider adding a teaspoon of maple syrup or a pitted date to the blender before processing. A splash of vanilla extract can also add a lovely aroma and flavor. If you’re looking for a richer, more decadent milk, consider using a slightly lower water-to-oat ratio. For those who find the texture just right but wish for a hint of warmth, a tiny pinch of cinnamon or cardamom can be added during the blending stage. While the recipe calls for filtered water, some experiment with using a portion of filtered water and a portion of unsweetened plant-based milk (like almond or cashew) for added creaminess, though this deviates from the pure oat milk experience.
FAQs
Q: Why is my homemade oat milk sometimes gummy?
A: Gummy oat milk usually results from over-blending or using warm water. The starches in the oats are released when overworked or heated, leading to that texture. Blend for the recommended time and always use cold water.
Q: How long does homemade oat milk really last in the fridge?
A: Properly stored in an airtight container, homemade oat milk typically lasts for about 3 to 5 days. Always check for any off smells or textures before consuming.
Q: Can I sweeten my oat milk?
A: Absolutely! You can add a touch of sweetness by blending in a pitted date, a drizzle of maple syrup, or a bit of agave nectar.
Q: What can I do with the leftover oat pulp?
A: Don’t discard that pulp! It’s still packed with fiber. You can dry it out and use it as an ingredient in granola, cookies, or even as a thickener for soups.
Q: Does oat milk need to be shaken before use?
A: Yes, it’s normal for homemade oat milk to separate. A good shake will re-emulsify the milk, bringing it back to its creamy consistency.
Final Thoughts
There’s a profound satisfaction in mastering the art of homemade oat milk. It’s a testament to how simple, wholesome ingredients can yield something so incredibly versatile and delicious. Whether it’s gracing your morning latte, enriching your breakfast smoothie, or becoming the silent star in your favorite baked goods, this creamy, dairy-free staple is a true kitchen hero. I encourage you to embark on this simple, yet rewarding, culinary journey. Give it a try, savor the process, and discover the pure, unadulterated goodness you can create right in your own home. Share your creations, and perhaps discover your own favorite ways to enjoy this liquid gold!