
Oyakodon: A Symphony of Chicken, Egg, and Comfort
There’s a particular comfort that settles in your soul when you encounter a dish that feels both profoundly simple and utterly perfect. For me, that dish is Oyakodon. I first stumbled upon this classic Japanese rice bowl during a whirlwind trip through Tokyo, seeking refuge from a sudden downpour in a tiny, unassuming eatery tucked away on a side street. The steam rising from the lacquered bowls on the counter was an immediate invitation. When my Oyakodon arrived, the glistening chicken and custardy egg atop fluffy rice seemed to promise warmth and satiety, and it delivered tenfold. That first bite was a revelation – the savory-sweet broth, the tender chicken, the yielding egg, all coalescing into a harmony of flavors and textures that has stayed with me ever since. It’s a dish that whispers of home, of care, and of the profound joy found in humble ingredients elevated by thoughtful preparation.
Recipe Overview
- Prep Time: 15 minutes
- Cook Time: 20 minutes
- Total Time: 35 minutes
- Servings: 2
- Yield: 2 rice bowls
- Dietary Type: Contains poultry, eggs, soy
Ingredients
- 2 boneless chicken thighs, with skin (in Japan, this is usually sold as one intact piece)
- Salt, to taste
- 3 tablespoons mirin (Japanese sweet rice wine)
- 1 tablespoon sake (Japanese rice wine)
- 1 cup dashi (Japanese soup stock, can be made from granules or from scratch)
- 2 tablespoons soy sauce
- 1 tablespoon sugar
- ½ large onion, thinly sliced
- 2 large eggs, gently beaten
- 2 green onions or 1 scallion, finely sliced for garnish
- 3 cups Japanese cooked rice
Equipment Needed
- Large frying pan with a lid (a cast iron skillet is ideal for crisping the chicken skin)
- Cutting board
- Sharp knife
- Small bowl (for beaten eggs)
- Serving bowls
- Optional: A second, heavy pan or a pan filled with water for weighing down the chicken
Instructions
The magic of Oyakodon lies in its elegant simplicity and the way disparate ingredients—chicken, egg, onion, and rice—come together to create something truly extraordinary. The method I’ve found yields the most satisfying results involves a two-stage cooking process for the chicken, ensuring that wonderfully crispy skin we all crave.
-
Crisp the Chicken Skin: Begin by salting the chicken thighs generously on both sides. Place the chicken thighs, skin-side down, into a large, cool frying pan. The key here is starting with a cool pan; this allows the fat to render slowly, resulting in beautifully crisp skin. To aid in even cooking and maximum crispiness, place a heavy pan (a cast iron skillet or another pan filled with water works wonderfully) on top of the chicken. Gradually increase the heat to medium. Cook until the skin is crispy and deeply browned, which usually takes about 10–15 minutes, depending on your stove. Even if the chicken isn’t fully cooked through at this stage, that’s perfectly fine.
-
Prepare the Chicken and Pan: Once the skin is beautifully crispy and brown, carefully remove the chicken from the pan and transfer it to a cutting board. Let it rest for a moment, then cut it into bite-sized pieces. While the chicken rests, remove most of the rendered grease from the frying pan. Don’t worry if a little bit of oil remains; it can contribute to the overall flavor.
-
Build the Sauce: Return the frying pan to the stove. Add the mirin and sake to the pan. Bring them to a boil and allow them to bubble for about 30 seconds to cook off some of the alcohol.
-
Add Remaining Sauce Ingredients: Next, add the dashi, soy sauce, and sugar to the pan. Stir gently to combine and bring the mixture back up to a boil.
-
Simmer the Onions and Chicken: Spread the thinly sliced onion evenly in the simmering sauce. Then, place the bite-sized chicken pieces on top of the onions, ensuring they are nestled within the liquid. Cover the pan with a lid and bring it back to a gentle boil. Let it cook for about 10 minutes. If you opted to skip the initial skin-crisping step for a leaner result, this is when you would skim any excess fat that rises to the surface as it cooks.
-
Incorporate the Eggs: After the chicken and onions have simmered, slowly and gently pour the beaten eggs over the entire mixture in the pan. Be sure to distribute the egg evenly. Cover the pan again and continue to cook until the eggs are just set. You’re looking for a custardy texture, not firm and rubbery. If you notice the egg starting to stick to the sides of the pan, you can gently shake the pan to loosen it.
-
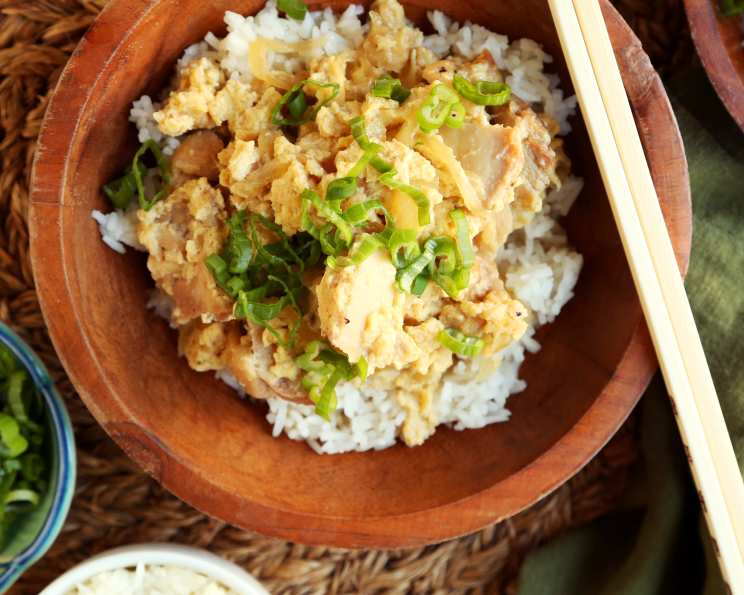
Assemble the Bowls: To serve, prepare your bowls with hot Japanese cooked rice. Carefully pour the Oyakodon mixture (the chicken, egg, and sauce) over the rice in each bowl.
-
Garnish and Serve: Finally, garnish generously with the finely sliced green onions (or scallion). Serve immediately while hot and comforting.
Expert Tips & Tricks
- Chicken Thighs are Key: While you can use chicken breast, chicken thighs are strongly recommended for Oyakodon. Their higher fat content makes them far more tender and forgiving, ensuring a succulent result that won’t dry out. The skin, when crisped, adds an irresistible textural contrast.
- Dashi Matters: The quality of your dashi will significantly impact the final flavor. If you have the time, making dashi from scratch using kombu (kelp) and katsuobushi (bonito flakes) is ideal. However, good quality instant dashi granules are a perfectly acceptable and convenient alternative.
- Egg Perfection: The goal for the egg in Oyakodon is a beautiful, custardy texture – slightly runny in places, and melded together with the savory sauce. Avoid overcooking, which will result in a tough, rubbery egg. Pouring the egg in stages can also help achieve a more varied texture.
- The Power of the Pan: Using a pan with a good, even heat distribution is crucial. A well-seasoned cast iron skillet is your best friend for achieving that perfectly rendered, crispy chicken skin.
Serving & Storage Suggestions
Oyakodon is a dish best enjoyed fresh, right off the stove. The combination of the hot, savory sauce, the tender chicken and egg, and the fluffy rice is a comforting masterpiece that truly shines when served immediately.
If you find yourself with leftovers, they can be stored in an airtight container in the refrigerator for up to 1–2 days. However, it’s important to note that the texture of the egg and chicken may change upon reheating. To reheat, gently warm the Oyakodon mixture in a saucepan over low heat, or in a microwave-safe dish. It’s best to reheat just the chicken and egg mixture and then pour it over freshly steamed rice to recapture some of the original appeal. Oyakodon does not freeze well, as the texture of the egg can become watery.
Nutritional Information
| Nutrient | Amount per Serving | % Daily Value |
|---|---|---|
| Calories | 703.5 kcal | |
| Calories from Fat | 177 g | |
| Total Fat | 19.7 g | 30% |
| Saturated Fat | 5.8 g | 28% |
| Cholesterol | 265 mg | 88% |
| Sodium | 1287.7 mg | 53% |
| Total Carbohydrate | 92.7 g | 30% |
| Dietary Fiber | 1.6 g | 6% |
| Sugars | 8.7 g | 34% |
| Protein | 31.6 g | 63% |
(Note: Nutritional information is an estimate and can vary based on specific ingredients and preparation methods.)
Variations & Substitutions
While the classic Oyakodon is undeniably delicious, there are subtle ways to adapt it to your preferences.
- Leaner Option: If you prefer a leaner dish, you can use boneless, skinless chicken thighs. However, be mindful that the texture might be less rich and the cooking time may need to be adjusted to prevent overcooking.
- Vegetarian Oyakodon: For a vegetarian take, you could substitute thinly sliced firm tofu or shiitake mushrooms for the chicken. The preparation method would need to be adjusted, but the savory-sweet sauce and egg base would still create a delightful dish.
- Flavor Boost: Some variations include a splash of sake or even a pinch of ginger in the sauce for added depth.
FAQs
Q: What is the best type of rice to use for Oyakodon?
A: Short-grain Japanese rice, also known as sushi rice, is ideal. Its slightly sticky texture is perfect for holding up to the saucy topping.
Q: Can I use chicken breast instead of thighs?
A: Yes, but chicken thighs are highly recommended for their tenderness and fat content, which prevents them from drying out. If using breast, cook it gently to avoid overcooking.
Q: How do I prevent the egg from cooking too quickly?
A: Pour the beaten egg slowly and evenly over the mixture, and cover the pan immediately. Cook over gentle heat to allow the egg to set gradually into a custardy texture.
Q: What is dashi and where can I find it?
A: Dashi is a fundamental Japanese soup stock. You can find instant dashi granules in most Asian grocery stores or the international aisle of larger supermarkets. You can also make it from scratch using kombu and katsuobushi.
Q: Is it okay for the egg to be slightly runny?
A: Absolutely! A slightly runny, custardy egg is characteristic of authentic Oyakodon and adds to its delicious texture and flavor.
This Oyakodon is more than just a meal; it’s a bowl of pure comfort, a testament to the beauty of simple ingredients thoughtfully prepared. It’s the kind of dish that nourishes not just the body, but the soul. I encourage you to try it, to experience that same warmth and satisfaction I found on that rainy day in Tokyo. Serve it with a side of pickled ginger or a simple miso soup, and let the flavors transport you. Happy cooking!