
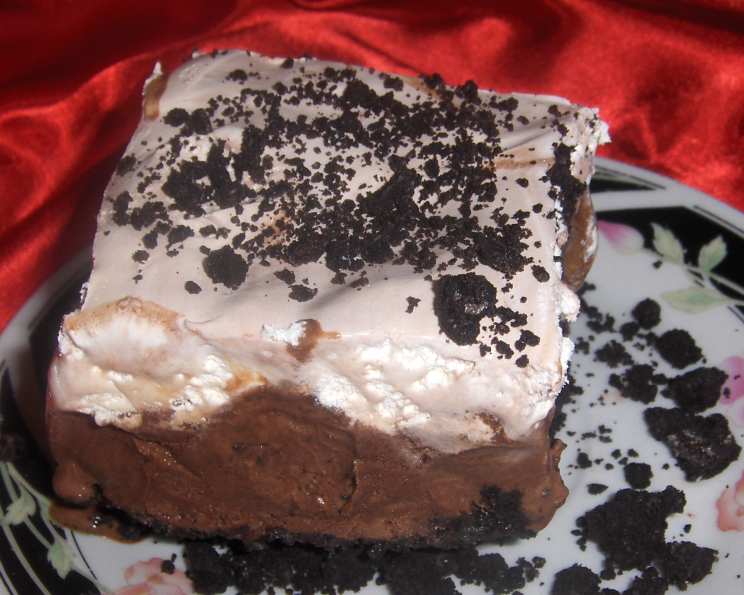
The Ultimate Oreo Ice Cream Cake: A No-Bake Dream Come True
There are certain desserts that transport you back to childhood, to birthday parties filled with colorful balloons and the joyous cacophony of friends. For me, the Oreo Ice Cream Cake is one of those magical creations. I recall one particular summer afternoon, sticky with heat, when my aunt unveiled a magnificent dessert that looked like it belonged in a gourmet bakery. It was a symphony of textures and flavors – the crumbly crunch of cookies, the smooth coolness of ice cream, and the rich decadence of chocolate. Even though only a sliver remained, that first bite was pure bliss. It was a revelation that something so utterly delicious could be so wonderfully simple to assemble, a testament to the power of fewer, yet impactful, ingredients.
Recipe Overview
- Prep Time: 25 minutes
- Cook Time: 0 minutes (No Bake)
- Total Time: 2 hours 10 minutes (including freezing)
- Servings: 12
- Yield: 1 (9×13 inch) cake
- Dietary Type: Vegetarian
Ingredients
This marvel of simplicity relies on just a handful of pantry staples and freezer essentials. The magic lies in the combination, proving that sometimes, less truly is more.
- 1 (20 ounce) package Oreo cookies, crushed
- 1 (8 ounce) package Cool Whip, thawed
- 1 (16 ounce) jar of Hershey’s Hot Fudge, warmed
- 1 1/2 gallons vanilla ice cream
Equipment Needed
While this recipe is delightfully unfussy, a few key items will make the assembly process smooth sailing.
- A 9×13 inch baking pan
- A food processor or a large zip-top bag and a rolling pin for crushing cookies
- A spatula or offset spatula for spreading
- A microwave or stovetop for warming the hot fudge
- Freezer space
Instructions
The beauty of this Oreo Ice Cream Cake lies in its straightforward, no-bake construction. It’s the perfect dessert for busy hosts or for those moments when the craving strikes and you need instant gratification (with a little patience for freezing, of course!).
- Prepare your Pan: Begin by greasing your 9×13 inch baking pan. This crucial step ensures that your finished cake will release cleanly, presenting beautifully when it’s time to serve. You can use a light coating of cooking spray or a small amount of butter.
- Crush the Cookies: Next, it’s time to transform those beloved Oreo cookies into a delicious, crumbly base. You have two excellent options here. For the quickest and most uniform results, place the Oreos in a food processor and pulse until they are finely crushed. Alternatively, for a more hands-on approach, you can place the cookies in a large, heavy-duty zip-top bag, seal it tightly, and then use a rolling pin to beat the heck out of them until they achieve a crumbly texture. The goal is to have fine crumbs, with just a few slightly larger pieces for textural interest.
- Layer the Cookie Crumbs (Part 1): Take half of the crushed Oreo cookies and layer them evenly in the bottom of your prepared 9×13 inch pan. Gently press the crumbs down with the back of a spoon or your fingers to create a firm, cohesive base for the ice cream. This initial layer will act as the foundation of your cake.
- Soften and Spread the Ice Cream: Now for the star of the show: the vanilla ice cream. Allow the 1 1/2 gallons of vanilla ice cream to soften at room temperature for about 10-15 minutes. You want it to be pliable enough to spread easily, but not so melted that it becomes soupy. Once softened, spread the ice cream evenly over the layer of cookie crumbs in the pan. Use your spatula to create a smooth, even surface.
- Warm and Drizzle the Hot Fudge: In a small microwave-safe bowl or a saucepan on the stovetop, warm the 16 ounce jar of Hershey’s hot fudge until it is smooth and pourable. Be careful not to overheat it; you just want it to be at a consistency that allows it to flow easily. Pour the warm hot fudge evenly over the layer of vanilla ice cream.
- Add the Cool Whip Layer: Take your thawed 8 ounce package of Cool Whip and spread it gently over the hot fudge layer. Aim for an even coating that seals in the fudge and provides a creamy contrast.
- Layer the Cookie Crumbs (Part 2): Finally, cover the Cool Whip layer with the remaining crushed Oreo cookies. Distribute them evenly across the top of the cake, creating the signature Oreo topping that fans of this classic treat will adore.
- Freeze to Firmness: Transfer the assembled cake to the freezer. Allow it to freeze for at least two hours, or until it is completely firm. The longer it freezes, the firmer it will become, making it easier to slice and serve. Overnight freezing is ideal for the best texture.
- Tempering for Serving: Before you plan to serve your masterpiece, take it out of the freezer about 20 minutes beforehand. This tempering period allows the ice cream to soften just enough to make slicing easier and to achieve the perfect creamy texture for enjoyment.
Expert Tips & Tricks
- Cookie Consistency: For an extra-crisp crust, you can add a tablespoon or two of melted butter to your crushed Oreo crumbs before pressing them into the pan. This adds richness and helps the crumbs bind together more effectively.
- Ice Cream Texture: Ensure your ice cream is adequately softened. If it’s too hard, you’ll struggle to spread it evenly, and if it’s too soft, it can become a melty mess. A little patience here goes a long way.
- Fudge Fun: While Hershey’s Hot Fudge is a classic choice, feel free to experiment with your favorite brand of chocolate syrup or even a homemade hot fudge sauce for a personalized touch.
- Freezing Power: To speed up the freezing process, you can place the pan in the freezer for about 30 minutes after assembling the ice cream layer before adding the fudge and Cool Whip.
Serving & Storage Suggestions
This Oreo Ice Cream Cake is best served directly from the freezer after its brief tempering period. Use a sharp knife dipped in hot water to slice into neat portions. The contrast of the cold, creamy ice cream, rich fudge, and crunchy cookies is what makes this cake so irresistible.
Leftovers can be stored, well-covered, in the freezer for up to two weeks. To serve again, allow the cake to temper for about 15-20 minutes at room temperature before slicing. It’s crucial to keep it well-wrapped to prevent freezer burn.
Nutritional Information
| Nutrient | Amount per Serving | % Daily Value |
|---|---|---|
| Calories | 984.8 kcal | |
| Calories from Fat | 436 kcal | |
| Total Fat | 48.5 g | 74 % |
| Saturated Fat | 26.6 g | 133 % |
| Cholesterol | 125.6 mg | 41 % |
| Sodium | 592.6 mg | 24 % |
| Total Carbohydrate | 129.2 g | 43 % |
| Dietary Fiber | 4.4 g | 17 % |
| Sugars | 96.5 g | 386 % |
| Protein | 14.4 g | 28 % |
(Note: Nutritional information is an estimate and can vary based on specific product brands and ingredient variations.)
Variations & Substitutions
While this recipe is perfection in its simplicity, there’s always room for a personal flourish!
- Cookie Crusaders: Swap out the classic Oreos for Double Stuf Oreos for an even more intense cookie flavor, or try Mint Oreos for a refreshing twist. Even chocolate chip cookies could be used for a different flavor profile.
- Ice Cream Indulgence: Vanilla is a classic for a reason, but don’t hesitate to explore other complementary flavors. Chocolate ice cream would create an intense chocolate experience, while cookies and cream ice cream would amplify the Oreo theme. Mint chocolate chip would also be a delightful choice.
- Fudge Fiesta: If you’re feeling adventurous, homemade hot fudge sauce offers a richer, more decadent flavor. You could also swirl in some caramel sauce or peanut butter for extra layers of taste.
FAQs (Frequently Asked Questions)
Q: Can I use a different flavor of ice cream?
A: Absolutely! While vanilla is classic, feel free to experiment with your favorite flavors that complement chocolate and cookies.
Q: How finely do the Oreos need to be crushed?
A: Aim for fine crumbs, similar to coarse sand. This creates a good base and topping texture without being too gritty or too powdery.
Q: How long does the cake need to freeze before serving?
A: It needs to freeze for at least two hours until firm. For the best sliceability and texture, freezing overnight is recommended.
Q: Can I make this cake ahead of time?
A: Yes! This cake is ideal for making ahead. Simply assemble, freeze, and then temper for about 20 minutes before serving.
Q: How should I store leftovers?
A: Wrap the cake tightly in plastic wrap and aluminum foil and store in the freezer for up to two weeks.
Final Thoughts
This Oreo Ice Cream Cake is a testament to the fact that extraordinary desserts don’t always require extraordinary effort. It’s a crowd-pleaser, a nostalgic delight, and a truly satisfying treat that comes together with minimal fuss. Whether you’re hosting a birthday bash, a potluck, or simply craving a spectacular homemade dessert, this recipe is sure to impress. Serve it with a cold glass of milk or a dollop of whipped cream, and watch as smiles abound with every delicious, frozen bite. Happy baking—or in this case, happy assembling!