
The Enchanting Red Velvet Cupcake: A Vegan Masterpiece with Dreamy Cream Cheese Frosting
There are certain flavors that instantly transport me back to cherished memories, and for me, red velvet is one of them. I can vividly recall the hushed excitement of birthday parties in elementary school, the tables laden with colorful treats, and that unmistakable deep red hue of the cupcakes. The slightly tangy, subtly chocolatey cake paired with that cool, sweet cream cheese frosting was pure magic. Now, years later, I’ve dedicated myself to recreating that nostalgic joy, but with a modern, plant-based twist. Achieving that perfect balance of moist cake and luscious frosting, all without dairy or eggs, has been a culinary quest I’ve thoroughly enjoyed, and I’m thrilled to share this perfected vegan red velvet recipe with you.
Recipe Overview
- Prep Time: 20 minutes
- Cook Time: 18-20 minutes
- Total Time: 38-40 minutes (plus cooling)
- Servings: 12 cupcakes
- Yield: 12 cupcakes
- Dietary Type: Vegan
Ingredients
For the Cupcakes:
- 1 cup soy milk
- 1 teaspoon apple cider vinegar
- 1 ¼ cups all-purpose flour
- 1 cup granulated sugar
- 2 tablespoons cocoa powder
- ½ teaspoon baking powder
- ½ teaspoon baking soda
- ½ teaspoon salt
- ⅓ cup canola oil
- 2 tablespoons red food coloring
- 2 teaspoons vanilla extract
- ¼ teaspoon almond extract
- 1 teaspoon chocolate extract (essential for that authentic flavor!)
For the Cream Cheese Frosting:
- ¼ cup margarine, non-hydrogenated, softened (Earth Balance is a great option)
- ¼ cup vegan cream cheese, softened (Tofutti, Better Than Cream Cheese, or similar)
- 2 cups powdered sugar, sifted
- 1 teaspoon vanilla extract
Equipment Needed
- Standard 12-cup muffin tin
- Cupcake liners
- Two medium mixing bowls
- Whisk
- Spatula or wooden spoon
- Measuring cups and spoons
- Hand mixer or stand mixer (for frosting)
- Cooling rack
Instructions
- Prepare the Oven and Liners: Begin by preheating your oven to a steady 350 degrees Fahrenheit (175 degrees Celsius). Line your muffin pans with cupcake liners, ensuring each of the 12 cups is ready to receive batter.
- Curdle the Soy Milk: In a small bowl or liquid measuring cup, combine the soy milk and apple cider vinegar. Give it a quick whisk and then set it aside for about 5-10 minutes. You’ll notice it begins to thicken slightly and develop a curdled appearance – this is our vegan buttermilk, which adds moisture and tenderness to the cake.
- Combine Dry Ingredients: In a large mixing bowl, sift together the all-purpose flour, granulated sugar, cocoa powder, baking powder, baking soda, and salt. Whisk these dry ingredients thoroughly to ensure they are evenly distributed. This prevents pockets of leavening agents or cocoa, leading to a more consistent bake.
- Combine Wet Ingredients: To the bowl with the curdled soy milk mixture, add the canola oil, red food coloring, chocolate extract, vanilla extract, and almond extract. Whisk these wet ingredients together until they are well combined and the food coloring has fully dispersed, creating a vibrant liquid.
- Marry Wet and Dry: Create a well in the center of your dry ingredients. Pour the wet ingredients into this well. Gently fold the wet ingredients into the dry ingredients using a spatula or wooden spoon. Continue mixing until you can no longer see large lumps of flour, but be careful not to overmix. A few small lumps are perfectly acceptable and will actually help prevent a gummy texture. Overmixing develops the gluten in the flour too much, which is the primary culprit for tough or gummy baked goods.
- Fill the Liners: Divide the batter evenly among the prepared cupcake liners, filling each one about three-quarters full. These cupcakes have a good rise, so leaving too much space will result in overflowing.
- Bake to Perfection: Place the filled muffin tin into your preheated oven. Bake for 18-20 minutes, or until a toothpick inserted into the center of a cupcake comes out clean.
- Cooling Process: Once baked, remove the muffin tin from the oven. Let the cupcakes cool in the pan for approximately 5 minutes. This initial cooling period in the pan helps them firm up. Then, carefully transfer the cupcakes to a cooling rack or a clean, dry surface to cool completely. This is a crucial step; attempting to frost warm cupcakes will result in a melted, messy frosting disaster.
Frosting Assembly:
- Cream the Fats: In a medium bowl, using a hand mixer or a stand mixer fitted with the paddle attachment, cream together the softened margarine and softened vegan cream cheese until they are just combined and smooth. Be careful not to over-cream at this stage.
- Incorporate Sugar: Gradually whip in the sifted powdered sugar in ½ cup batches. Continue mixing until the frosting is smooth and creamy, scraping down the sides of the bowl as needed to ensure everything is incorporated evenly.
- Add Vanilla: Finally, mix in the vanilla extract.
- Chill if Necessary: If the frosting seems a little too soft, you can refrigerate it for about 15-20 minutes before using to achieve a firmer, more pipeable consistency.
Expert Tips & Tricks
- The Power of Extracts: The inclusion of chocolate extract and almond extract is what truly elevates these vegan red velvet cupcakes from good to extraordinary. Don’t skip them! They provide a depth of flavor that is often missing in vegan versions. If you can’t find almond extract, you can omit it, but the chocolate extract is non-negotiable for that authentic red velvet profile.
- Room Temperature is Key: For the frosting, ensuring both the margarine and vegan cream cheese are at room temperature (softened) is paramount. Cold fats will result in a lumpy, uneven frosting.
- Sifting is Your Friend: Always sift your powdered sugar for the frosting. This removes any lumps and creates a silky-smooth texture that is a joy to spread or pipe.
- Don’t Over-Mix the Batter: I cannot stress this enough! Overmixing develops gluten, which is the enemy of tender cupcakes. Mix just until the ingredients are combined. A few small lumps are a sign of a happy batter.
- Achieving Vibrant Red: The amount of red food coloring can be adjusted slightly to achieve your desired shade of red. Gel food coloring will typically give you a more intense color with less liquid.
Serving & Storage Suggestions
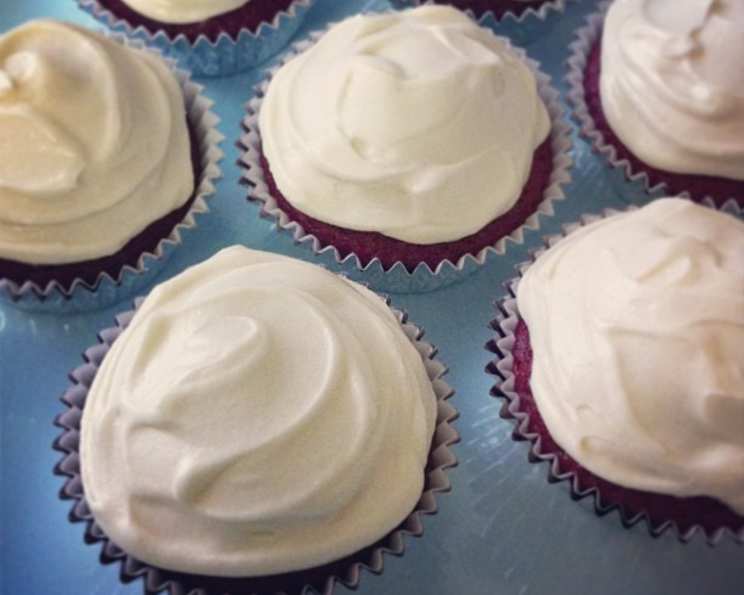
Once your cupcakes are completely cool, it’s time for the crowning glory: the cream cheese frosting! You can spread it generously with a spatula for a rustic charm, or use a piping bag with a decorative tip for a more polished look. These cupcakes are best enjoyed at room temperature, allowing the flavors to meld beautifully.
For storage, keep any leftover frosted cupcakes tightly covered and refrigerated. The cream cheese frosting will firm up in the fridge. You can bring them back to room temperature for about 30 minutes before serving, or enjoy them slightly chilled. They will keep well in the refrigerator for 3-4 days. If you need to store them for longer, you can also freeze them. It’s best to freeze unfrosted cupcakes separately from the frosting. Thaw frozen cupcakes overnight in the refrigerator and then frost.
Nutritional Information (Estimated Per Cupcake)
| Nutrient | Amount per Serving | % Daily Value |
|---|---|---|
| Calories | 294.4 kcal | |
| Total Fat | 10.4 g | 16% |
| Saturated Fat | 1.4 g | 6% |
| Cholesterol | 0 mg | 0% |
| Sodium | 220.3 mg | 9% |
| Total Carbohydrate | 48.6 g | 16% |
| Dietary Fiber | 0.8 g | 3% |
| Sugars | 37.2 g | 148% |
| Protein | 2.2 g | 4% |
Note: Nutritional values are estimates and can vary based on specific ingredients used.
Variations & Substitutions
- Gluten-Free: For a gluten-free version, you can substitute a 1-to-1 gluten-free all-purpose flour blend for the all-purpose flour. Be sure the blend contains xanthan gum.
- Milk Alternatives: While soy milk is recommended for its fat content, other unsweetened plant-based milks like almond milk or oat milk can also be used.
- Vinegar Alternatives: If you don’t have apple cider vinegar, white vinegar or lemon juice can be used as substitutes to curdle the plant-based milk.
- Intensifying Color: For a deeper red hue, consider using a vegan gel food coloring in a concentrated formula. You can also add a touch more cocoa powder if you prefer a more pronounced chocolate flavor, but be mindful that this might slightly alter the color.
FAQs (Frequently Asked Questions)
Q: Why are my vegan red velvet cupcakes not red enough?
A: The intensity of red can vary depending on the brand of food coloring used. For a more vibrant color, try using a vegan gel food coloring, which is more concentrated. You can also add a touch more red food coloring until you achieve your desired shade.
Q: Can I make this recipe without almond extract?
A: Yes, while almond extract adds a subtle complexity, you can omit it if you don’t have it on hand. The cupcakes will still be delicious, with the vanilla and chocolate extracts taking center stage.
Q: My cream cheese frosting is too soft. What can I do?
A: If your frosting is too soft, it likely needs more powdered sugar or to be chilled. Gradually add more sifted powdered sugar, ¼ cup at a time, until you reach the desired consistency. Alternatively, chill the frosting for 15-20 minutes to firm it up before using.
Q: How do I know when the cupcakes are baked through?
A: The best way to check for doneness is to insert a toothpick into the center of a cupcake. If it comes out clean with no wet batter clinging to it, the cupcakes are ready.
Q: Can I make these cupcakes ahead of time?
A: Yes! The unfrosted cupcakes can be baked and cooled completely, then stored in an airtight container at room temperature for up to 2 days, or frozen for longer storage. Frost them just before serving for the best texture and appearance.
Final Thoughts
These vegan red velvet cupcakes with cream cheese frosting are more than just a dessert; they’re a testament to how incredible plant-based baking can be. They offer that comforting, familiar flavor we all know and love, without compromise. I encourage you to try this recipe, to share it with friends and family, and to witness the delight on their faces when they discover that something so wonderfully delicious can be entirely vegan. Serve these beauties with a glass of cold, unsweetened plant-based milk or a warm cup of coffee – the perfect pairing for this timeless treat. Enjoy every decadent bite!